> For the complete documentation index, see [llms.txt](https://docs.powermonitor.com.br/llms.txt). Markdown versions of documentation pages are available by appending `.md` to page URLs; this page is available as [Markdown](https://docs.powermonitor.com.br/en/power-monitor/configuracoes/alertas.md).
# Alerts
Configure how alerts are delivered: your own SMTP server, Microsoft Teams, Slack and Telegram channels, webhooks and ITSM (PagerDuty, Opsgenie, ServiceNow, Azure DevOps) and public API keys.
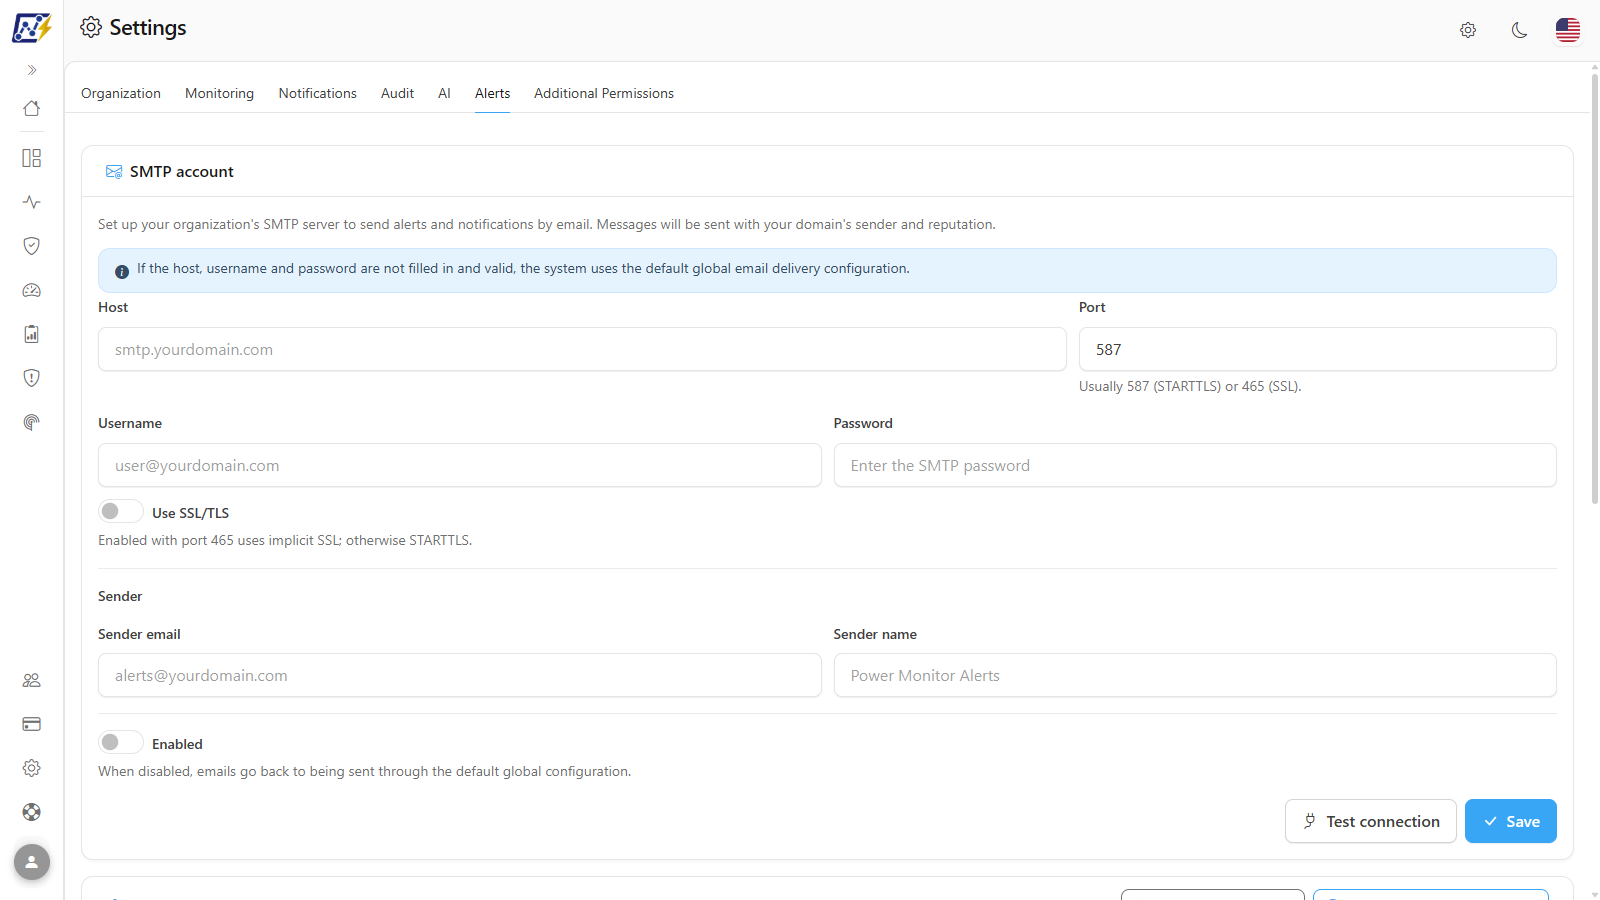
The **Alerts** tab defines **through which channels** Power Monitor notifications are delivered and how other systems can consume them. It has six independent sections:
1. **SMTP account**: your organization's e-mail server for sending alert e-mails.
2. **Microsoft Teams notifications**: Teams channels that receive the alerts.
3. **Slack notifications**: Slack channels that receive the alerts.
4. **Telegram notifications**: Telegram chats/groups that receive the alerts.
5. **Webhooks and ITSM**: sending alerts to external tools (signed webhook, PagerDuty, Opsgenie, ServiceNow and Azure DevOps).
6. **API keys**: keys to consume the public API, read-only, from Power BI or scripts.
**Which** e-mail alerts exist and **who** receives them is defined in [Notifications](/en/power-monitor/configuracoes/notificacoes.md). The Teams, Slack and Telegram channels have their own selection of alert types, channel by channel.
**How to access:** *Settings › Alerts*. Exclusive to **Administrators**.
Alerts tab
## What it is for
* Sending alert e-mails with your company's sender and domain reputation (preventing them from landing in spam or being blocked by internal policies).
* Taking alerts to where the team already works: a Teams channel, a Slack channel or a Telegram group.
* Separating alerts by channel (for example, refresh failures in a data engineering channel and capacity alerts in an infrastructure channel).
## How to use
All flows require the **Administrator** role and start from *Settings › Alerts*. Summary of the most common tasks (each one is detailed in [Features](#features)):
1. **E-mails with the company domain:** [use the company SMTP server](#how-to-use-the-company-smtp-server) and validate it with [Test connection](#test-smtp-connection).
2. **Alerts in Teams:** [grant access to the bot](#microsoft-teams-grant-access-to-the-bot) and [register a channel](#microsoft-teams-register-a-channel).
3. **Alerts in Slack:** [connect the workspace and register channels](#slack-connect-the-workspace-and-register-channels).
4. **Alerts in Telegram:** [connect a chat or group](#telegram-connect-a-chat-or-group).
5. **Routing each alert to the right channel:** adjust the [Notification types](#notification-types-per-channel) of each channel and check with [Send test](#send-test).
6. **Open incidents in PagerDuty, Opsgenie, ServiceNow or Azure DevOps, or call your own automation:** [register a Webhooks and ITSM endpoint](#webhooks-and-itsm).
7. **Read alerts, costs and SLA in a Power BI report or a script:** [create an API key](#api-keys).
## Features
### SMTP account
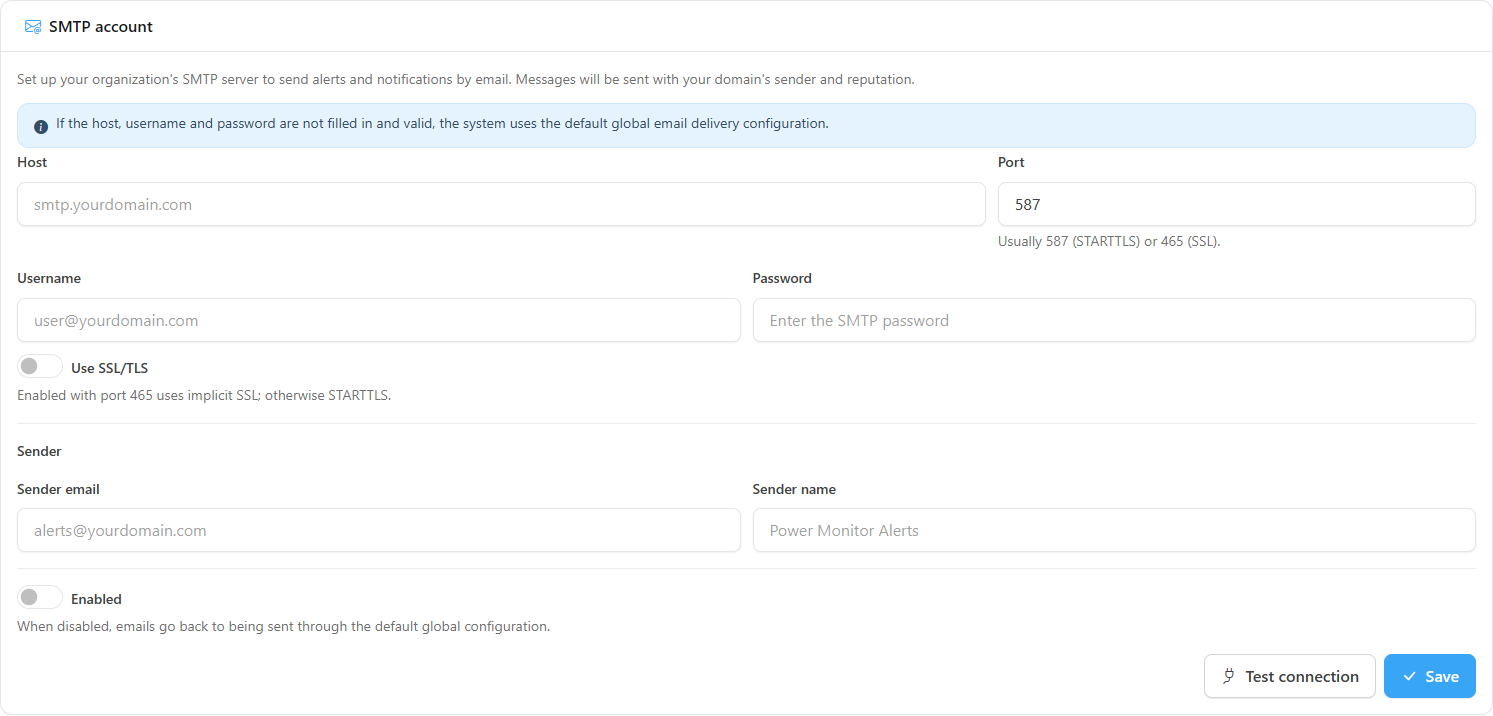
**What it is:** a form with your organization's e-mail server, used to send Power Monitor e-mails to your users (alerts, checklists, welcome messages for new users and other platform notices).
**What it is for:** making messages go out with your company's sender and domain. It is optional: without your own SMTP, e-mails are sent through Power Monitor's default configuration.
SMTP account
**How it works / rules:**
| Field | Description |
| ---------------------------------- | ------------------------------------------------------------------------------------------------------------------------------------------------------------- |
| **Host** | SMTP server address (e.g.: `smtp.seudominio.com.br`). |
| **Port** | Usually **587** (STARTTLS) or **465** (SSL). |
| **Username** / **Password** | Credentials of the sending account. The saved password is never displayed: the field shows *•••••••• (keeps the current one)*. |
| **Remove saved password** | Checkbox that appears when there is a saved password. When checked, it clears and locks the **Password** field and deletes the password on the next **Save**. |
| **Use SSL/TLS** | On with port 465 uses implicit SSL; otherwise, STARTTLS. |
| **Sender email** / **Sender name** | How messages appear to recipients. |
| **Enabled** | Turns on the use of your server. When off, e-mails go back to being sent through Power Monitor's default configuration. |
| **Save** | Saves the configuration. |
{% hint style="info" %}
If the server, user and password are not filled in and valid, Power Monitor automatically uses the default sending configuration.
{% endhint %}
### How to use the company SMTP server
**What it is:** the step-by-step guide to start sending alert e-mails through your organization's server.
**What it is for:** replacing the default sending with the company's sender and domain, with a test before enabling it.
**How to use:**
{% stepper %}
{% step %}
### Fill in the account
In **SMTP account**, enter **Host**, **Port**, **Username** and **Password**. Turn on **Use SSL/TLS** according to the server (on with port 465 uses implicit SSL; otherwise, STARTTLS).
{% endstep %}
{% step %}
### Define the sender
In **Sender**, fill in **Sender email** and **Sender name** (e.g.: *Power Monitor Alerts*).
{% endstep %}
{% step %}
### Test the connection
Click **Test connection** (see below).
{% endstep %}
{% step %}
### Enable and save
Turn on **Enabled** and click **Save**. The screen then shows *Updated on … by …*, with the **Hide data** button next to it, which masks the user who made the last change. To check sending end to end, use **Test** in [Notifications](/en/power-monitor/configuracoes/notificacoes.md).
{% endstep %}
{% endstepper %}
### Test SMTP connection
**What it is:** the **Test connection** button of the SMTP account form.
**What it is for:** validating server, port, SSL and credentials before saving, preventing alerts from failing to go out because of a typo.
**How to use:**
1. Fill in (or change) the **SMTP account** fields.
2. Click **Test connection**. The test uses the data you typed, even before saving.
3. If it succeeds, *Successfully connected to the SMTP server.* is displayed; if not, the server's error message is displayed (or *Could not connect to the SMTP server.*).
**How it works / rules:** the test checks the connection to the server; it does not send an alert e-mail. To test actual sending, use the **Test** button in [Notifications](/en/power-monitor/configuracoes/notificacoes.md).
### Change or remove the SMTP password
**What it is:** maintenance of the sending account's saved password.
**What it is for:** updating the password after a change on the e-mail server or deleting it for security.
**How to use:**
1. In **SMTP account**, the **Password** field shows *•••••••• (keeps the current one)* when a password is already saved.
2. To change it, type the new password. To delete it, check **Remove saved password**.
3. Click **Save**. Leaving the field empty keeps the current password.
### Go back to Power Monitor's default sending
**What it is:** turning off your own SMTP without deleting the registered data.
**What it is for:** working around a problem on the company server without missing alerts.
**How to use:**
1. In **SMTP account**, turn off **Enabled**.
2. Click **Save**. E-mails go back to being sent through the default configuration, without losing the registered data.
### Channels: rules common to Teams, Slack and Telegram
**What it is:** the behavior shared by the three channel sections.
**What it is for:** understanding what each channel receives before configuring it.
**How it works / rules:**
* Each registered channel/chat receives, **by default, all available alert types**. Use **Notification types** to uncheck what you do not want in that channel.
* Channels do **not** follow users' workspace scope: a channel receives the alerts of the entire organization for the selected types.
* Alert types available for channels: **Gateway Offline**, **Dataset Refresh Failed**, **Fabric Item Failed**, **Capacity Offline**, **Capacity Usage Limit**, **Capacity Background Usage**, **Item Consumption Anomaly**, **Capacity Governance Actions**, **Alert Resolved**, **Consumption Data Unavailable**, **Daily Checklist** and **Hourly Checklist** (checklists arrive in channels in a summarized version, with the counts of each block). The **Execution Duration Deviation** alert is sent by e-mail only.
### Microsoft Teams: section and buttons
**What it is:** the **Microsoft Teams notifications** section, with the **Download Teams app** and **Grant the bot access in Teams** buttons in the header, the new channel form and the list of registered channels.
**What it is for:** delivering alerts to a Teams channel where the team already talks.
Microsoft Teams notifications
**How it works / rules:**
| Button / field | Description |
| ------------------------------------------ | ------------------------------------------------------------------------------------------------------------------------------------------- |
| **Download Teams app** | Downloads the Power Monitor app package so that a Teams administrator can publish it in the Teams admin center and add it to the team. |
| **Grant the bot access in Teams** | Opens the consent window (see below). Also available in [Additional Permissions](/en/power-monitor/configuracoes/permissoes-adicionais.md). |
| **Team name** / **Channel name** + **Add** | Registration of a new channel, with the exact names as they appear in Teams. |
| Channel cards | One card per channel, with editing, removal, **Notification types** and **Send test**. |
### Microsoft Teams: grant access to the bot
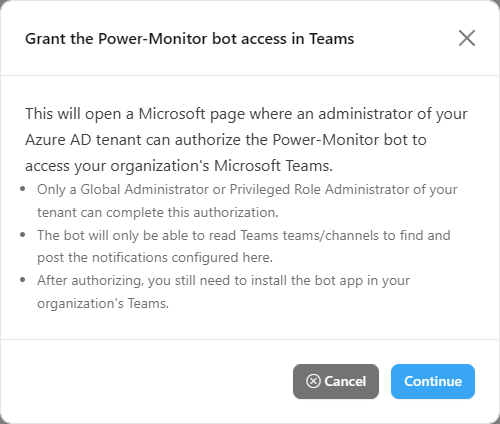
**What it is:** the **Grant the Power-Monitor bot access in Teams** window, which leads to Microsoft's consent page.
**What it is for:** authorizing, once per tenant, the Power Monitor bot to locate teams and channels and post notifications.
Teams bot consent window
**How to use:**
1. Click **Grant the bot access in Teams**.
2. Read the notices in the window and click **Continue** (or **Cancel** to give up).
3. Complete the consent on the Microsoft page that opens. At the end, *Consent granted successfully!* is displayed.
**How it works / rules:**
* Only a tenant **Global Administrator** or **Privileged Role Administrator** can complete this authorization.
* The bot can then read Teams teams and channels only to locate them and post the configured notifications.
* After authorizing, you still need to install the bot app in the organization's Teams (**Download Teams app** and publication by the Teams administrator).
### Microsoft Teams: register a channel
**What it is:** the complete flow for a Teams channel to start receiving alerts.
**What it is for:** putting Teams into production as an alert channel.
**How to use:**
{% stepper %}
{% step %}
### Authorize the bot
Grant access to the bot (previous section), if this has not been done in the tenant yet.
{% endstep %}
{% step %}
### Install the app in the team
Click **Download Teams app** and ask the Teams administrator to publish it in the Teams admin center and add it to the team that will receive the alerts.
{% endstep %}
{% step %}
### Register the channel
Enter **Team name** and **Channel name** exactly as they appear in Teams and click **Add** (the button is only enabled with both fields filled in). *Channel added successfully.* is displayed.
{% endstep %}
{% step %}
### Choose the types and test
On the channel card, adjust **Notification types** (all are checked by default) and click **Send test**. If the message reaches the channel, *Test message sent successfully.* is displayed.
{% endstep %}
{% endstepper %}
### Slack: connect the workspace and register channels
**What it is:** the **Slack notifications** section, with the workspace connection box, the new channel form and the channel cards.
**What it is for:** delivering alerts to a Slack channel.
Slack notifications
**How to use:**
{% stepper %}
{% step %}
### Connect the workspace
In **Slack notifications**, click **Connect to Slack**. In the Slack window, choose the workspace and authorize. The section then shows **Connected to workspace: …** (message *Slack connected successfully!*). If the window does not open, allow pop-ups in the browser.
{% endstep %}
{% step %}
### Invite the bot to the channel
In Slack, open the channel that will receive the alerts and invite the Power Monitor bot with the `/invite` command.
{% endstep %}
{% step %}
### Register the channel
Back in Power Monitor, enter the **Channel name** without the `#` (e.g.: `alertas`) and click **Add**.
{% endstep %}
{% step %}
### Choose the types and test
Adjust **Notification types** and click **Send test**.
{% endstep %}
{% endstepper %}
**How it works / rules:**
* While no workspace is connected, the section shows *No Slack workspace connected yet.* and the new channel form does not appear.
* To switch workspaces, click **Reconnect** and repeat the authorization.
{% hint style="warning" %}
In Slack, the bot must be **invited to each configured channel** (`/invite` command in the channel). Without this, **Send test** fails.
{% endhint %}
### Telegram: connect a chat or group
**What it is:** the **Telegram notifications** section, which connects chats and groups through a connection command, without having to find the chat ID manually.
**What it is for:** receiving alerts on your mobile phone, in a Telegram group of the on-call team.
Telegram notifications
**How to use:**
{% stepper %}
{% step %}
### Add the bot
In Telegram, add the **@power\_bot\_notifier\_bot** bot to the group that will receive the alerts (or open a direct conversation with it).
{% endstep %}
{% step %}
### Generate the command
In **Telegram notifications**, click **Connect a Telegram chat**. The screen shows a command in the format `/connect CÓDIGO` and the message *Waiting for the command to be sent... (expires in 10 minutes)*.
{% endstep %}
{% step %}
### Send the command in the chat
Copy the command and send it **in the same chat or group** where the bot is. Power Monitor detects the connection by itself: *Chat connected successfully!* is displayed and the chat is added to the list, with **Chat ID** and **Display name** filled in.
{% endstep %}
{% step %}
### Choose the types and test
Adjust **Notification types** and click **Send test**.
{% endstep %}
{% endstepper %}
**How it works / rules:** the code expires in **10 minutes**. If it expires before it is sent, click **Connect a Telegram chat** again to generate another one. The code is exclusive to your organization, which prevents connecting another organization's chat by mistake.
### Notification types per channel
**What it is:** the **Notification types** drop-down list on each channel card (Teams, Slack and Telegram).
**What it is for:** routing each alert type to the right channel, for example, only refresh failures in the data engineering channel.
**How to use:**
1. On the channel (or chat) card, click the **Notification types** list.
2. Check or uncheck the types. **Clear selection** unchecks all of them.
3. Each change is saved immediately, with no save button; the summary shows how many types are selected (e.g.: *12 types selected*).
4. (Optional) Click **Send test** to check the channel.
**How it works / rules:** if saving fails, *Could not update the notification preference.* is displayed and that type is not changed.
### Send test
**What it is:** the **Send test** button on each channel card.
**What it is for:** confirming that Power Monitor can post to that channel before relying on it for a real alert.
**How to use:** on the channel card, click **Send test**. If the message is delivered, *Test message sent successfully.* is displayed; otherwise, the returned error is displayed (in Teams, check whether the app is installed in the team; in Slack, whether the bot was invited to the channel).
### Edit or remove a channel
**What it is:** the confirmation (check mark) and trash can buttons on each channel card.
**What it is for:** correcting the name of a channel renamed in Teams/Slack or stopping alerts from being sent to a channel.
**How to use:**
1. On the channel card, change the names (**Team name**/**Channel name** in Teams, **Channel name** in Slack, **Chat ID** and **Display name** in Telegram).
2. Click the confirmation button (check mark icon), which is only enabled when there is a change. *Channel updated successfully.* (or *Chat updated successfully.*) is displayed.
3. To remove it, click the card's trash can button. *Channel removed successfully.* (or *Chat removed successfully.*) is displayed.
{% hint style="warning" %}
Removing a channel is immediate and **does not ask for confirmation**. To use the channel again, register it again (in Telegram, repeat the connection).
{% endhint %}
### Webhooks and ITSM
**What it is:** the **Webhooks and ITSM** card, which sends each alert event to an external tool over HTTPS. Each **endpoint** chooses the destination, the events, the source types and the severity. **Exclusive to Administrators** (the card does not even appear for other profiles).
**What it is for:** integrating Power Monitor into the company's on-call and ticketing flow: automatically opening and closing incidents in PagerDuty, Opsgenie, ServiceNow or Azure DevOps, or triggering your own automation (Power Automate, Zapier, n8n, an internal service) with a signed webhook.
Webhooks and ITSM
**Endpoint types**
| Type | What it does | Credential |
| ------------------- | ------------------------------------------------------------------------------------------------------------------- | --------------------------------------------------------------------------------------------------------------------------- |
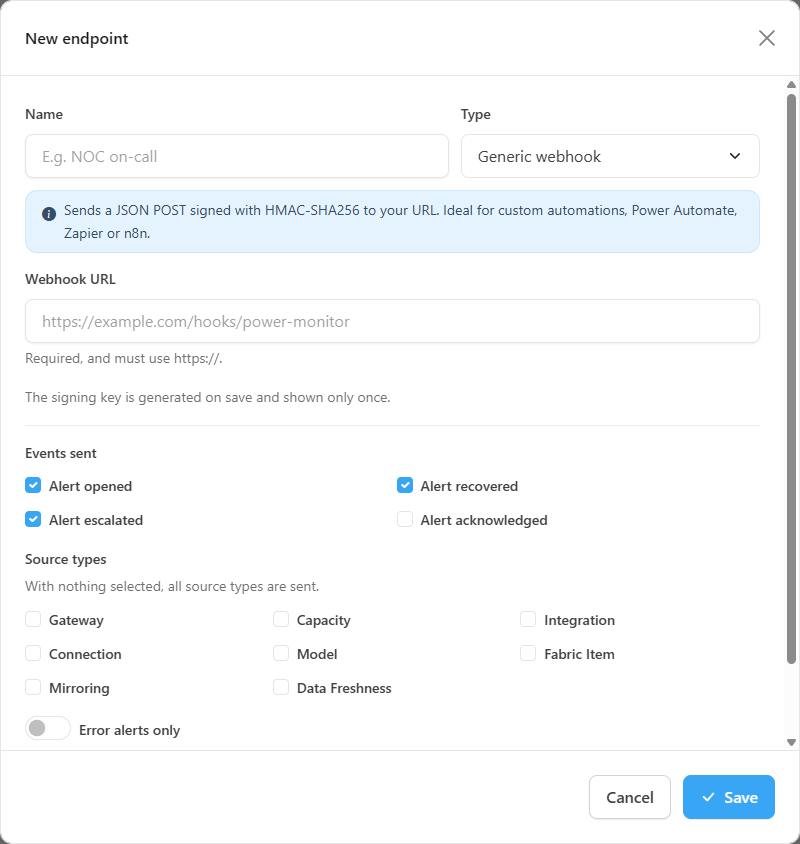
| **Generic webhook** | Sends a JSON POST signed with HMAC-SHA256 to your URL. Ideal for custom automations, Power Automate, Zapier or n8n. | The URL (required, with `https://`). The **signing key** is generated by Power Monitor. |
| **PagerDuty** | Triggers, acknowledges and resolves incidents through the Events API v2. | **Routing key** of the target service. Optional URL (empty uses PagerDuty's default address). |
| **Opsgenie** | Creates, acknowledges and closes alerts. | **API key** of an Opsgenie integration. Optional URL (EU instances need their own URL). |
| **ServiceNow** | Opens and resolves incidents in your instance. | Instance URL (required) and **username and password** or a **token**. |
| **Azure DevOps** | Creates and completes work items. | Organization URL and **Project** (required) and a **Personal Access Token (PAT)** with read and write access to work items. |
**How to use**
{% stepper %}
{% step %}
### Create the endpoint
In **Webhooks and ITSM**, click **New endpoint**. Enter the **Name** (for example, *NOC on-call*), choose the **Type** and fill in the URL and the credential of the chosen type. The type cannot be changed later: to use another type, create another endpoint.
{% endstep %}
{% step %}
### Choose what to send
Under **Events sent**, check at least one: **Alert opened**, **Alert recovered**, **Alert escalated** or **Alert acknowledged** (by default, the first three). Under **Source types**, check the desired types (with nothing selected, all are sent). Turn on **Error alerts only** to not receive informational ones.
{% endstep %}
{% step %}
### Save and keep the signing key
Keep **Endpoint active** on and click **Save**. For the generic webhook, the **Signing key** window appears with the key; copy it now, because it **will not be shown again**.
{% endstep %}
{% step %}
### Test
On the endpoint row, click **Test**. The result shows the HTTP status and the duration. For the on-call and ticketing types (PagerDuty, Opsgenie, ServiceNow and Azure DevOps), the test opens a sample incident and closes it right after; if it cannot be closed, the screen warns you to close it manually.
{% endstep %}
{% endstepper %}
"New endpoint" modal
**How it works / rules**
* **Events.** An alert that opens generates **Alert opened**; when the resource recovers, **Alert recovered**; when the incident is escalated, **Alert escalated**; when someone acknowledges it, **Alert acknowledged**. Reoccurrences of the same incident do not generate a new event. Alerts that are silenced or correlated to an open cause are not sent (see [Monitoring › Alerts](/en/power-monitor/monitoramento/alertas.md)).
* **In ticketing systems**, the same incident is followed from start to end: the recovery resolves the open ticket, the acknowledgement updates it and the escalation raises the urgency or records a note.
* **Limit:** up to **20 endpoints** per organization. When the limit is reached, **New endpoint** is disabled until you delete one.
* **Deliveries.** The **Deliveries** button opens the endpoint history, with **Status** (**Pending**, **Delivered**, **Failed, retry scheduled** or **Abandoned**), **Event**, **Attempts**, **HTTP**, **Last error**, **Next attempt** and **Created at**. The endpoint row shows the status of the **Last delivery**. The list is paginated and **Next attempt** is only filled in for deliveries with a retry scheduled. The history is kept for 30 days.
* **Retries.** A delivery that fails is retried automatically up to **5 attempts**, with increasing intervals (1 minute, 5 minutes, 30 minutes and 2 hours). Client-error responses (HTTP 4xx, except 408 and 429) are not retried: the delivery is abandoned right away, because it would not fix itself. With no response (timeout or network failure), 408, 429 and 5xx are retried. Pending deliveries are processed every minute.
* **Secret shown only once.** The signing key (and the credentials of the other types) are never shown again. To change the signing key, edit the endpoint and check **Generate a new signing key**: the current key stops working and the new one is shown only once. For the other types, leaving the credential empty when editing **keeps** the current one. If you change the destination address (host), you must enter the credential again, so that a saved credential is never reused on another server.
* **Receiving guide.** At the bottom of the card, the **How to receive the generic webhook** block (visible when a generic endpoint exists or the list is empty) shows an example body, the headers and how to verify the signature.
* **Deleting** an endpoint also removes its delivery history and cannot be undone.
* **Who sees it:** only Administrators see and manage this card.
{% hint style="info" %}
Call security: only **https** addresses of **public** hosts are accepted (without user and password in the URL). Destinations on a private network, loopback, link-local or cloud metadata services are refused, and Power Monitor **does not follow redirects**. Each call has a **10-second** limit. For the body format, the headers and how to validate the signature, see [Webhooks and public API (technical reference)](/en/power-monitor/configuracoes/webhooks-e-api-publica.md).
{% endhint %}
### API keys
**What it is:** the **API keys** card, where the administrator creates keys to consume Power Monitor's **public API**, in **read-only** mode, for example in Power BI reports or scripts. Each key has its own **permissions (scopes)** and **expiry**. **Exclusive to Administrators.**
**What it is for:** bringing alerts, alert metrics, capacities, workspaces, daily costs and monthly SLA to your own reports and automations, without giving anyone access to the interface.
API keys
**How to use**
{% stepper %}
{% step %}
### Create the key
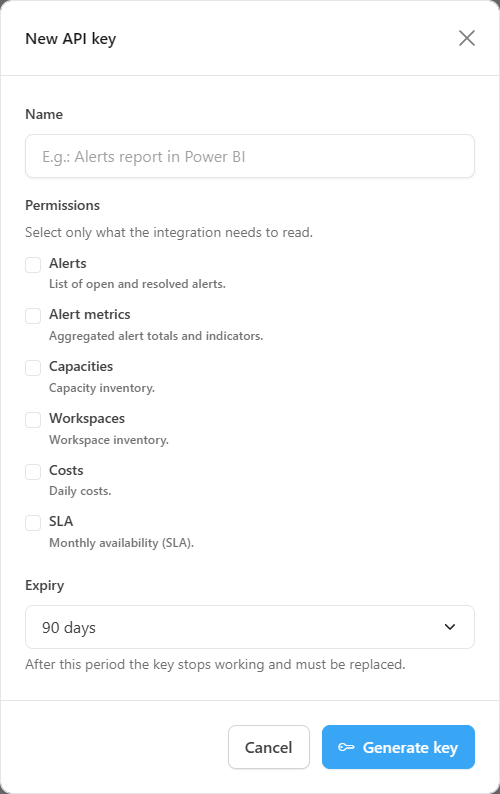
Click **New key**. Enter the **Name** (for example, *Alerts report in Power BI*, up to 100 characters), check under **Permissions** only what the integration needs to read and choose the **Expiry** (30, 90, 180 or 365 days; the default is 90).
{% endstep %}
{% step %}
### Copy the key
Click **Generate key**. The **API key created** window shows the full key **only once**. Copy it and store it somewhere safe; if you lose it, revoke it and create another.
{% endstep %}
{% step %}
### Use it in the integration
Send the key in the `X-Api-Key` header of the `GET` calls to the public API. The collapsible **How to use the public API** block of the card itself lists the endpoints and has a `curl` example and a Power Query (Power BI) example. See also the [technical reference](/en/power-monitor/configuracoes/webhooks-e-api-publica.md#public-api).
{% endstep %}
{% endstepper %}
"New API key" modal
**Permissions (scopes)**
| Permission | What it allows |
| ----------------- | ---------------------------------------------------------------------------- |
| **Alerts** | List of open and resolved alerts. |
| **Alert metrics** | Aggregated alert totals and indicators (MTTA, MTTR, reoccurrence and so on). |
| **Capacities** | Capacity inventory. |
| **Workspaces** | Workspace inventory. |
| **Costs** | Daily costs. |
| **SLA** | Monthly availability (SLA). |
**How it works / rules**
* Each key appears in the list with the name, the prefix, the permissions, the state (**Active**, **Expired** or **Revoked**) and the dates **Expires**, **Last used** (or "never used") and **Created**.
* **Revoke** (with confirmation) makes the integrations using the key stop working immediately. Expired or revoked keys do not count toward the limit.
* Limit: up to **10 active keys** per organization.
* **Usage limit:** 60 requests per minute per key. Repeated attempts with an invalid key are temporarily blocked.
* The key belongs to the **organization**, not to a user: it sees all the organization's workspaces and capacities, without the workspace scope filter that applies to users.
* The API is read-only and only answers under the public path; a key cannot access any other part of Power Monitor.
* The creation and revocation of keys are recorded in the audit log; the key itself is never recorded.
## Frequently asked questions
I registered the Teams channel, but the test does not arrive.
The Power Monitor app must be installed in the team before the first message is sent, and bot consent must have been granted in the tenant. Also check that the team and channel names are identical to those in Teams.
Can a channel receive only some alerts?
Yes. In each channel, use **Notification types** to keep only the types you want.
I lost the webhook signing key (or the API key). How do I recover it?
It cannot be recovered: they are shown only once. For the generic webhook, edit the endpoint and check **Generate a new signing key**, then update your receiver. For the API key, revoke the key and create another.
The webhook is not reaching my server.
Open **Deliveries** for the endpoint and read **HTTP** and **Last error**. Check that the URL is **https**, public and reachable from the internet, that it responds within 10 seconds and that it returns a 2xx status. 4xx errors are abandoned with no retry; use **Test** after fixing it.
Can I point the webhook to an internal company server?
Not directly: private network addresses are refused for security. Publish a receiver at a public https address (for example, an API gateway or a cloud automation) and validate the webhook signature.
Can I use WhatsApp to receive alerts?
No. The available channels are e-mail, Microsoft Teams, Slack and Telegram.
I disabled my own SMTP. Do the e-mails stop?
No. They go back to being sent through Power Monitor's default configuration.
## Related pages
* [Notifications](/en/power-monitor/configuracoes/notificacoes.md): which e-mail alerts exist and who receives them.
* [Additional Permissions](/en/power-monitor/configuracoes/permissoes-adicionais.md): Teams bot consent.
* [Monitoring › Alerts](/en/power-monitor/monitoramento/alertas.md)
* [Webhooks and public API (technical reference)](/en/power-monitor/configuracoes/webhooks-e-api-publica.md): body format, signature and endpoints.
---
# Agent Instructions
This documentation is published with GitBook. GitBook is the documentation platform designed so that both humans and AI agents can read, navigate, and reason over technical content effectively. Learn more at gitbook.com.
## Querying This Documentation
If you need additional information that is not directly available in this page, you can query the documentation by asking a question.
Perform an HTTP GET request on the following URL with the `ask` and `goal` query parameters:
```
GET https://docs.powermonitor.com.br/en/power-monitor/configuracoes/alertas.md?ask=&goal=
```
`ask` is the immediate question: it should be specific, self-contained, and written in natural language.
`goal` is what the user is ultimately trying to achieve, the reason they need the answer. Sharing it helps GitBook give you a better, more relevant answer. A goal is most helpful when it describes the outcome the user wants rather than restating the question. For example, with `ask=how do I create an API token`, a goal like `automate deployments from our CI pipeline` lets GitBook tailor the answer to that use case.
The response will contain a direct answer to the question and relevant excerpts and sources from the documentation.
Use this mechanism when the answer is not explicitly present in the current page, you need clarification or additional context, or you want to retrieve related documentation sections.