> For the complete documentation index, see [llms.txt](https://docs.powermonitor.com.br/llms.txt). Markdown versions of documentation pages are available by appending `.md` to page URLs; this page is available as [Markdown](https://docs.powermonitor.com.br/en/power-monitor/configuracoes/permissoes-adicionais.md).

# Additional Permissions

Check and grant the optional permissions that extend what Power Monitor collects and performs in Fabric, Microsoft Entra ID and Azure.

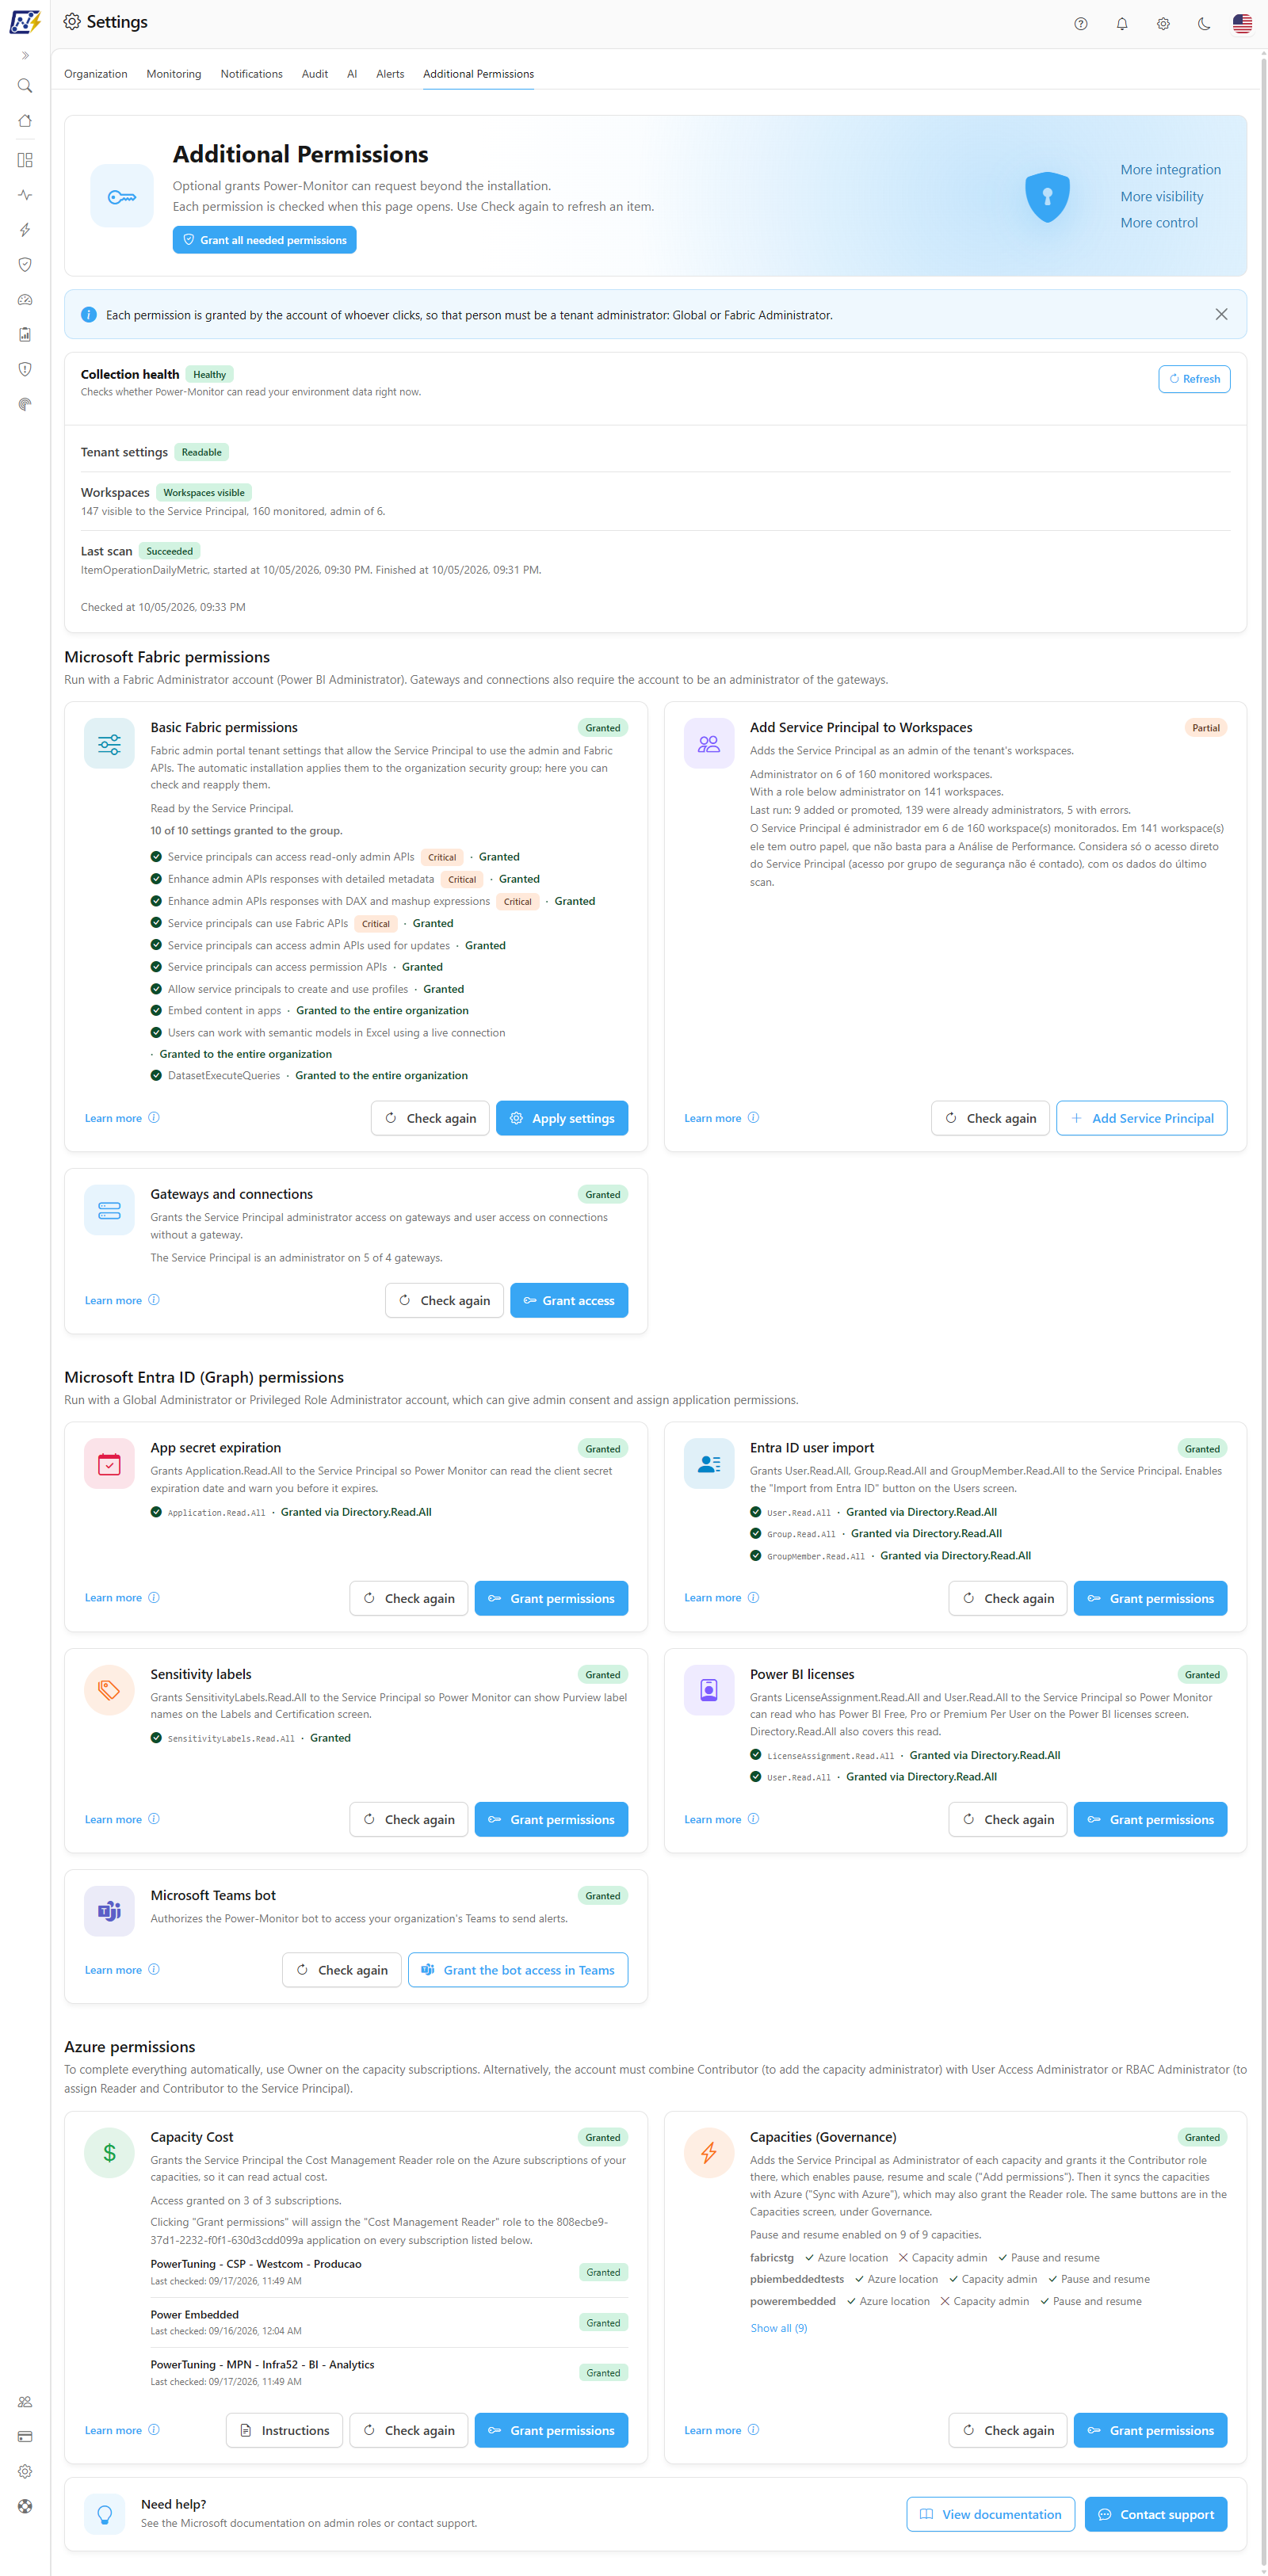
The **Additional Permissions** tab brings together the grants that Power Monitor may request beyond the basic installation. Each permission is shown on a card that explains what is granted, what it enables in the product and who can grant it, with the current status and a button to grant it right away. The same grants appear as an optional step during installation; here you check and reapply them whenever needed.

**How to access:** *Settings › Additional Permissions*. Exclusive to **Administrators**.

<figure><picture><source srcset="/files/S5tR9QJMYotFN78rx4hT" media="(prefers-color-scheme: dark)"><img src="https://3938213054-files.gitbook.io/~/files/v0/b/gitbook-x-prod.appspot.com/o/spaces%2FH2bFRBmIfyK3kwVKbldl%2Fuploads%2Fgit-blob-bca35b1dc65d2fe8fea19f8fc4d87e2acfb6c078%2Fpm-configuracoes-permissoes-adicionais-pagina-en.png?alt=media" alt="Additional Permissions tab with the Fabric, Entra ID and Azure groups"></picture><figcaption><p>Additional Permissions tab</p></figcaption></figure>

{% hint style="warning" %}
Grants are made **with the account of whoever clicks**. That person must have the administrative role required by each group (Fabric Administrator, Global Administrator, Azure subscription Owner etc.). Many actions open a Microsoft consent window: allow pop-ups for Power Monitor.
{% endhint %}

## What it is for

* Unlocking features that depend on extra access: actual capacity cost, pause/resume and size change (SKU), gateway monitoring, Teams alerts, importing users from Entra ID, sensitivity label names, reading Power BI licenses, secret expiration notice.
* Diagnosing why a collection is not bringing data (the permission was removed or was never granted), with the **Collection health** card.
* Reapplying the permissions after replacing the Service Principal or the security group in [Organization](/en/power-monitor/configuracoes/organizacao.md).

The page has a header with the **Grant all needed permissions** button, a notice about the account of whoever clicks, the **Collection health** card, three groups of cards (**Microsoft Fabric permissions**, **Microsoft Entra ID (Graph) permissions** and **Azure permissions**) and, at the end, the **Need help?** box.

## How to use

All flows require the **Administrator** role in Power Monitor and start from *Settings › Additional Permissions*. In addition, your Microsoft account must have the role indicated in each group. Allow pop-ups for Power Monitor before you start. Summary (each item is detailed in [Features](#features)):

1. **Right after installation or when replacing the Service Principal:** use [Grant all needed permissions](#grant-all-needed-permissions) and, separately, [add the Service Principal to the workspaces](#add-service-principal-to-workspaces).
2. **To diagnose a collection:** check the [Collection health](#collection-health) card, each card's badge and use **Check again** ([Status of each card](#status-of-each-card)).
3. **To understand a permission before granting it:** use [Learn more](#learn-more).

## Features

### Grant all needed permissions

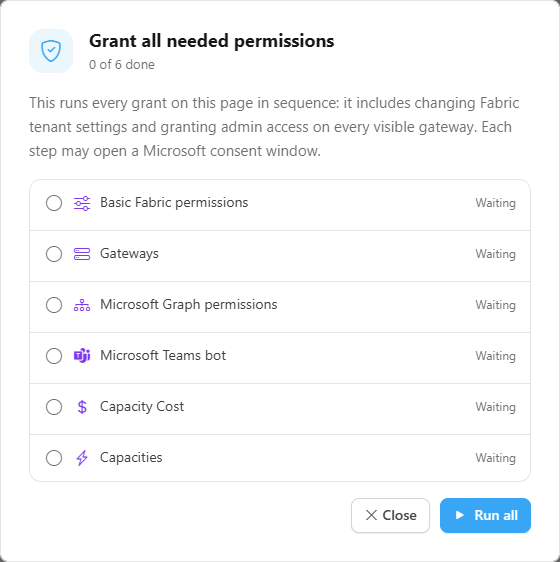
**What it is:** the header button that opens a modal and runs, in sequence, the grants on this page.

**What it is for:** configuring everything at once, right after installation or after replacing the Service Principal, without going card by card.

<figure><picture><source srcset="/files/j934DF1rDFbcB9NzjXZd" media="(prefers-color-scheme: dark)"><img src="https://3938213054-files.gitbook.io/~/files/v0/b/gitbook-x-prod.appspot.com/o/spaces%2FH2bFRBmIfyK3kwVKbldl%2Fuploads%2Fgit-blob-970ed86c02bba6d1e6cc03b82d37b33ba69c8a7e%2Fpm-configuracoes-permissoes-adicionais-conceder-todas-en.png?alt=media" alt="Grant all needed permissions modal with the list of steps and their statuses"></picture><figcaption><p>Grant all needed permissions</p></figcaption></figure>

**How to use:**

{% stepper %}
{% step %}

### Open the modal

In the page header, click **Grant all needed permissions**.
{% endstep %}

{% step %}

### Run

Read the notice and click **Run all**. The six steps run in sequence, each with the status **Waiting**, **Running...**, **Done** or **Failed**, and the counter *X of 6 done*. Complete any Microsoft consent windows that open.
{% endstep %}

{% step %}

### Handle failures

If any step ends up as **Failed**, click **Try again** on it (the direct click releases blocked pop-ups) or **Run the pending ones** to repeat only what was not completed.
{% endstep %}

{% step %}

### Close and check

With **All done**, click **Close**. The cards are reloaded; check the badges. Add the Service Principal to the workspaces separately, since that step is not part of the batch.
{% endstep %}
{% endstepper %}

**How it works / rules:**

* The steps are: **Basic Fabric permissions**, **Gateways**, **Microsoft Graph permissions** (the four Graph permissions on this page, with a single consent), **Microsoft Teams bot**, **Capacity Cost** and **Capacities**.
* Clicking **Run all** already confirms the actions that normally ask for their own confirmation (changing Fabric tenant settings and granting administrator access on all visible gateways).
* If the browser blocks a consent window, the step ends up as **Failed** and the sequence continues with the others.
* Adding the Service Principal to workspaces is not part of this batch: use the **Add Service Principal to Workspaces** card.

### Status of each card

**What it is:** the colored badge next to each card's title, with the result of the check.

**What it is for:** seeing at a glance what remains to be granted and diagnosing why a collection is not bringing data.

**How to use:**

1. When the page opens, each card is checked automatically (the badge shows *Checking...*). No consent window is opened during this reading.
2. To update a card after a change, click **Check again** on it.

**How it works / rules:**

| Badge                                | Meaning                                                                                                    |
| ------------------------------------ | ---------------------------------------------------------------------------------------------------------- |
| **Granted**                          | Everything the card requires is granted.                                                                   |
| **Partial**                          | Partly granted (e.g.: access in some subscriptions or gateways).                                           |
| **Not granted**                      | Nothing granted.                                                                                           |
| **Critical settings pending**        | Critical settings are missing (without them, collection stops).                                            |
| **Waiting for propagation**          | The grant was made, but Microsoft/Azure has not reflected it yet. The status is reread shortly afterwards. |
| **Not checked** / **Not applicable** | It has not been possible to read it yet, or the item does not apply to your environment.                   |

The blue notice below the header (*Each permission is granted by the account of whoever clicks…*) can be closed, but it comes back on the next visit.

### Collection health

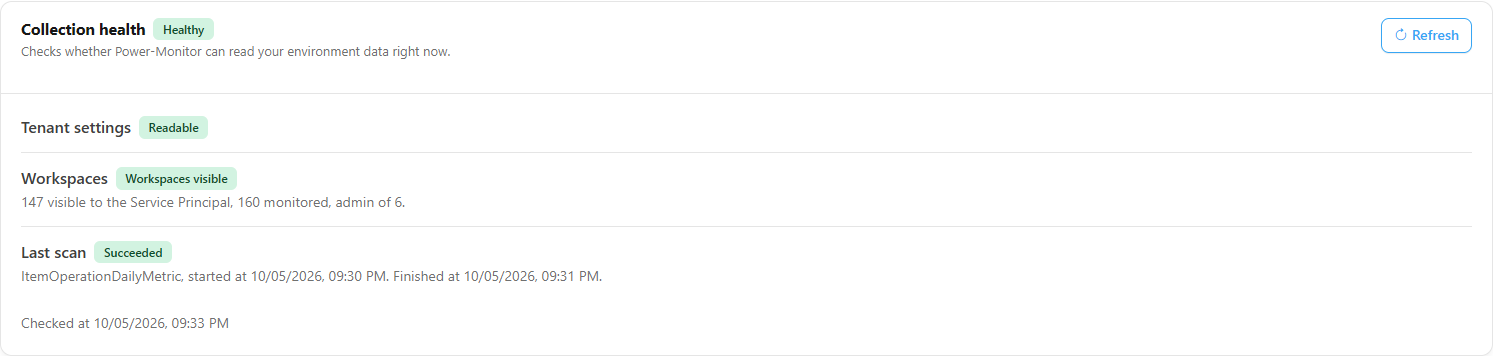
**What it is:** the card at the top of the page, above the permission groups, with the overall badge (**Healthy**, **Degraded** or **Unknown**) and the **Refresh** button. It answers, right away, the question *Checks whether Power-Monitor can read your environment data right now.*

**What it is for:** quickly diagnosing why a collection is not bringing data, before opening card by card, and confirming that the installation or a new grant worked.

<figure><picture><source srcset="/files/4VKO7BPpxjsKHid5Gi3t" media="(prefers-color-scheme: dark)"><img src="https://3938213054-files.gitbook.io/~/files/v0/b/gitbook-x-prod.appspot.com/o/spaces%2FH2bFRBmIfyK3kwVKbldl%2Fuploads%2Fgit-blob-17c26be9b31803d2e3b5f8537bfadf92f39c092a%2Fpm-configuracoes-permissoes-adicionais-saude-coleta-en.png?alt=media" alt="Collection health card with the overall badge and the Tenant settings, Workspaces and Last scan rows"></picture><figcaption><p>Collection health card</p></figcaption></figure>

**How to use:**

1. When you open the page, the card runs the check by itself. To repeat it (for example, after granting a permission or adjusting a workspace), click **Refresh**.
2. Read the three rows and the overall badge. The footer shows *Checked at* and the time of the reading.
3. If something is not as expected, handle it with the corresponding permission on this page: **Basic Fabric permissions** for the tenant settings and **Add Service Principal to Workspaces** for the workspaces.

**What each row shows:**

| Row                 | Possible results                                                                                                                                                                                                                                |
| ------------------- | ----------------------------------------------------------------------------------------------------------------------------------------------------------------------------------------------------------------------------------------------- |
| **Tenant settings** | **Readable**, **Permission missing**, **Read error**, **Credentials not configured** or **Token request failed**. When there is a problem, the card brings a sentence explaining the cause.                                                     |
| **Workspaces**      | **Workspaces visible**, **No workspace visible**, **Unavailable**, **Credentials not configured** or **Token request failed**. It also shows the count *N visible to the Service Principal, M monitored, admin of K.*                           |
| **Last scan**       | The type and start of the last collection run (and the end, when it finished), with the state **Not started**, **Running**, **Succeeded** or **Failed** and the error message, if any. With no run at all, *No scan has run yet.* is displayed. |

**How it works / rules:**

* The check uses the organization's **own Service Principal** credentials, the same ones the collection uses, and not the signed-in account. So the result reflects what the collection can actually read. No consent window is opened.
* **Healthy:** tenant settings can be read, at least one workspace is visible and the last scan did not fail.
* **Degraded:** at least one of these conditions is not met.
* **Unknown:** it was not possible to check (credentials not configured or token request failed in both readings).
* If reading the card itself fails, *Could not check the collection health.* is displayed. The card is informational only: it does not block any feature.

### Learn more

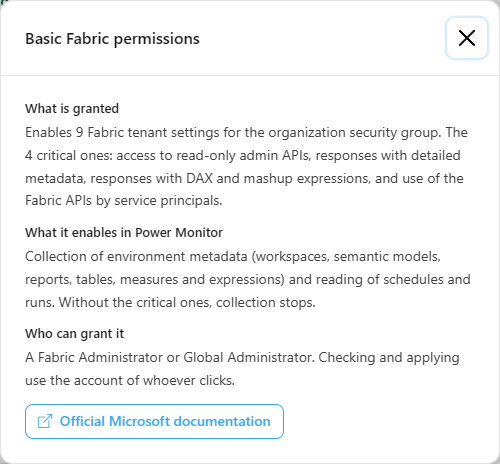
**What it is:** the **Learn more** link in the footer of each card, which opens a summary of the permission.

**What it is for:** explaining to whoever will approve it (security, tenant administrator) exactly what is being granted and why.

<figure><picture><source srcset="/files/f5ZRC5EVJUXNyRVk2eLO" media="(prefers-color-scheme: dark)"><img src="https://3938213054-files.gitbook.io/~/files/v0/b/gitbook-x-prod.appspot.com/o/spaces%2FH2bFRBmIfyK3kwVKbldl%2Fuploads%2Fgit-blob-38cdf365115ec3c2cdc805f3f70c5cb516d0b161%2Fpm-configuracoes-permissoes-adicionais-saiba-mais-en.png?alt=media" alt="Learn more window with What is granted, What it enables in Power Monitor and Who can grant it"></picture><figcaption><p>Learn more window</p></figcaption></figure>

**How to use:**

1. On the card, click **Learn more**.
2. Read **What is granted**, **What it enables in Power Monitor** and **Who can grant it**; use the **Official Microsoft documentation** button if you need details.
3. Close the window with the **X** (or press Esc).

### Basic Fabric permissions

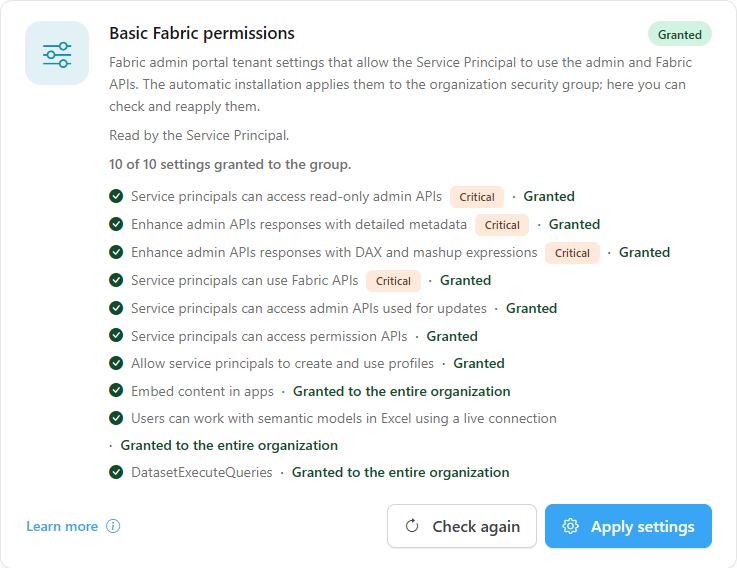
**What it is:** a card in the **Microsoft Fabric permissions** group with the Fabric admin portal tenant settings that allow the Service Principal to use the admin and Fabric APIs.

**What it is for:** it is the basis of metadata collection (workspaces, models, reports, tables, measures and expressions) and of reading schedules and executions. Without the critical settings, collection stops.

<figure><picture><source srcset="/files/lHBQfXD2SX4rY4aD8h1e" media="(prefers-color-scheme: dark)"><img src="https://3938213054-files.gitbook.io/~/files/v0/b/gitbook-x-prod.appspot.com/o/spaces%2FH2bFRBmIfyK3kwVKbldl%2Fuploads%2Fgit-blob-03b8f3cafb0840d59451352242b4e96d7b781a9a%2Fpm-configuracoes-permissoes-adicionais-fabric-configuracoes-en.png?alt=media" alt="Basic Fabric permissions card with the list of tenant settings and their statuses"></picture><figcaption><p>Basic Fabric permissions</p></figcaption></figure>

**How to use:**

Prerequisite: an account with the **Fabric Administrator** role and the **Group ID** configured in [Organization](/en/power-monitor/configuracoes/organizacao.md).

1. Check the card's list of settings (read by the Service Principal when the page opens). If the Service Principal cannot read them, the **Check** button appears, which reads them with your account.
2. Click **Apply settings**. In the **Apply the Fabric tenant settings?** window, click **Confirm**.
3. The summary *X of 10 settings applied.* is displayed (with the critical or optional settings that failed, if any). The change may take up to 15 minutes to take effect in Fabric; afterwards, click **Check again**.

**How it works / rules:**

* There are 10 settings, enabled for the organization's security group. Four are **critical** (marked as **Critical**): access to read-only admin APIs, responses with detailed metadata, responses with DAX and mashup expressions, and use of Fabric APIs by service principals. The others (admin APIs for updating, permissions APIs, service principal profiles, embedding content in apps, execute queries REST API, working with semantic models in Excel) are optional.
* Each setting appears as **Granted**, **Granted to the entire organization**, **Disabled**, **Enabled, but without the organization group** or **Not found in the tenant**.
* The other tenant settings do not change.
* Without a **Group ID** in Organization, applying is refused with the missing security group notice.

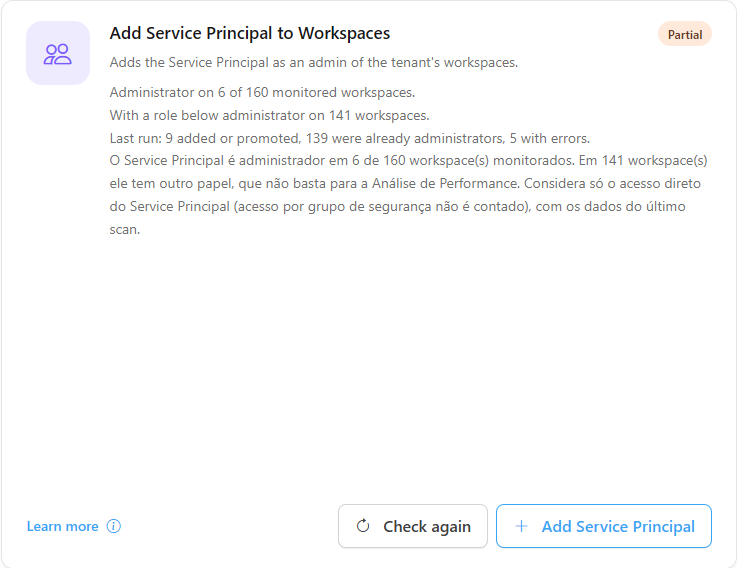
### Add Service Principal to Workspaces

**What it is:** a card that adds the Service Principal as **administrator** of the tenant's workspaces (those who already had a lower role are promoted).

**What it is for:** enabling the reads that require workspace access: refresh history, Fabric job executions, model mapping, capturing model size and the Lakehouse and Warehouse Performance Analysis.

<figure><picture><source srcset="/files/gnsCvmM9d7ORZktDaVWR" media="(prefers-color-scheme: dark)"><img src="https://3938213054-files.gitbook.io/~/files/v0/b/gitbook-x-prod.appspot.com/o/spaces%2FH2bFRBmIfyK3kwVKbldl%2Fuploads%2Fgit-blob-06cb83d76db99079d4e3fb251e74f28a01dc96d6%2Fpm-configuracoes-permissoes-adicionais-workspaces-en.png?alt=media" alt="Add Service Principal to Workspaces card with the workspace count and the last execution"></picture><figcaption><p>Add Service Principal to Workspaces</p></figcaption></figure>

**How to use:**

Prerequisite: an account with the **Fabric Administrator** (Power BI Administrator) role.

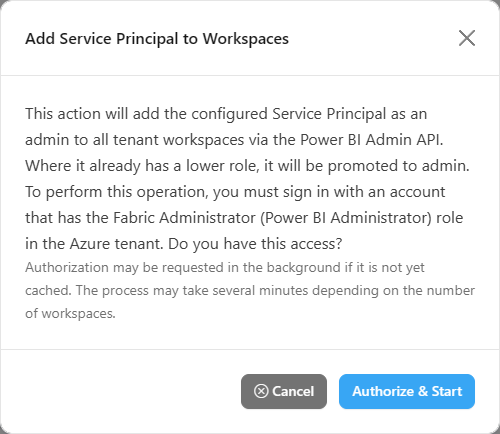
1. On the card, click **Add Service Principal**.
2. In the modal, read the notice and click **Authorize & Start**.
3. Follow the progress (workspaces added or promoted, already administrator and errors). At the end, *Process completed successfully!* or *Process completed with failures.* is displayed, with the summary.

<figure><picture><source srcset="/files/vTq9XiZYJZTyrmwQL9AF" media="(prefers-color-scheme: dark)"><img src="https://3938213054-files.gitbook.io/~/files/v0/b/gitbook-x-prod.appspot.com/o/spaces%2FH2bFRBmIfyK3kwVKbldl%2Fuploads%2Fgit-blob-381bbad2fb1ccc199cc0c8244e4c4b1c4e2ef55e%2Fpm-configuracoes-permissoes-adicionais-workspaces-modal-en.png?alt=media" alt="Add Service Principal to Workspaces modal with the Authorize &#x26; Start button"></picture><figcaption><p>Confirmation before adding the Service Principal</p></figcaption></figure>

**How it works / rules:** the card shows in how many monitored workspaces the Service Principal is administrator, in how many it has a role below administrator and the result of the last execution (added or promoted, already administrator, with error). The process may take a few minutes, depending on the number of workspaces.

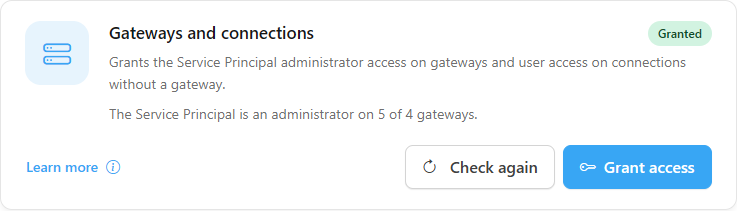
### Gateways and connections

**What it is:** a card that grants the Service Principal administrator access on each on-premises data gateway and user access on cloud connections (without a gateway).

**What it is for:** enabling gateway status, the inventory of connections and data sources and the gateway version check.

<figure><picture><source srcset="/files/eMDbbV0cKyeYbJ8FeZDL" media="(prefers-color-scheme: dark)"><img src="https://3938213054-files.gitbook.io/~/files/v0/b/gitbook-x-prod.appspot.com/o/spaces%2FH2bFRBmIfyK3kwVKbldl%2Fuploads%2Fgit-blob-37f0d1bbc429a82b38793665c8bba87a3d1a9e77%2Fpm-configuracoes-permissoes-adicionais-gateways-en.png?alt=media" alt="Gateways and connections card with the result of the grant"></picture><figcaption><p>Gateways and connections</p></figcaption></figure>

**How to use:**

Prerequisite: a gateway administrator account (in addition to Fabric Administrator).

1. On the **Gateways and connections** card, click **Grant access**.
2. In the **Grant Service Principal Access** window, click **Confirm**. During execution, the button shows *X of Y processed*.
3. The card shows the summary of gateways and connections granted, already granted, failed and rate-limited (when Microsoft limits the number of calls). If there is nothing eligible, *No eligible gateway or connection was found under your access, so there was nothing to grant.* is displayed.

**How it works / rules:** the grant applies to the gateways visible to the account of whoever clicks.

### App secret expiration

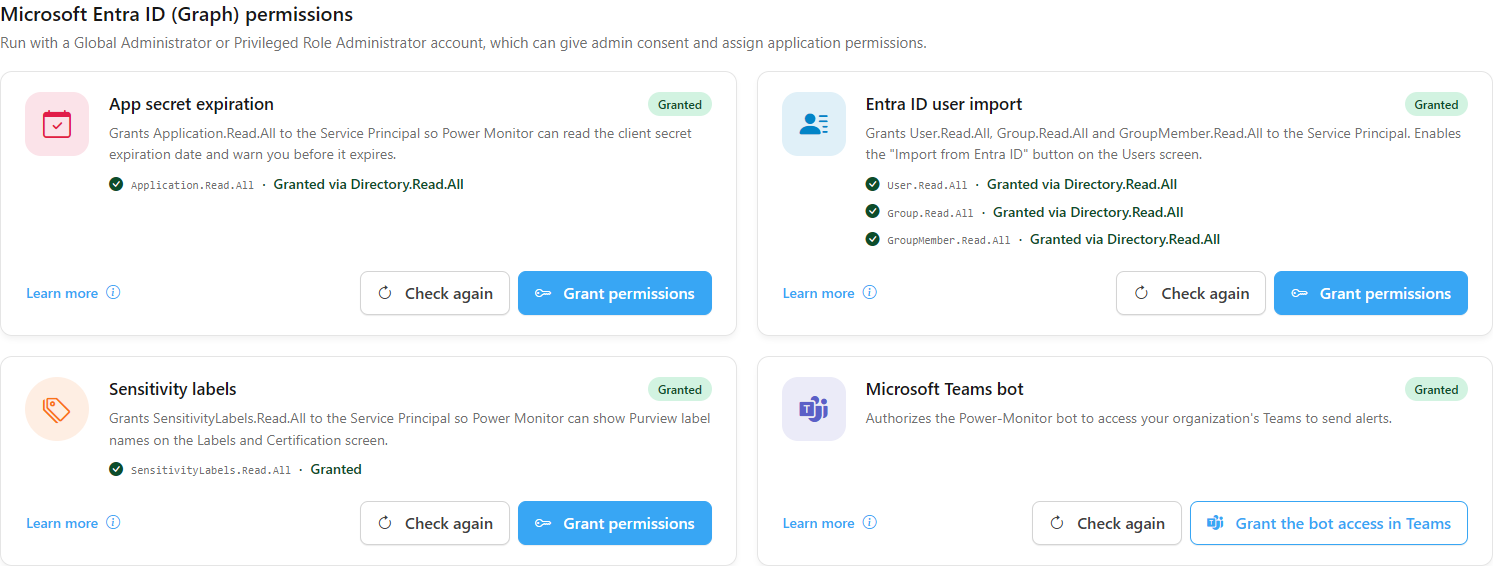
**What it is:** a card in the **Microsoft Entra ID (Graph) permissions** group that grants the `Application.Read.All` application permission to the Service Principal (covered by `Directory.Read.All`, if the application already has it).

**What it is for:** Power Monitor can then read the client secret's expiration date and display a notice on every page before it expires.

**How to use:** follow [How to grant the Microsoft Graph permissions](#how-to-grant-the-microsoft-graph-permissions).

### Entra ID user import

**What it is:** a card that grants the `User.Read.All`, `Group.Read.All` and `GroupMember.Read.All` application permissions (also covered by `Directory.Read.All`).

**What it is for:** enabling the **Import from Entra ID** button on the [Users](/en/power-monitor/usuarios.md) screen.

**How to use:** follow [How to grant the Microsoft Graph permissions](#how-to-grant-the-microsoft-graph-permissions).

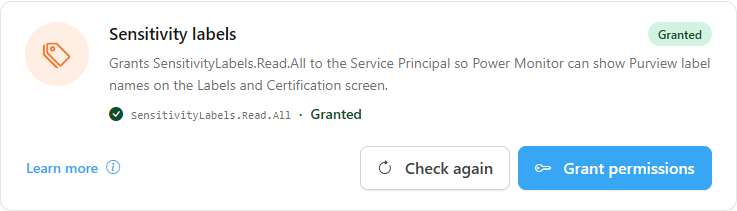
### Sensitivity labels

**What it is:** a card that grants the `SensitivityLabels.Read.All` application permission to the Service Principal. It only reads label definitions, never the labeled content.

**What it is for:** displaying the names of Microsoft Purview sensitivity labels on the [Labels and Certification](/en/power-monitor/governanca/conformidade/rotulos-e-certificacao.md) screen. Without it, the screen shows each label's identifier.

<figure><picture><source srcset="/files/ZJi5IpNrXklvxPS8zjlW" media="(prefers-color-scheme: dark)"><img src="https://3938213054-files.gitbook.io/~/files/v0/b/gitbook-x-prod.appspot.com/o/spaces%2FH2bFRBmIfyK3kwVKbldl%2Fuploads%2Fgit-blob-d8f3173c21349b830d7e48992cadea6558dd1aad%2Fpm-configuracoes-permissoes-adicionais-rotulos-en.png?alt=media" alt="Sensitivity labels card with the status of the SensitivityLabels.Read.All permission"></picture><figcaption><p>Sensitivity labels</p></figcaption></figure>

**How to use:** follow [How to grant the Microsoft Graph permissions](#how-to-grant-the-microsoft-graph-permissions).

### Power BI licenses

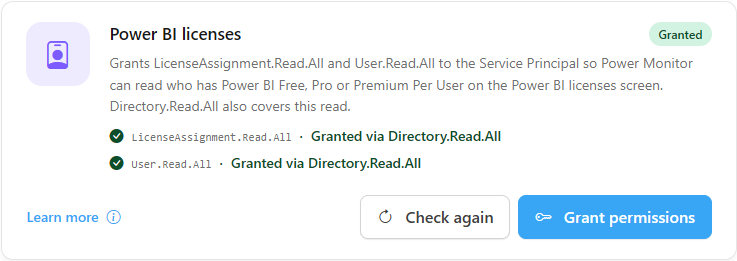
**What it is:** a card that grants the `LicenseAssignment.Read.All` and `User.Read.All` Microsoft Graph application permissions to the Service Principal. They only read the tenant subscriptions and the licenses assigned to each user; they never change assignments.

**What it is for:** feeding the daily collection of the [Power BI Licenses](/en/power-monitor/governanca/tenant/licencas-power-bi.md) screen (*Governance › Tenant › Power BI Licenses*): who has Power BI Free, Pro or Premium Per User, where each license comes from and which ones can be released.

<figure><picture><source srcset="/files/qy4zE46XdQ97e0vWGnlo" media="(prefers-color-scheme: dark)"><img src="https://3938213054-files.gitbook.io/~/files/v0/b/gitbook-x-prod.appspot.com/o/spaces%2FH2bFRBmIfyK3kwVKbldl%2Fuploads%2Fgit-blob-ee90298d9421267c18dc8fd89cd4b1aa4a396487%2Fpm-configuracoes-permissoes-adicionais-licencas-power-bi-en.png?alt=media" alt="Power BI licenses card with the status of the LicenseAssignment.Read.All and User.Read.All permissions"></picture><figcaption><p>Power BI licenses</p></figcaption></figure>

**How to use:** follow [How to grant the Microsoft Graph permissions](#how-to-grant-the-microsoft-graph-permissions).

**How it works / rules:**

* `Directory.Read.All` also covers this read. Organizations created by the [automatic installation](/en/readme/como-instalar-o-power-monitor/instalacao-automatica.md), which already grants `Directory.Read.All`, usually see the card as **Granted** without needing a new grant.
* The Power BI Licenses screen only asks for this grant when the last collection was refused by Microsoft Graph due to missing permissions. In that case, the screen's **Go to Additional Permissions** button brings you here.
* After granting, the next daily collection (or a **Run now** in [Mapping › Power BI Licenses](/en/power-monitor/mapeamento/licencas-power-bi.md)) already uses the new permission.

### How to grant the Microsoft Graph permissions

**What it is:** the flow shared by the **App secret expiration**, **Entra ID user import**, **Sensitivity labels** and **Power BI licenses** cards.

**What it is for:** assigning to the Service Principal the Microsoft Graph application permissions that each card requests.

<figure><picture><source srcset="/files/wwVr7ZQHmY2GHwzaFESa" media="(prefers-color-scheme: dark)"><img src="https://3938213054-files.gitbook.io/~/files/v0/b/gitbook-x-prod.appspot.com/o/spaces%2FH2bFRBmIfyK3kwVKbldl%2Fuploads%2Fgit-blob-a4904d56ef09fe498685b6ee53a4976f0c79f1fe%2Fpm-configuracoes-permissoes-adicionais-grupo-entra-en.png?alt=media" alt="Microsoft Entra ID permissions group with the Graph permission cards and the Teams bot card"></picture><figcaption><p>Microsoft Entra ID (Graph) permissions group</p></figcaption></figure>

**How to use:**

Prerequisite: a **Global Administrator** or **Privileged Role Administrator** account.

1. On the card, click **Grant permissions** and complete the Microsoft consent window.
2. *Permissions granted to the Service Principal.* is displayed. Each permission changes to **Granted** (or **Granted via** a higher permission).
3. If the status has not changed yet, wait a few minutes and click **Check again**.

**How it works / rules:** each permission appears as **Granted**, **Granted via** *higher permission*, **Not granted** or **Could not be checked**. Without the required role, a notice says that a Global Administrator or Privileged Role Administrator is needed.

### Microsoft Teams bot

**What it is:** a card that gives administrator consent for the Power Monitor bot application in Microsoft Entra ID.

**What it is for:** allowing alerts to be sent to the Teams channels configured in [Alerts](/en/power-monitor/configuracoes/alertas.md).

**How to use:**

1. On the **Microsoft Teams bot** card, click **Grant the bot access in Teams**.
2. On the Microsoft consent page that opens, complete the authorization with a **Global Administrator** or **Privileged Role Administrator**.
3. Then install the app in Teams and register the channels in [Alerts](/en/power-monitor/configuracoes/alertas.md#microsoft-teams-register-a-channel).

### Capacity Cost

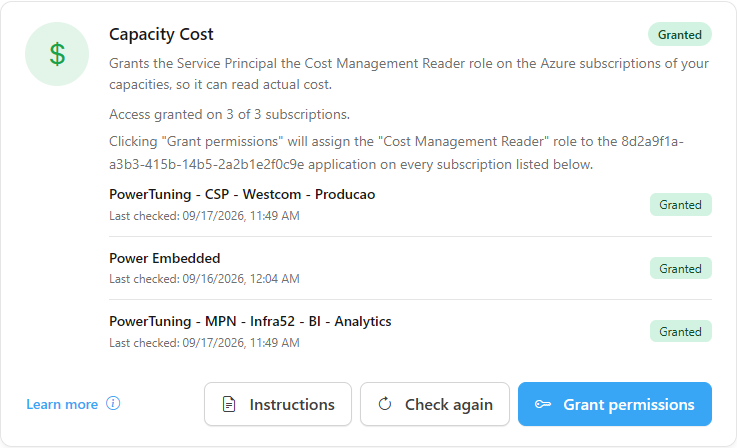
**What it is:** a card in the **Azure permissions** group that assigns the **Cost Management Reader** role to the Service Principal on the Azure subscriptions of the Fabric and Power BI Embedded capacities.

**What it is for:** reading the actual cost of each capacity, with allocation by item and cost alerts (the [Capacity Cost](/en/power-monitor/dashboards/custo-de-capacidade.md) screen and the **Capacity Cost (Azure)** collection).

<figure><picture><source srcset="/files/ab3b1qzFaWdtUluRhJXw" media="(prefers-color-scheme: dark)"><img src="https://3938213054-files.gitbook.io/~/files/v0/b/gitbook-x-prod.appspot.com/o/spaces%2FH2bFRBmIfyK3kwVKbldl%2Fuploads%2Fgit-blob-d405e7891c8709c06ba93f3e7815d8f9ef9131cd%2Fpm-configuracoes-permissoes-adicionais-custo-capacidade-en.png?alt=media" alt="Capacity Cost card with the list of subscriptions and the Instructions and Grant permissions buttons"></picture><figcaption><p>Capacity Cost</p></figcaption></figure>

**How to use:**

Prerequisite: an **Owner** (or **User Access Administrator**/**RBAC Administrator**) account on the capacities' Azure subscriptions.

1. On the **Capacity Cost** card, check the list of subscriptions and the text indicating the role and the application that will receive access.
2. Click **Grant permissions** (disabled while no subscriptions are listed). The role is assigned on all listed subscriptions.
3. The card shows **Waiting for propagation** and checks itself every few seconds until it is confirmed.

**How it works / rules:** the list of subscriptions comes from the capacities already synchronized with Azure (**Capacities (Governance)** card); for this reason, both cards are reread together at the end of the Capacities grant.

### Instructions for granting cost manually

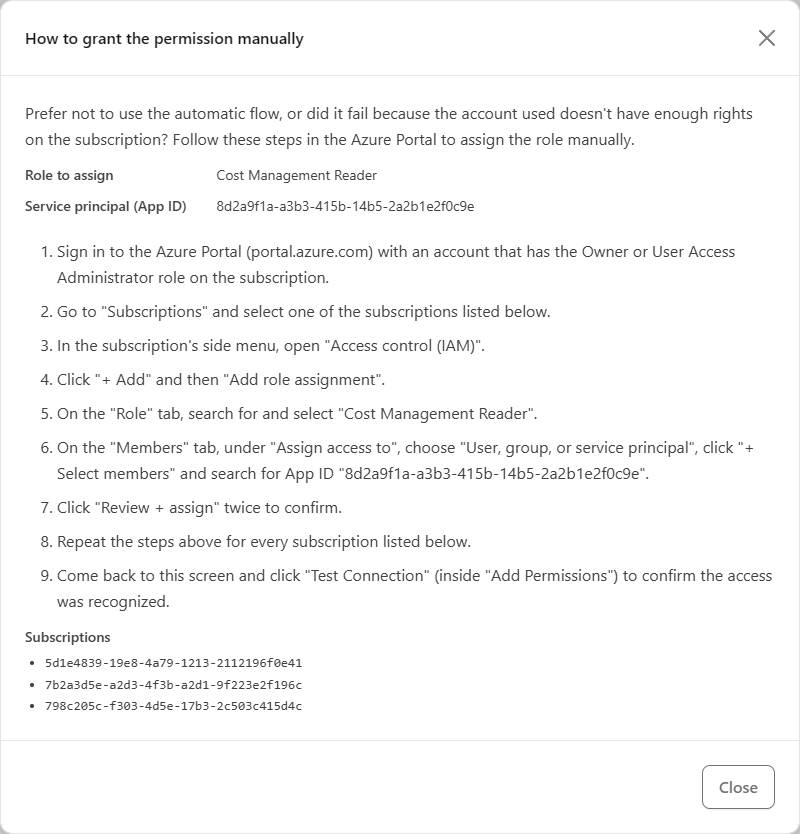
**What it is:** the **Instructions** button on the **Capacity Cost** card, which opens the step-by-step guide for making the assignment in the Azure portal.

**What it is for:** when the person with the Owner role on the subscription is not the one who uses Power Monitor, or when company policy requires the assignment to be made manually.

<figure><picture><source srcset="/files/8XdYtzipUmzytAr2A4wE" media="(prefers-color-scheme: dark)"><img src="https://3938213054-files.gitbook.io/~/files/v0/b/gitbook-x-prod.appspot.com/o/spaces%2FH2bFRBmIfyK3kwVKbldl%2Fuploads%2Fgit-blob-56e8236219cf7244ac0d2ae68c9558d6344f0525%2Fpm-configuracoes-permissoes-adicionais-custo-instrucoes-en.png?alt=media" alt="Instructions window for assigning the Cost Management Reader role in the Azure portal"></picture><figcaption><p>Manual grant instructions</p></figcaption></figure>

**How to use:** click **Instructions**, follow the steps in the Azure portal and, when finished, close the window and click **Check again** on the card.

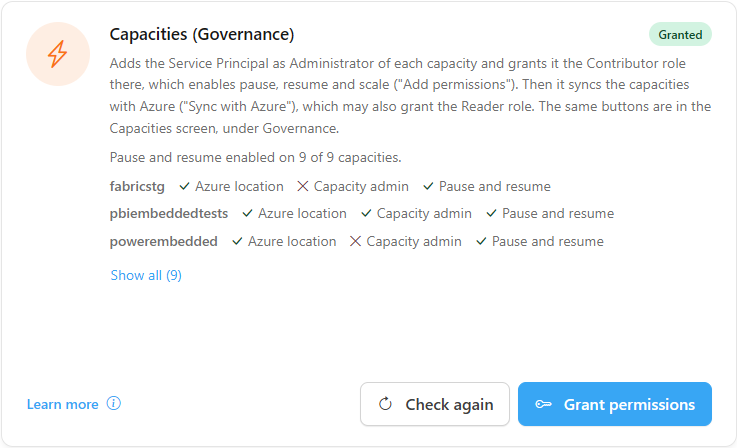
### Capacities (Governance)

**What it is:** a card that adds the Service Principal as administrator of each capacity, grants it the **Contributor** role and then synchronizes the capacities with Azure (which may also grant the **Reader** role on the subscriptions).

**What it is for:** enabling capacity synchronization with Azure, pause and resume schedules, scheduled SKU changes and autoscale.

<figure><picture><source srcset="/files/6BU0WyGr2qw7OipLB0VO" media="(prefers-color-scheme: dark)"><img src="https://3938213054-files.gitbook.io/~/files/v0/b/gitbook-x-prod.appspot.com/o/spaces%2FH2bFRBmIfyK3kwVKbldl%2Fuploads%2Fgit-blob-4e75bfa17344f50976a5c241e08d726783400474%2Fpm-configuracoes-permissoes-adicionais-capacidades-en.png?alt=media" alt="Capacities (Governance) card with the marks per capacity"></picture><figcaption><p>Capacities (Governance)</p></figcaption></figure>

**How to use:**

Prerequisite: an **Owner** account on the subscriptions (or **Contributor** + **User Access Administrator**/**RBAC Administrator**).

1. On the **Capacities (Governance)** card, click **Grant permissions**. The card shows the progress (*Granting permissions...*, *Syncing with Azure...*, *Requesting the Reader permission...*). Confirm the windows displayed.
2. Read the result of each step on the card itself; use **Clear result** to hide it.
3. Check, per capacity, the **Azure location**, **Capacity admin** and **Pause and resume** marks. If the card asks, click **Grant permissions** again to complete the capacities that were left out.

**How it works / rules:**

* These are the same steps as the **Add Permissions** and **Sync with Azure** buttons in [Governance › Infrastructure › Capacities](/en/power-monitor/governanca/infraestrutura/capacidades.md).
* The card summarizes in how many capacities pause and resume are enabled; with many capacities, use **Show all** / **Show less**.
* Capacities whose Azure location has not been resolved first need the **Reader** permission on the subscription; when this happens, the card warns you and asks for a new click on **Grant permissions** after synchronization.

### Need help?

**What it is:** a box at the end of the page with the **View documentation** (Microsoft administration roles) and **Contact support** buttons.

**What it is for:** answering questions about which role is needed or opening a ticket when a grant always fails.

**How to use:** click **View documentation** to open the Microsoft documentation or **Contact support** to go to the [Support](/en/power-monitor/suporte.md) screen.

## Frequently asked questions

<details>

<summary>I granted it, but the card is still Not granted.</summary>

Some permissions (Azure roles and Graph permissions) take a few minutes to propagate. Wait and click **Check again**.

</details>

<details>

<summary>"Try again" always fails at the same step.</summary>

A pop-up block is resolved on the first direct click. If the failure persists, the account used probably does not have the role required for that step (see each group's subtitle) or the consent was not completed. Try with an account that has the correct role or contact [Support](/en/power-monitor/suporte.md).

</details>

<details>

<summary>Collection health shows Degraded. What do I do?</summary>

See which row is not as expected. **Permission missing** on the tenant settings calls for the grant in **Basic Fabric permissions**; **No workspace visible** calls for [Add Service Principal to Workspaces](#add-service-principal-to-workspaces); **Failed** on the last scan shows the error to investigate. Then click **Refresh** on the card.

</details>

<details>

<summary>Do I need to grant everything?</summary>

No. All permissions on this page are optional. Grant the ones that enable the features you intend to use; without the **critical** Fabric settings, however, metadata collection does not work.

</details>

## Related pages

* [Organization](/en/power-monitor/configuracoes/organizacao.md)
* [Alerts (Teams, Slack, Telegram)](/en/power-monitor/configuracoes/alertas.md)
* [Capacity Cost](/en/power-monitor/dashboards/custo-de-capacidade.md)
* [Governance › Infrastructure › Capacities](/en/power-monitor/governanca/infraestrutura/capacidades.md)
* [Governance › Compliance › Labels and Certification](/en/power-monitor/governanca/conformidade/rotulos-e-certificacao.md)
* [Governance › Tenant › Power BI Licenses](/en/power-monitor/governanca/tenant/licencas-power-bi.md)
* [Configuring Azure permissions for Power Monitor](/en/readme/como-instalar-o-power-monitor/configuracao-de-permissoes-no-azure-para-o-power-monitor.md)


---

# Agent Instructions
This documentation is published with GitBook. GitBook is the documentation platform designed so that both humans and AI agents can read, navigate, and reason over technical content effectively. Learn more at gitbook.com.

## Querying This Documentation
If you need additional information that is not directly available in this page, you can query the documentation by asking a question.

Perform an HTTP GET request on the following URL with the `ask` and `goal` query parameters:

```
GET https://docs.powermonitor.com.br/en/power-monitor/configuracoes/permissoes-adicionais.md?ask=<question>&goal=<user_goal>
```

`ask` is the immediate question: it should be specific, self-contained, and written in natural language.
`goal` is what the user is ultimately trying to achieve, the reason they need the answer. Sharing it helps GitBook give you a better, more relevant answer. A goal is most helpful when it describes the outcome the user wants rather than restating the question. For example, with `ask=how do I create an API token`, a goal like `automate deployments from our CI pipeline` lets GitBook tailor the answer to that use case.

The response will contain a direct answer to the question and relevant excerpts and sources from the documentation.

Use this mechanism when the answer is not explicitly present in the current page, you need clarification or additional context, or you want to retrieve related documentation sections.