> For the complete documentation index, see [llms.txt](https://docs.powermonitor.com.br/llms.txt). Markdown versions of documentation pages are available by appending `.md` to page URLs; this page is available as [Markdown](https://docs.powermonitor.com.br/en/power-monitor/faturamento.md).

# Billing

Understand how Power Monitor charges (daily average of monitored items), track invoices, tax invoices and payments, and keep the organization's fiscal data up to date.

The **Billing** screen shows how much your organization pays for Power Monitor and why: the current tier, the calculation of the monthly fee based on the **daily average of monitored items**, the invoice history with payment slips (boletos)/payment links and tax invoices, the **fiscal data** used for billing and the **daily audit** that supports each amount.

**How to access:** in the footer of the side menu, click **Billing**. Exclusive to **Administrators**. The screen has three tabs: **Invoices**, **Fiscal Data** and **Daily Audit** (on mobile, the tabs become a drop-down list).

<figure><picture><source srcset="/files/5PE3mgiX6N2gQ8b7j82B" media="(prefers-color-scheme: dark)"><img src="https://3938213054-files.gitbook.io/~/files/v0/b/gitbook-x-prod.appspot.com/o/spaces%2FH2bFRBmIfyK3kwVKbldl%2Fuploads%2Fgit-blob-6bd718e386f0bf2b103cfbbf72af52d24c89a0a6%2Fpm-faturamento-faturas-en.png?alt=media" alt="Invoices tab with the current plan, the average calculation and the invoice history"></picture><figcaption><p>Billing, Invoices tab</p></figcaption></figure>

## What it is for

* Knowing which billing tier the organization is in and how many more items still fit in it.
* Understanding, step by step, how the month's fee was calculated.
* Downloading tax invoices and accessing the payment link for invoices.
* Keeping the CNPJ (Brazilian company tax ID), address, billing emails and due date rules correct for issuing invoices and tax invoices.
* Checking, day by day, how many items were counted and which ones were included in the average.

## How billing works

* **The plan is automatic.** There is no plan to choose: the monthly fee is defined by the **tier** into which the number of monitored items falls. Your organization's tier table appears on the Invoices tab.
* **What counts as an item:** the artifacts (reports, semantic models, dashboards, dataflows, notebooks, pipelines, lakehouses, warehouses and other Fabric/Power BI items) in **monitored workspaces**. Unmonitored workspaces, items deleted from the tenant, and the workspaces, capacities and gateways themselves are not counted.
* **Daily average, not peak.** Every day (around 00:30 Brasília time, UTC-3) Power Monitor records how many items were being monitored. When the month closes, it adds up the items of the measured days and divides by the number of those days; the result, **rounded down**, defines the billed tier. An isolated peak day does not change your invoice.
* **Trial days are not included in the average** (they are recorded, but not billed). Days without a measurement do not count as zero: they are simply left out of the division.
* **There is a minimum amount:** even with zero monitored items, the monthly fee of the lowest tier is charged.
* **Billing for the closed month.** A month's invoice is generated in the first days of the following month, after the cycle is complete.
* **Prorated first month.** The first cycle starts at the end of the free trial; you pay only for the remaining days of the month (the Invoices tab shows the pro-rata discount).

{% hint style="warning" %}
Monitoring more workspaces increases the item base from the day they start being monitored. In particular, turning off workspace monitoring curation (in Governance › Workspaces) immediately starts monitoring **all** workspaces, which may change the tier of the next invoice. Days already measured are not recalculated.
{% endhint %}

### Free trial

* The trial lasts **30 days**, with no credit card.
* During the trial, a notice at the top of the pages shows the end date, with links to review the billing data and to request cancellation. Email reminders are sent 7 days and 1 day before the end, and on the end date itself.
* At the end of the 30 days, the subscription is **activated automatically** and the organization starts being billed (setup fee and monthly fee), as accepted during installation. Anyone who does not want to continue must request cancellation before the end of the trial.
* If the trial ends without fiscal data filled in, the **Billing information required** window appears, which blocks usage until an administrator fills in the data (the Billing screens remain accessible). Users who are not administrators are instructed to ask an administrator.

### Setup fee

Installation has a one-time setup fee, which can be paid in installments (the installment options and amounts appear under **Fiscal Data**). The installments are added to the first monthly invoices. After the trial ends, the installment plan can no longer be changed. Exempt organizations see the notice **This organization is exempt from the setup fee.**

### Exemptions

When the organization is exempt from payment, the screen shows the notice **This organization is exempt from payment and will not be charged for platform usage.**; waived invoices appear with the status **Waived** (100% discount).

## Features

All the features below require the **Administrator** role and start from the **Billing** item, in the footer of the side menu.

### Billing tiers (Monitored artifacts)

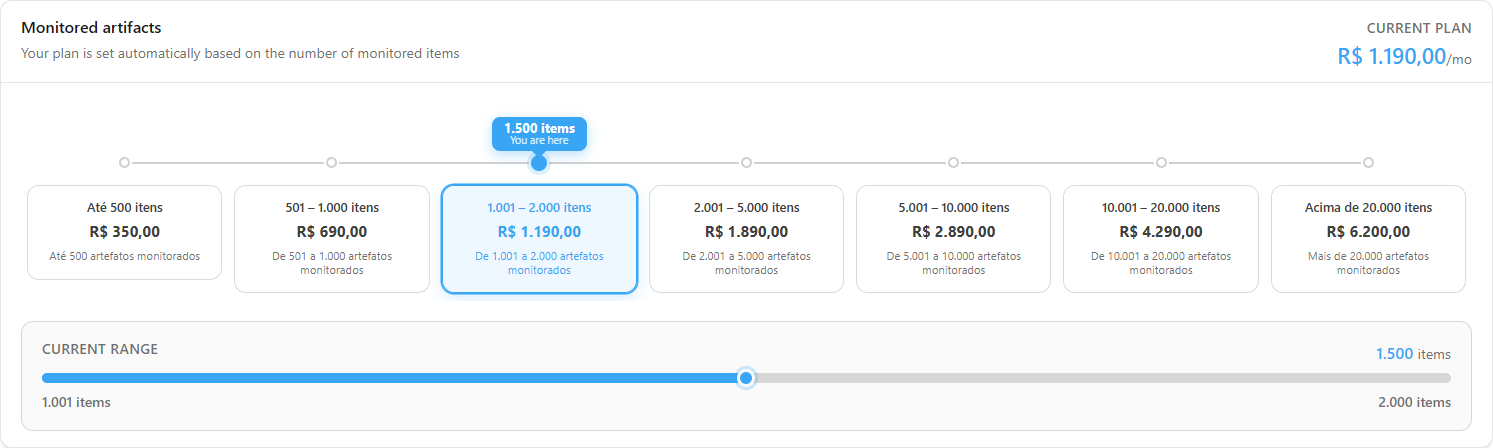
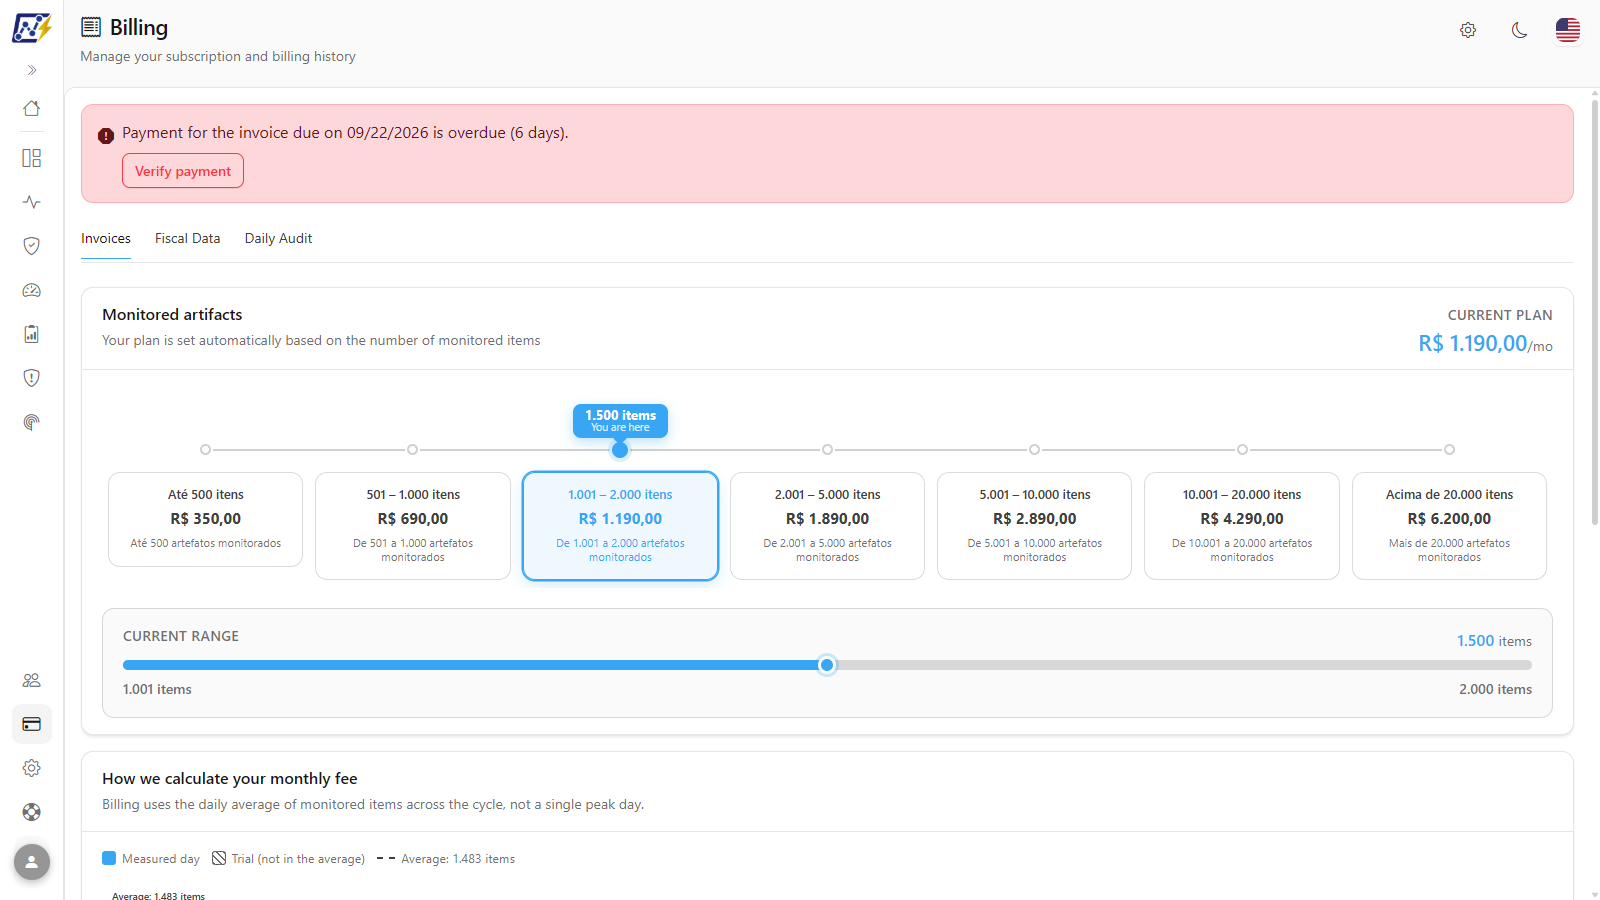
**What it is:** the first card on the **Invoices** tab. It shows the organization's tier table (number of items and monthly price for each one), the **Current plan** with the monthly amount, the **Current range** and the **You are here** marker with the number of items monitored today. The text *Your plan is set automatically based on the number of monitored items* reminds you that there is no manual choice.

**What it is for:** knowing which tier the organization is in and how far it is from changing tiers, before deciding to monitor more (or fewer) workspaces.

<figure><picture><source srcset="/files/gSxpGgHIGpTQzBKK8dJd" media="(prefers-color-scheme: dark)"><img src="https://3938213054-files.gitbook.io/~/files/v0/b/gitbook-x-prod.appspot.com/o/spaces%2FH2bFRBmIfyK3kwVKbldl%2Fuploads%2Fgit-blob-fc2126e4e5f7ad22d3867038ad13b5d883fc0c72%2Fpm-faturamento-faixas-en.png?alt=media" alt="Monitored artifacts card with the billing tiers, the current plan and the You are here marker"></picture><figcaption><p>Billing tiers</p></figcaption></figure>

**How to use:**

1. Open the **Invoices** tab.
2. In the **Monitored artifacts** card, locate the **You are here** marker and compare the number of items with the limits of the **Current range**.
3. Check the monthly amount in **Current plan**. The last tier appears as **Unlimited**.

**How it works:** the **You are here** position uses the current number of monitored items; the tier actually billed for the month is the one for the cycle's **daily average** (see the next card).

### How we calculate your monthly fee

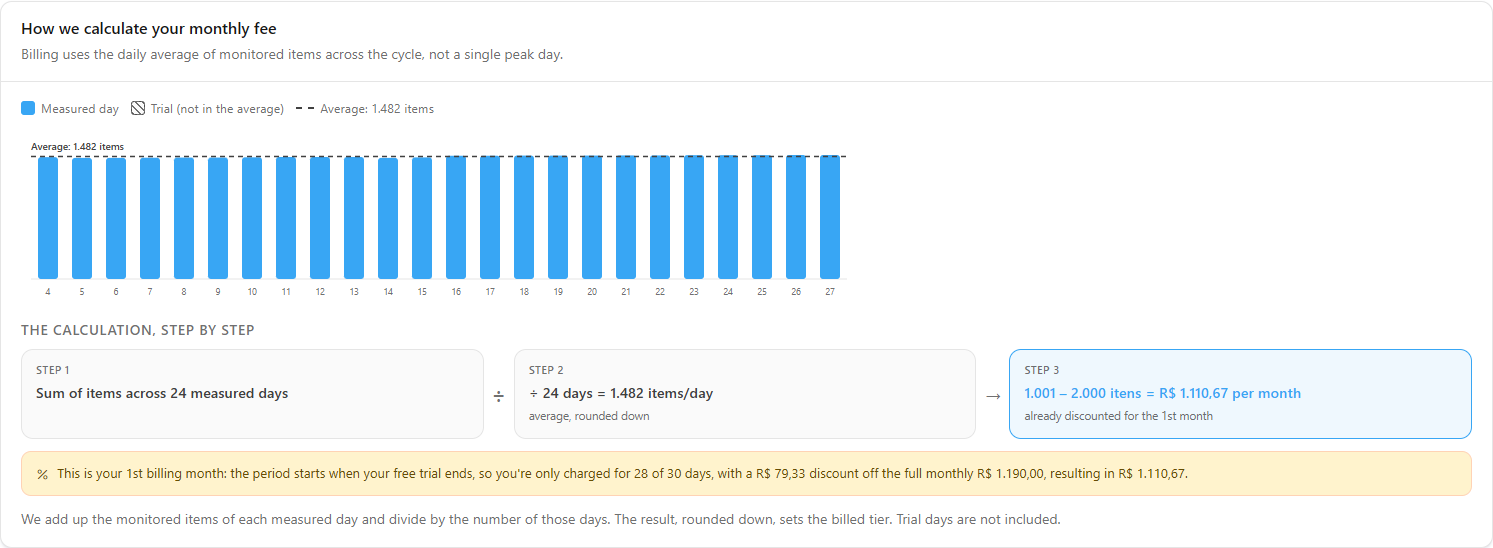
**What it is:** the **How we calculate your monthly fee** card, with a bar chart of the monitored items on each day of the cycle and the calculation in three steps (**The calculation, step by step**).

**What it is for:** understanding and verifying the month's amount, without having to do the math: it shows that billing uses the cycle average, not a peak day.

<figure><picture><source srcset="/files/x04QB8NVl53S5ZVSGfJj" media="(prefers-color-scheme: dark)"><img src="https://3938213054-files.gitbook.io/~/files/v0/b/gitbook-x-prod.appspot.com/o/spaces%2FH2bFRBmIfyK3kwVKbldl%2Fuploads%2Fgit-blob-03a3ca43a25dde67f904b01132711e370851fcde%2Fpm-faturamento-calculo-media-en.png?alt=media" alt="How we calculate your monthly fee card with daily chart and three-step formula"></picture><figcaption><p>How we calculate your monthly fee</p></figcaption></figure>

**How to use:**

1. On the **Invoices** tab, locate the **How we calculate your monthly fee** card.
2. In the chart, each bar is a day of the cycle. Hover over a bar to see the date and the number of items on that day (*measured day* or *trial, not billed*).
3. Read the three steps:
   * **Step 1**: sum of the items of the measured days;
   * **Step 2**: division by the number of days = average items/day (rounded down);
   * **Step 3**: corresponding tier = amount per month (already including the 1st month discount, when applicable).

**How it works:**

* Chart legend: **Measured day** (solid bar), **Trial (not in the average)** (hatched bar) and the **Average: N items** line.
* In the first billing month, a notice explains the prorated amount: how many days of the month are billed, the discount and the resulting amount.
* If there is no measurement in the cycle yet, the message *There are no measured days in this cycle yet: the calculation appears as soon as the first daily measurement is recorded.* appears.

### Current invoice

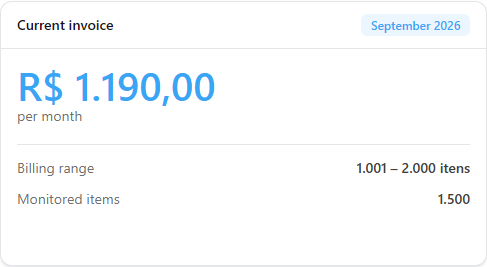
**What it is:** the **Current invoice** card, with the estimated monthly amount for the current cycle (**per month**), the **Billing range** and the **Monitored items**.

**What it is for:** having an estimate for the month in progress, for cost forecasting.

<figure><picture><source srcset="/files/RbWkQpoWGtpaz6Q50pgy" media="(prefers-color-scheme: dark)"><img src="https://3938213054-files.gitbook.io/~/files/v0/b/gitbook-x-prod.appspot.com/o/spaces%2FH2bFRBmIfyK3kwVKbldl%2Fuploads%2Fgit-blob-8ce7f4c0e56d42c45ddafc5b8a9ab20f94b99514%2Fpm-faturamento-fatura-atual-en.png?alt=media" alt="Current invoice card with the estimated amount, the billing range and the monitored items"></picture><figcaption><p>Current invoice</p></figcaption></figure>

**How to use:** on the **Invoices** tab, check the **Current invoice** card. The amount is an estimate: the final invoice is generated in the first days of the following month, with the average for the complete cycle.

### Invoice History

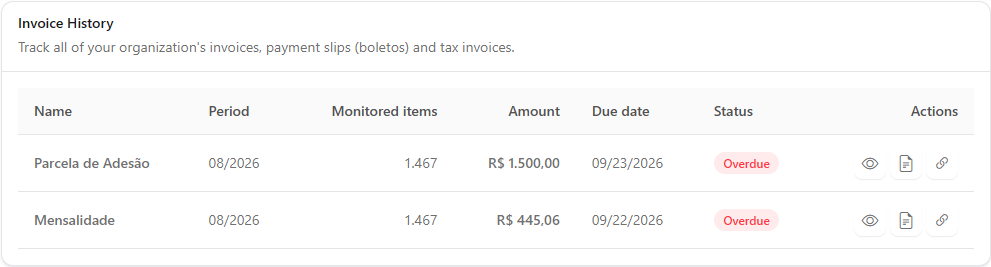
**What it is:** the **Invoice History** table, with all of the organization's charges (monthly fees, setup installments and manual charges).

**What it is for:** tracking what has already been billed and paid, identifying pending items and accessing payment slips, payment links and tax invoices.

<figure><picture><source srcset="/files/gQmot4CVO8Vt3bVKgnnU" media="(prefers-color-scheme: dark)"><img src="https://3938213054-files.gitbook.io/~/files/v0/b/gitbook-x-prod.appspot.com/o/spaces%2FH2bFRBmIfyK3kwVKbldl%2Fuploads%2Fgit-blob-0a7de748f8df65616836315149f0ae8990b9719b%2Fpm-faturamento-acoes-fatura-en.png?alt=media" alt="Invoice History table with name, period, monitored items, amount, due date, status and actions"></picture><figcaption><p>Invoice History</p></figcaption></figure>

| Column              | Content                                                                                                                          |
| ------------------- | -------------------------------------------------------------------------------------------------------------------------------- |
| **Name**            | Identification of the charge.                                                                                                    |
| **Period**          | Reference month.                                                                                                                 |
| **Monitored items** | Average number of items used for billing.                                                                                        |
| **Amount**          | Invoice amount. On waived invoices, hover to see *100% discount*.                                                                |
| **Due date**        | Due date.                                                                                                                        |
| **Status**          | **Paid**, **Pending**, **Awaiting payment**, **Overdue**, **Canceled**, **Waived**, **Not sent**, **Error** or **Not reported**. |
| **Actions**         | **View details**, **Download tax invoice** and **Access payment link**.                                                          |

**How to use:** on the **Invoices** tab, scroll to **Invoice History** and use the buttons in the **Actions** column on the charge's row.

**How it works:**

* An alert icon next to the status (*Charge not sent yet*) indicates a recorded charge that has not yet reached the billing system. The Power Tuning team is already notified and no action is needed from you.
* For the **Waived** status, the tooltip reports that a 100% discount was applied and, when available, the waiver date.
* With no charges, the message *No invoices found.* appears.

<figure><picture><source srcset="/files/gQmot4CVO8Vt3bVKgnnU" media="(prefers-color-scheme: dark)"><img src="https://3938213054-files.gitbook.io/~/files/v0/b/gitbook-x-prod.appspot.com/o/spaces%2FH2bFRBmIfyK3kwVKbldl%2Fuploads%2Fgit-blob-0a7de748f8df65616836315149f0ae8990b9719b%2Fpm-faturamento-acoes-fatura-en.png?alt=media" alt="Invoice History row with the View details, Download tax invoice and Access payment link buttons"></picture><figcaption><p>Invoice actions</p></figcaption></figure>

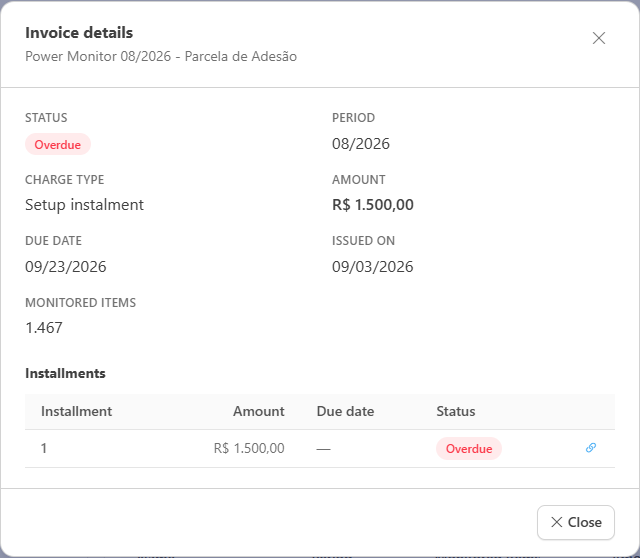
### Invoice details

**What it is:** the **Invoice details** window, opened by the **View details** button (eye icon).

**What it is for:** seeing the full composition of a charge, including the pro-rata discount and each installment, with its own payment link.

<figure><picture><source srcset="/files/EthCkQnxnCdTcxNQ9sEq" media="(prefers-color-scheme: dark)"><img src="https://3938213054-files.gitbook.io/~/files/v0/b/gitbook-x-prod.appspot.com/o/spaces%2FH2bFRBmIfyK3kwVKbldl%2Fuploads%2Fgit-blob-89708f24eff14d0554f62ba89fba6c8c27af8138%2Fpm-faturamento-detalhe-fatura-en.png?alt=media" alt="Invoice details modal with installments and links"></picture><figcaption><p>Invoice details</p></figcaption></figure>

**How to use:**

1. On the **Invoices** tab, locate the charge in **Invoice History**.
2. In the **Actions** column, click **View details** (eye icon).
3. Check the data and the list of **Installments**. Click **Close** to exit.

**What appears:** status, period, **Charge type** (**Monthly fee**, **Setup instalment** or **Manual charge**), amount, **Full amount** and **Pro-rata discount** (when applicable), **Waived on** (waived invoices), due date, **Issued on**, **Paid on**, **Reconciled status**, monitored items and the list of **Installments** (each with amount, due date, status and payment link). With no installments, the message *No installments recorded.* appears. Charges not yet sent show the notice **Charge not sent yet**.

### Paying an invoice (boleto or PIX)

**What it is:** the **Access payment link** button, on the invoice row and on each installment in the details.

**What it is for:** opening the charge page, with the available payment methods (such as boleto and PIX, Brazilian payment methods).

**How to use:**

1. On the **Invoices** tab, locate the charge with status **Pending**, **Awaiting payment** or **Overdue**.
2. Click **Access payment link**. The charge page opens in a new tab.
3. For charges in installments, open **View details** and use the payment link button on the row of each **Installment**.

If the link does not exist yet, the message *Payment link not available.* appears.

### Downloading the tax invoice

**What it is:** the **Download tax invoice** button, on the invoice row.

**What it is for:** obtaining the tax invoice (nota fiscal) for the company's accounting.

**How to use:**

1. On the **Invoices** tab, locate the charge.
2. Click **Download tax invoice**. The document opens in a new tab, from which it can be saved.

If the tax invoice has not been issued yet, the message *Tax invoice not available yet.* appears; try again after it is issued.

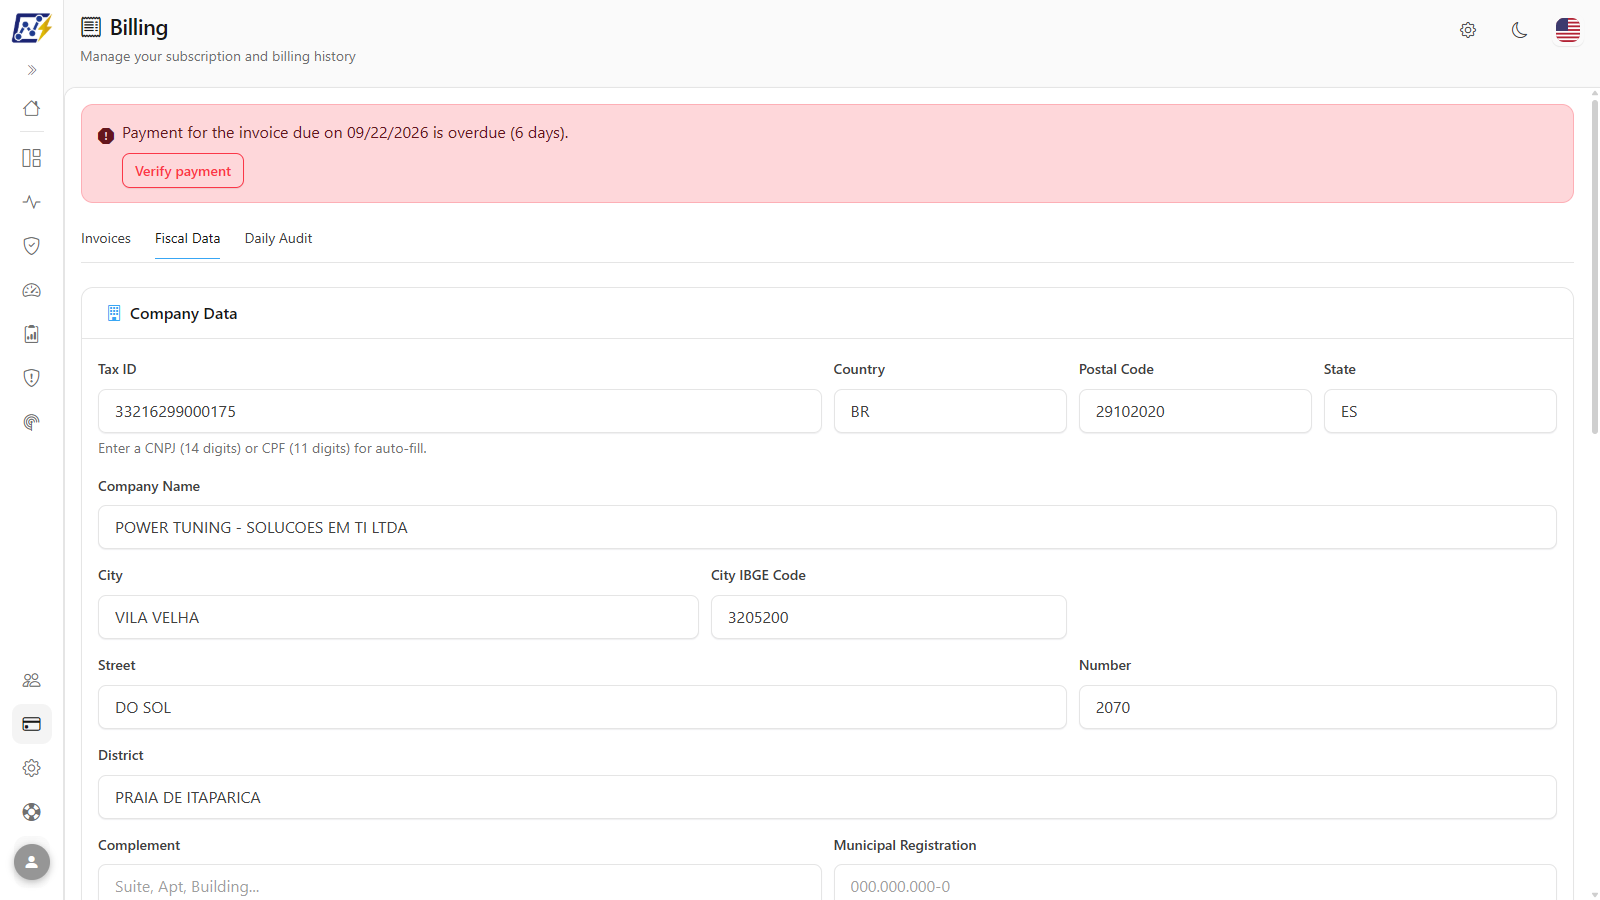
### Company Data

**What it is:** the **Company Data** card, on the **Fiscal Data** tab, with the tax identification and the billing address.

**What it is for:** ensuring that invoices and tax invoices are issued to the right company. Fill it in before the end of the free trial (to avoid the **Billing information required** window) and whenever the CNPJ or address changes.

<figure><picture><source srcset="/files/wgjgt4IBkpqmwnjAZBUM" media="(prefers-color-scheme: dark)"><img src="https://3938213054-files.gitbook.io/~/files/v0/b/gitbook-x-prod.appspot.com/o/spaces%2FH2bFRBmIfyK3kwVKbldl%2Fuploads%2Fgit-blob-fa4cedb99c8863e680dd1ec7bb0b02a53e144786%2Fpm-faturamento-dados-fiscais-en.png?alt=media" alt="Fiscal Data tab with company data and billing settings"></picture><figcaption><p>Fiscal Data</p></figcaption></figure>

| Field                                            | Note                                                                                                                                                                 |
| ------------------------------------------------ | -------------------------------------------------------------------------------------------------------------------------------------------------------------------- |
| **Tax ID (CNPJ)**                                | Enter the CNPJ (14 digits) or CPF (11 digits). For a CNPJ, the company data is filled in automatically from the Brazilian Federal Revenue Service (Receita Federal). |
| **Country**, **Postal Code**, **State**          | Billing address.                                                                                                                                                     |
| **Legal Name**                                   | Required.                                                                                                                                                            |
| **City**                                         | Required.                                                                                                                                                            |
| **City IBGE Code**                               | Required for addresses in Brazil.                                                                                                                                    |
| **Street**, **Number**, **District**, complement | District is required for addresses in Brazil.                                                                                                                        |

**How to use:**

{% stepper %}
{% step %}

### Open the tab

Click the **Fiscal Data** tab.
{% endstep %}

{% step %}

### Enter the CNPJ

In the **Tax ID (CNPJ)** field, type the CNPJ (14 digits) or CPF (11 digits) and leave the field. For a CNPJ, Power Monitor queries the Receita Federal and fills in **Legal Name**, **Trade Name** and address (message *Data filled in successfully.*). If the CNPJ is not found, fill in the fields manually.
{% endstep %}

{% step %}

### Check the address

Review **Country**, **Postal Code**, **State**, **City**, **City IBGE Code**, **Street**, **Number** and **District**. **Legal Name** and **City** are required; for addresses in Brazil, **City IBGE Code** and **District** are too.
{% endstep %}

{% step %}

### Save

Also review the [Billing Settings](#billing-settings) and the [Setup Fee Installments](#setup-fee-installments) and click **Save**. The message *Fiscal data saved successfully!* appears. If a required field is empty, it is highlighted with the corresponding message (e.g. *Company name is required.*).
{% endstep %}
{% endstepper %}

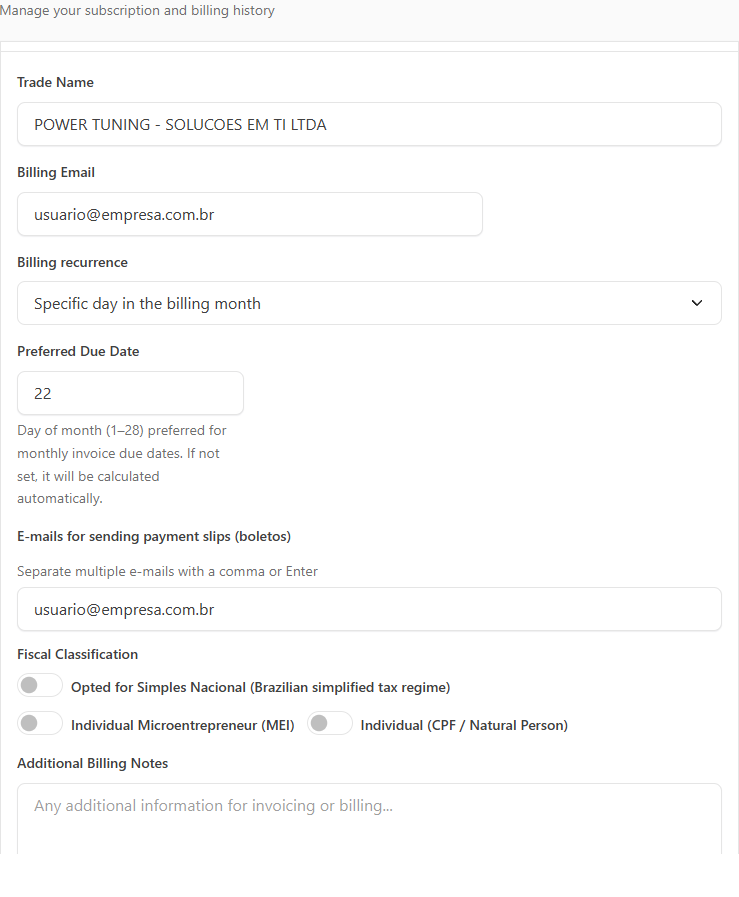
### Billing Settings

**What it is:** the **Billing Settings** card, on the **Fiscal Data** tab, with the billing contacts, the due date rule and the fiscal classification.

**What it is for:** defining who receives payment slips and charges, when invoices are due and how the tax invoice should be issued.

<figure><picture><source srcset="/files/Iz8x6nraygp09zmiPyrK" media="(prefers-color-scheme: dark)"><img src="https://3938213054-files.gitbook.io/~/files/v0/b/gitbook-x-prod.appspot.com/o/spaces%2FH2bFRBmIfyK3kwVKbldl%2Fuploads%2Fgit-blob-0579a10872e1d10bed27e43d9850ff3b89b6a978%2Fpm-faturamento-dados-fiscais-configuracoes-en.png?alt=media" alt="Billing Settings card with billing email, recurrence, due date, emails for payment slips and fiscal classification"></picture><figcaption><p>Billing Settings</p></figcaption></figure>

| Field                                           | Note                                                                                                                                                                                                                  |
| ----------------------------------------------- | --------------------------------------------------------------------------------------------------------------------------------------------------------------------------------------------------------------------- |
| **Trade Name**                                  | Filled in automatically via the CNPJ.                                                                                                                                                                                 |
| **Billing Email**                               | Main finance email.                                                                                                                                                                                                   |
| **Billing recurrence**                          | How the due date is calculated: **Days after the 1st day of the billing month**, **Specific day in the billing month**, **Specific day in the month after billing** or **Days from the billing date**.                |
| **Preferred Due Date** / **Due date (days)**    | Depending on the recurrence: a day of the month (1 to 28) or a number of days (up to 90). If left blank, the due date is calculated automatically. Due dates too close to the issue date move to the following month. |
| **E-mails for sending payment slips (boletos)** | One or more emails (separate with a comma or Enter).                                                                                                                                                                  |
| **Fiscal Classification**                       | **Opted for Simples Nacional (Brazilian simplified tax regime)**, **Individual Microentrepreneur (MEI)** or **Individual (CPF / Natural Person)**.                                                                    |
| **Additional Billing Notes**                    | Information for issuing the tax invoice or the charge.                                                                                                                                                                |

**How to use:**

1. On the **Fiscal Data** tab, go to the **Billing Settings** card.
2. Fill in the **Billing Email**, choose the **Billing recurrence** and enter the corresponding due date.
3. Add the **E-mails for sending payment slips (boletos)** (separate with a comma or Enter), check the applicable **Fiscal Classification** and, if needed, the **Additional Billing Notes**.
4. Click **Save**.

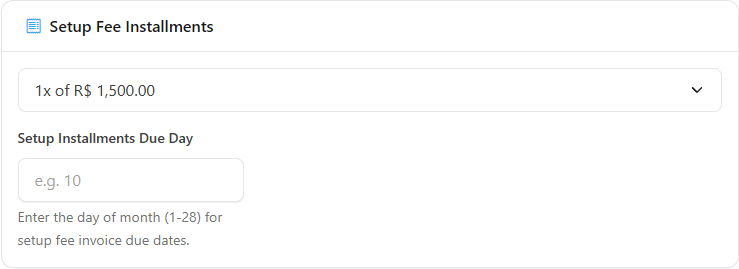
### Setup Fee Installments

**What it is:** the **Setup Fee Installments** card, on the **Fiscal Data** tab, with the options 1x, 2x or 3x (and the amount for each) and the **Setup Installments Due Day**.

**What it is for:** choosing how to pay the one-time installation setup fee.

<figure><picture><source srcset="/files/mpfFSeIJYrrn4CuI4AuE" media="(prefers-color-scheme: dark)"><img src="https://3938213054-files.gitbook.io/~/files/v0/b/gitbook-x-prod.appspot.com/o/spaces%2FH2bFRBmIfyK3kwVKbldl%2Fuploads%2Fgit-blob-559837a21f1a20207090ba14e59f358c2ed7636e%2Fpm-faturamento-dados-fiscais-parcelamento-en.png?alt=media" alt="Setup Fee Installments card with the installment options and the due day"></picture><figcaption><p>Setup Fee Installments</p></figcaption></figure>

**How to use:**

1. On the **Fiscal Data** tab, go to the **Setup Fee Installments** card.
2. Choose 1x, 2x or 3x and enter the **Setup Installments Due Day** (1 to 28).
3. Click **Save**.

**How it works:** the installments are added to the first monthly invoices. After the trial ends, the installment plan can no longer be changed. Exempt organizations see the notice **This organization is exempt from the setup fee.**

### Billed Average (Daily Audit)

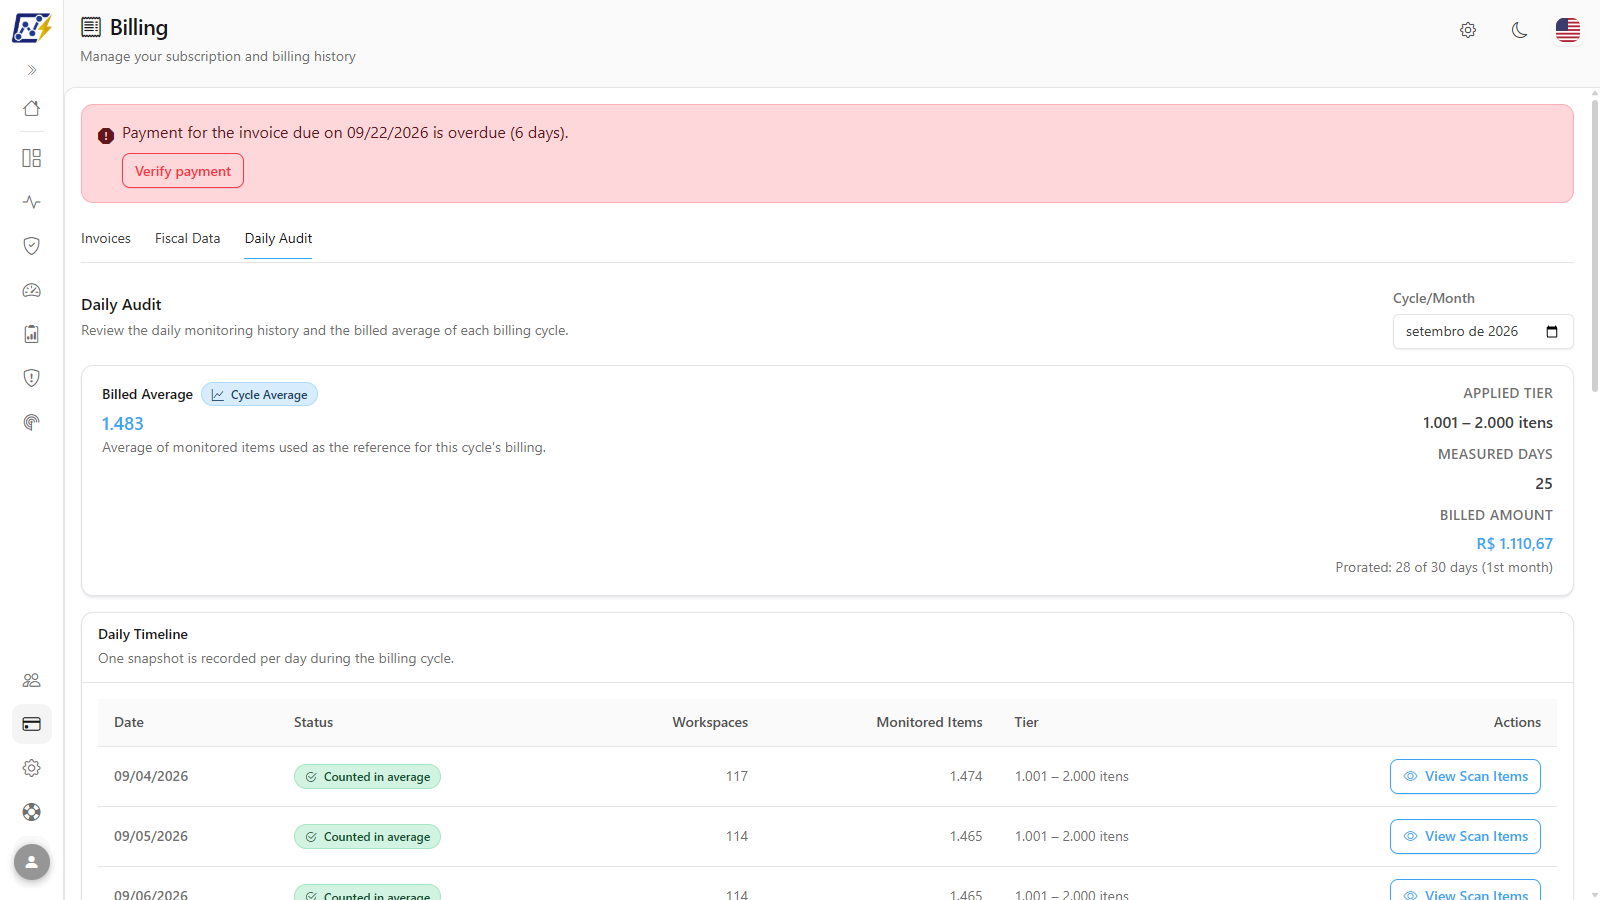
**What it is:** the **Daily Audit** tab starts with the **Cycle/Month** selector and the **Billed Average** card (**Cycle Average** badge), with the **Applied Tier**, **Average Items**, **Billed Amount** and **Measured Days** for the chosen cycle.

**What it is for:** checking, for any month, which average and which tier were used for billing, as proof of the billed amount.

<figure><picture><source srcset="/files/lYoq8pACoWEuO2OOOtFo" media="(prefers-color-scheme: dark)"><img src="https://3938213054-files.gitbook.io/~/files/v0/b/gitbook-x-prod.appspot.com/o/spaces%2FH2bFRBmIfyK3kwVKbldl%2Fuploads%2Fgit-blob-3d145979c01f5d4bbf2034aaf872556703affea9%2Fpm-faturamento-auditoria-diaria-en.png?alt=media" alt="Daily Audit tab with the Billed Average card and the Daily Timeline"></picture><figcaption><p>Daily Audit</p></figcaption></figure>

<figure><picture><source srcset="/files/F5AC2SfbhHrgkYnXBLi5" media="(prefers-color-scheme: dark)"><img src="https://3938213054-files.gitbook.io/~/files/v0/b/gitbook-x-prod.appspot.com/o/spaces%2FH2bFRBmIfyK3kwVKbldl%2Fuploads%2Fgit-blob-d3686b4042e4b76ff9d41a2b6b525e46513d15ef%2Fpm-faturamento-auditoria-media-cobrada-en.png?alt=media" alt="Billed Average card with applied tier, average items, billed amount and measured days"></picture><figcaption><p>Billed Average</p></figcaption></figure>

**How to use:**

1. Open the **Daily Audit** tab.
2. In **Cycle/Month**, choose the month.
3. In the **Billed Average** card, see the **Applied Tier**, **Average Items**, **Billed Amount** and **Measured Days**.

**How it works:** in the first billing month, the card indicates the proration (*Prorated: X of Y days (1st month)*). With no average recorded for the cycle, the message *No average recorded for this cycle yet.* appears.

### Daily Timeline

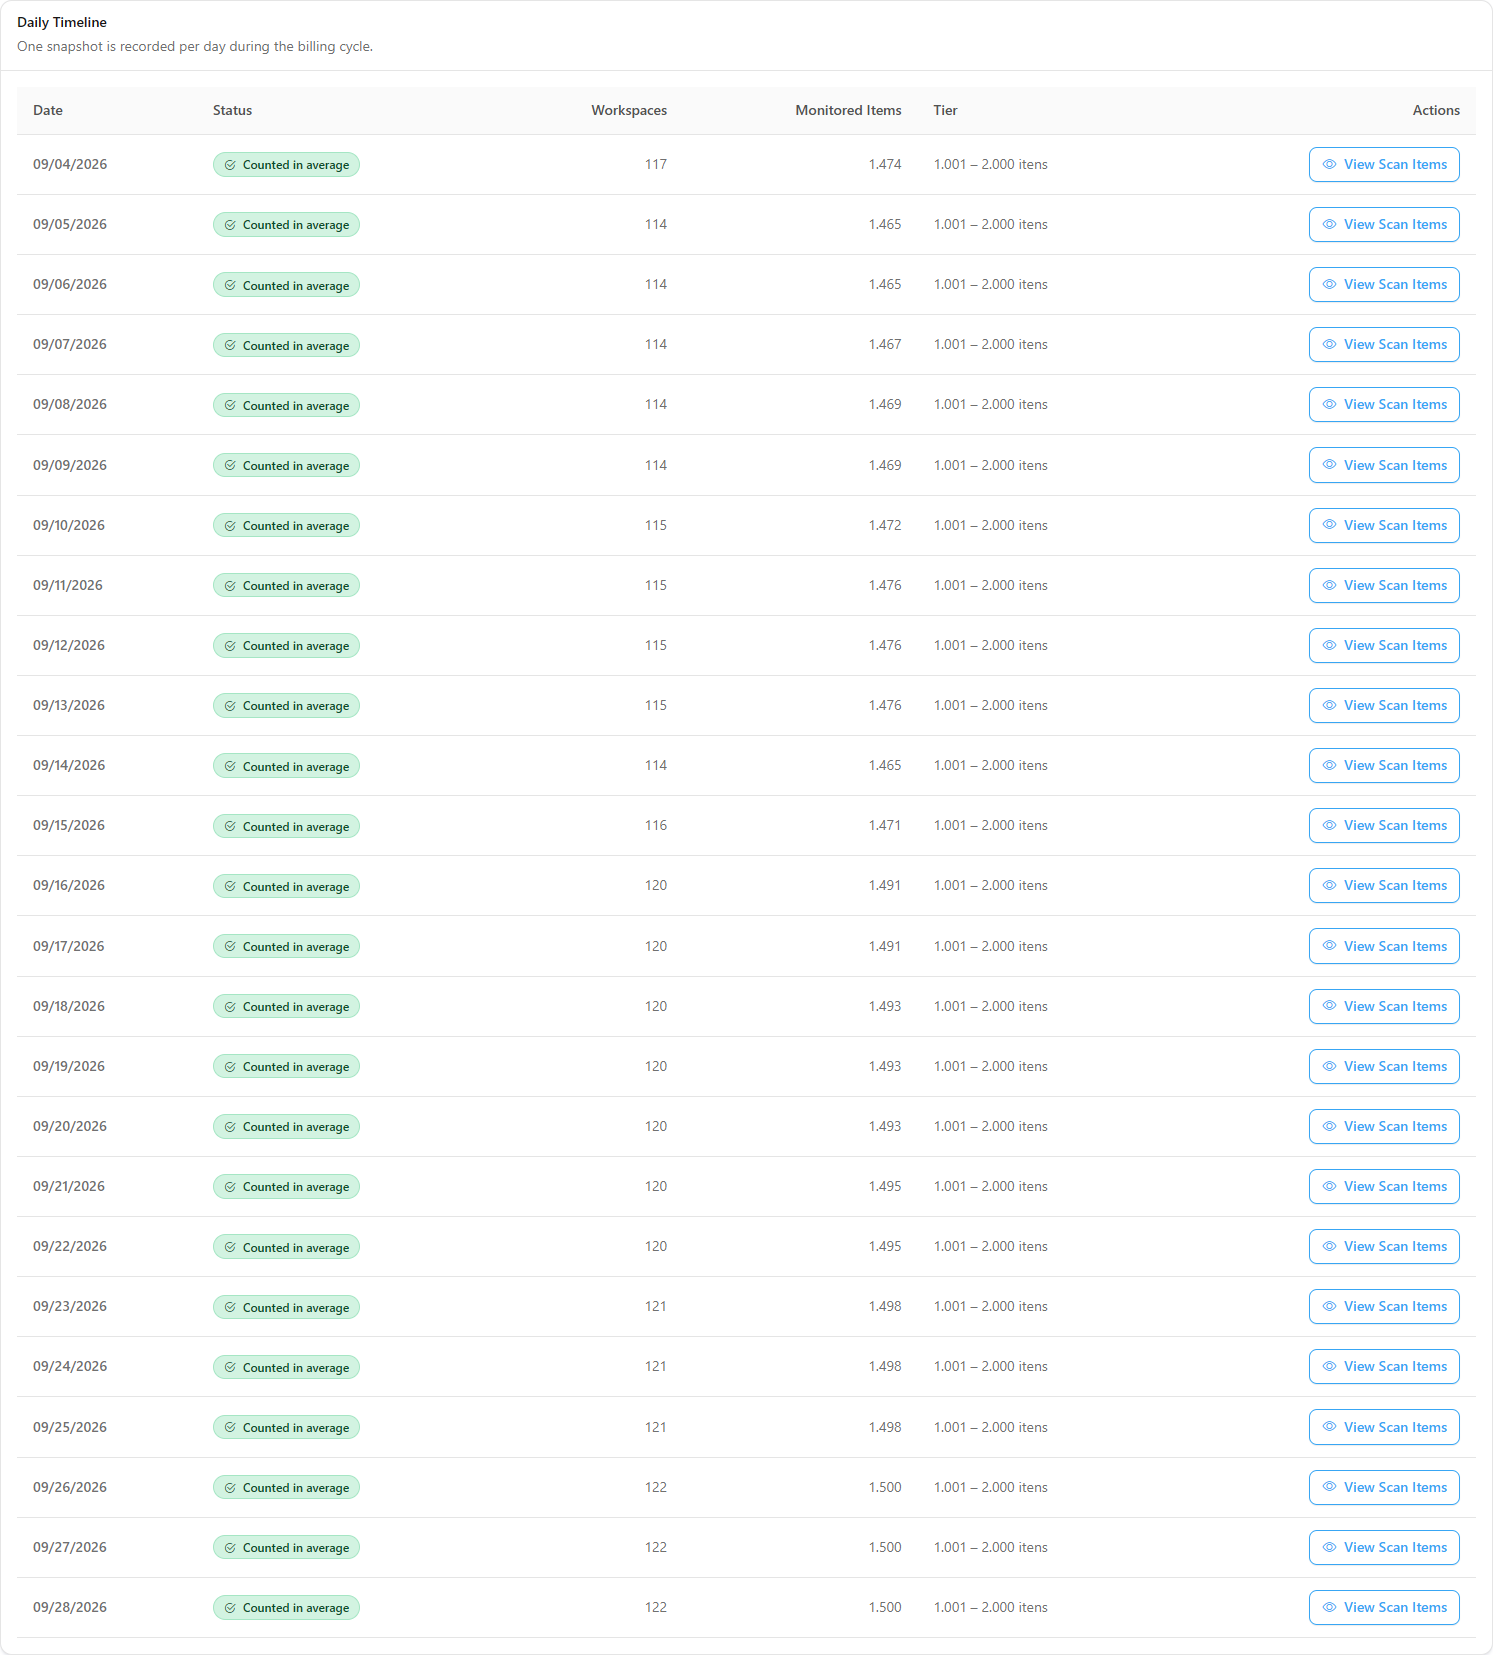
**What it is:** the **Daily Timeline** table, on the **Daily Audit** tab, with one record per day of the cycle: **Date**, **Status**, **Workspaces**, **Monitored Items**, **Tier** and the **View Scan Items** action.

**What it is for:** seeing, day by day, how many workspaces and items were monitored and which days were included in the average, to find the days that pushed the invoice up.

<figure><picture><source srcset="/files/w14vpVTaDeO6E0h0YZhv" media="(prefers-color-scheme: dark)"><img src="https://3938213054-files.gitbook.io/~/files/v0/b/gitbook-x-prod.appspot.com/o/spaces%2FH2bFRBmIfyK3kwVKbldl%2Fuploads%2Fgit-blob-f28946a1f041c6688ea8170f08c7fd3fc5a055d7%2Fpm-faturamento-auditoria-linha-do-tempo-en.png?alt=media" alt="Daily Timeline table with date, status, workspaces, monitored items, tier and the View Scan Items action"></picture><figcaption><p>Daily Timeline</p></figcaption></figure>

**How to use:**

1. On the **Daily Audit** tab, choose the **Cycle/Month**.
2. In the **Daily Timeline**, check each day: **Status**, **Workspaces**, **Monitored Items** and **Tier**.

**How it works:** the **Status** is **Counted in average** (measured day, included in the calculation) or **Trial (not billed)** (free trial day, recorded but excluded from the average). With no records in the cycle, the message *No snapshots found for this cycle.* appears.

### Scan Items for a day

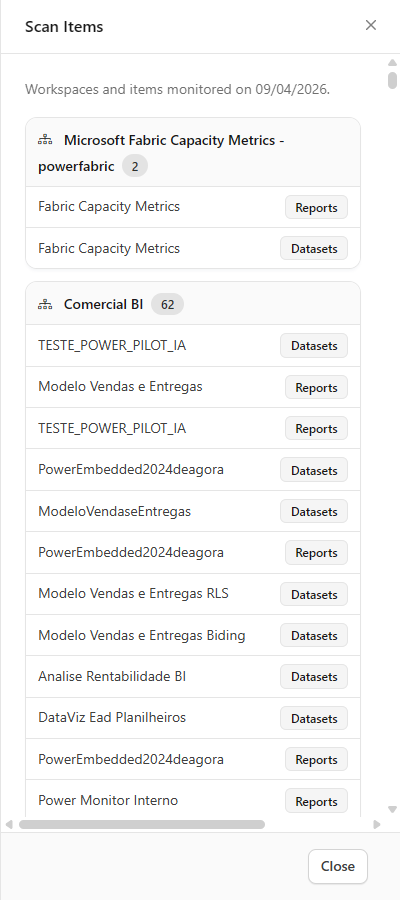
**What it is:** the **Scan Items** side panel, opened by the **View Scan Items** action for a day in the Timeline. It lists, grouped by workspace, the items monitored on that date.

**What it is for:** knowing exactly which workspaces and items were counted on a day, to validate the billing or decide what to stop monitoring.

<figure><picture><source srcset="/files/iNrHAJu1T5FtHRckSOuz" media="(prefers-color-scheme: dark)"><img src="https://3938213054-files.gitbook.io/~/files/v0/b/gitbook-x-prod.appspot.com/o/spaces%2FH2bFRBmIfyK3kwVKbldl%2Fuploads%2Fgit-blob-1c102cf1cfa6f2d6fd4640b9c8a6a280f8212216%2Fpm-faturamento-auditoria-itens-scan-en.png?alt=media" alt="Scan Items side panel with the workspaces and items for a day"></picture><figcaption><p>Scan Items for a day</p></figcaption></figure>

**How to use:**

1. On the **Daily Audit** tab, choose the **Cycle/Month**.
2. In the **Daily Timeline**, click **View Scan Items** on the desired day.
3. Check the workspaces and items monitored on that date. Click **Close** to go back.

**Example: investigating why the invoice came in a higher tier**

{% stepper %}
{% step %}

### See the average

On the **Daily Audit** tab, choose the cycle and check the **Average Items** and the **Applied Tier**.
{% endstep %}

{% step %}

### Find the days that pushed the average up

In the **Daily Timeline**, compare the **Monitored Items** and **Workspaces** for each day.
{% endstep %}

{% step %}

### See what was being monitored

Click **View Scan Items** on the day with the most items to see the workspaces and items counted.
{% endstep %}

{% step %}

### Adjust monitoring

If a workspace does not need to be monitored, stop monitoring it in [Governance › Workspaces](/en/power-monitor/governanca/workspaces.md). The change takes effect from the next daily measurement; days already measured are not recalculated.
{% endstep %}
{% endstepper %}

### Overdue payment notice and Verify payment

**What it is:** when an invoice passes its due date without an identified payment, a **red notice appears at the top of the pages** (and on the Billing screen itself) stating the due date and how many days the payment is overdue, with a link to the Billing page and the **Verify payment** button.

**What it is for:** warning the organization before a block and allowing an already made payment to be confirmed right away.

**How to use:**

1. With the red overdue notice visible, click **Verify payment**.
2. If the payment has already cleared, the notice disappears.
3. If not, the message *Payment not identified yet. Please try again later.* appears. If you click again too quickly, the message *Please wait a few seconds before trying again.* appears.

**How it works / rules:**

* The notice can be closed, but it comes back when you change pages as long as the pending item exists.
* The system may be **blocked if the delay exceeds 30 days**. With the organization blocked, users see the **Organization blocked** screen, with instructions to contact support.
* Interest and late fees, when applicable, are calculated on the charge itself.

## Frequently asked questions

<details>

<summary>Can I choose a smaller plan?</summary>

There is no plan choice: the tier is always the one for the daily average of monitored items. To pay less, reduce the number of monitored workspaces.

</details>

<details>

<summary>A new workspace appeared in the tenant. Is it already included in billing?</summary>

With monitoring curation turned on (default), new workspaces are created **unmonitored** and are only counted when someone starts monitoring them. With curation turned off, all workspaces are monitored and billed.

</details>

<details>

<summary>I removed a workspace from monitoring (or deleted items). When does the monthly fee go down?</summary>

The count is daily, at around 00:30 (Brasília time). An unmonitored workspace stops counting from the next daily record, and a deleted item stops counting after a scan detects the deletion. Previous days are not recalculated: the month's invoice uses the average of the measured days (rounded down, without trial days), so the reduction shows up in proportion to the days that remain. Check it day by day in **Daily Audit** (**Daily Timeline** and **View Scan Items**). See also [What counts as an artifact](/en/perguntas-frequentes/licenciamento/o-que-e-contado-como-artefato.md#when-does-an-item-stop-being-counted).

</details>

<details>

<summary>I paid, but the overdue notice is still there.</summary>

Clearing can take some time. Use **Verify payment** to check right away. If it persists, contact [Support](/en/power-monitor/suporte.md).

</details>

<details>

<summary>Who sees the trial and overdue payment notices?</summary>

The notices at the top of the pages appear for all users in the organization. The Billing screen and editing the fiscal data are exclusive to Administrators.

</details>

## Related pages

* [How much does Power Monitor cost?](/en/readme/quanto-custa-o-power-monitor.md)
* [Governance › Workspaces](/en/power-monitor/governanca/workspaces.md)
* [Interface and navigation](/en/power-monitor/interface-e-navegacao.md): notices at the top of the pages and error screens.
* [Support](/en/power-monitor/suporte.md)


---

# Agent Instructions
This documentation is published with GitBook. GitBook is the documentation platform designed so that both humans and AI agents can read, navigate, and reason over technical content effectively. Learn more at gitbook.com.

## Querying This Documentation
If you need additional information that is not directly available in this page, you can query the documentation by asking a question.

Perform an HTTP GET request on the following URL with the `ask` and `goal` query parameters:

```
GET https://docs.powermonitor.com.br/en/power-monitor/faturamento.md?ask=<question>&goal=<user_goal>
```

`ask` is the immediate question: it should be specific, self-contained, and written in natural language.
`goal` is what the user is ultimately trying to achieve, the reason they need the answer. Sharing it helps GitBook give you a better, more relevant answer. A goal is most helpful when it describes the outcome the user wants rather than restating the question. For example, with `ask=how do I create an API token`, a goal like `automate deployments from our CI pipeline` lets GitBook tailor the answer to that use case.

The response will contain a direct answer to the question and relevant excerpts and sources from the documentation.

Use this mechanism when the answer is not explicitly present in the current page, you need clarification or additional context, or you want to retrieve related documentation sections.