> For the complete documentation index, see [llms.txt](https://docs.powermonitor.com.br/llms.txt). Markdown versions of documentation pages are available by appending `.md` to page URLs; this page is available as [Markdown](https://docs.powermonitor.com.br/en/power-monitor/suporte.md).
# Support
Open and track technical support tickets with the Power Monitor team without leaving the platform.
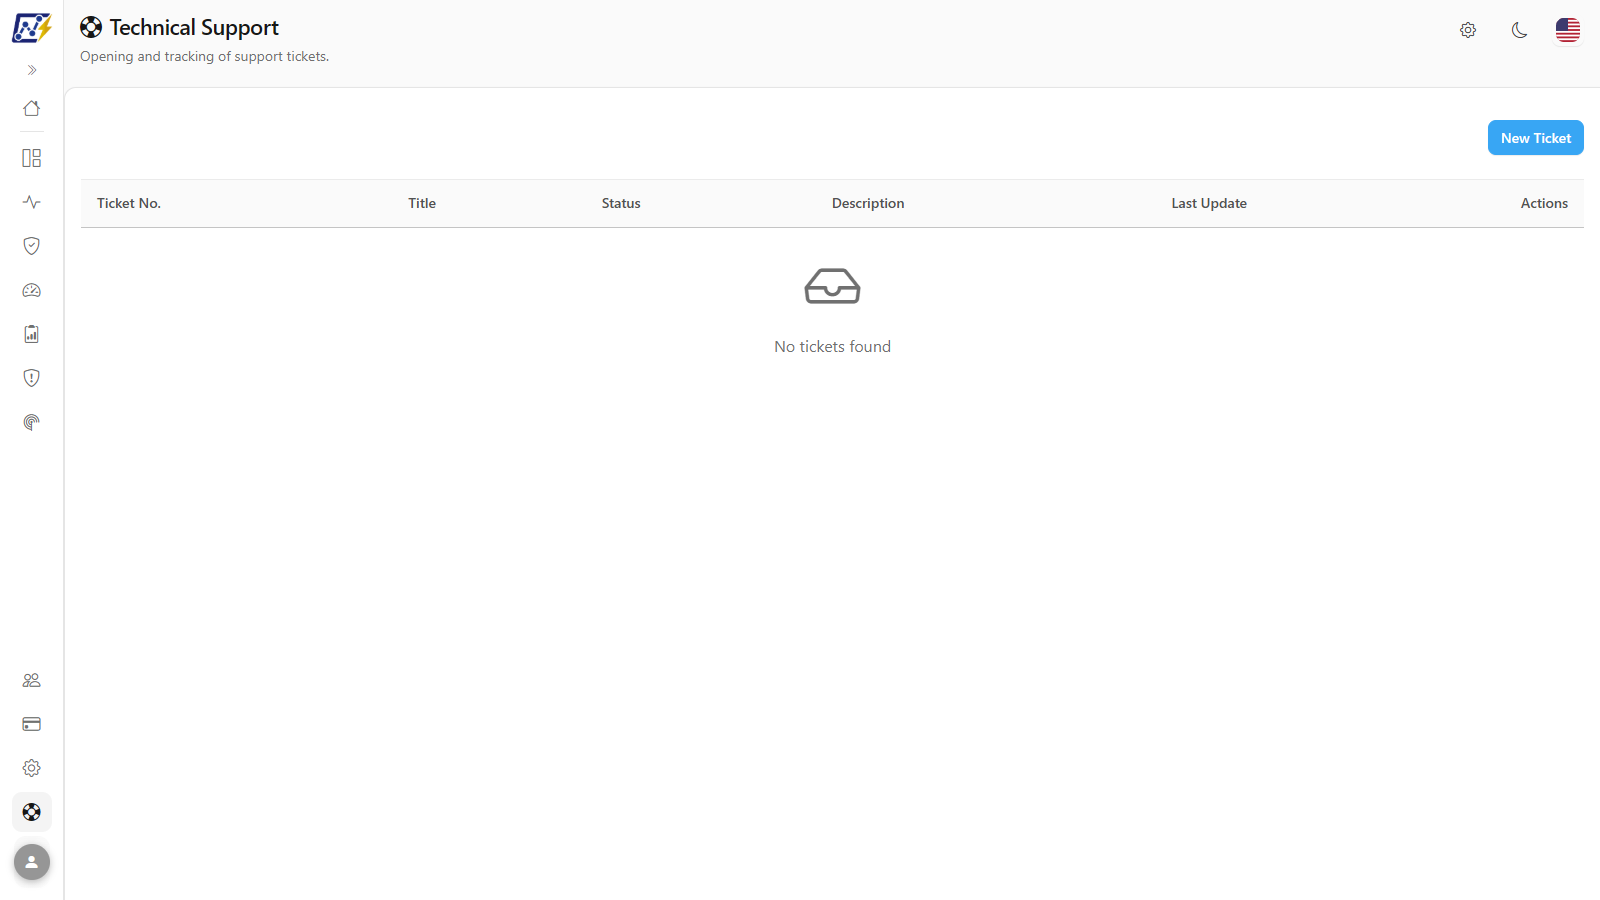
The **Support** screen (titled **Technical Support**) lets you open tickets with the Power Monitor team and track the progress of each one, with a comment history.
**How to access:** at the bottom of the side menu, click **Support**. Available to **all users** in the organization (Users and Administrators).
Technical Support
## What it is for
* Reporting a problem (for example, a data collection that stopped or a value that does not match).
* Asking for help with configuration or permissions.
* Tracking the team's response and adding information through comments.
{% hint style="warning" %}
**Be careful with sensitive data.** Do not include passwords, client secrets, API keys, connection strings or personal or customer data in the description or comments. To identify a resource, provide the name of the workspace/item or the identifier displayed in Power Monitor.
{% endhint %}
## Features
The features below are available to any user in the organization, from the **Support** item at the bottom of the side menu.
### Ticket list
**What it is:** the main table on the screen, with the **organization's** tickets (not just yours).
**What it is for:** seeing what has already been reported and the status of each ticket, avoiding duplicate tickets about the same problem.
| Column | Content |
| --------------- | -------------------------------------------- |
| **Ticket No.** | Ticket number. |
| **Title** | Summary provided when the ticket was opened. |
| **Status** | **Open**, **In progress** or **Closed**. |
| **Description** | Ticket text. |
| **Last Update** | Date of the latest activity. |
| **Actions** | **View details** (eye icon). |
**How to use:**
1. Find the ticket by its **Ticket No.** or **Title**.
2. Check the **Status** and **Last Update** to see whether there has been any activity.
3. Click **View details** to open the history (see [Ticket Details](#ticket-details)).
**How it works:** the status follows the ticket's progress with the Power Monitor team: **Open** (received, not yet started), **In progress** (being handled) and **Closed** (completed). If the organization has no tickets, *No tickets found* is displayed.
### Open a ticket (New Ticket)
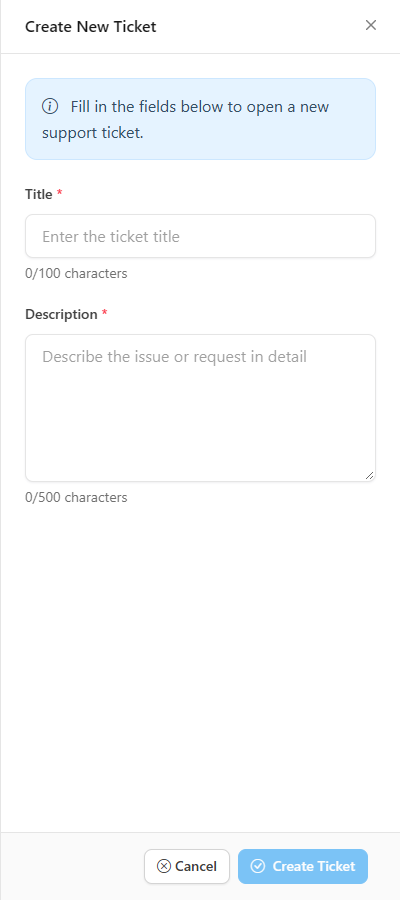
**What it is:** the **New Ticket** button, which opens the **Create New Ticket** side panel with the **Title** and **Description** fields.
**What it is for:** reporting a problem or asking the Power Monitor team for help without leaving the platform.
Create New Ticket
| Field | Rule |
| --------------- | --------------------------------------------------------------------------------------------------------------------------------- |
| **Title** | Required, up to 100 characters. |
| **Description** | Required, up to 500 characters. Describe the problem or request with as much context as possible (screen, workspace, item, time). |
**How to use:**
{% stepper %}
{% step %}
### Open the form
Click **New Ticket**. The **Create New Ticket** side panel opens.
{% endstep %}
{% step %}
### Describe the problem
Fill in **Title** (up to 100 characters) and **Description** (up to 500 characters). The counters below each field show how many characters have been used. Specify the screen, workspace or item involved and when the problem occurred, without pasting sensitive data.
{% endstep %}
{% step %}
### Submit
Click **Create Ticket** (the button is enabled only when both fields are filled in). The panel closes and the ticket appears in the list with the **Open** status. If something fails, *Could not create the ticket. Please try again in a moment.* is displayed.
{% endstep %}
{% endstepper %}
To give up, click **Cancel**: the panel closes and the form is cleared.
**How it works:** the ticket is recorded with the organization's name and your email. Empty fields or fields over the limit show *Title is required*, *Description is required*, *Title cannot be longer than 100 characters* or *Description cannot be longer than 500 characters*.
### Ticket Details
**What it is:** the **Ticket Details** side panel, opened with **View details**. It shows the title and description, the **Status**, the **Last Update**, the **Last Update Reason** (when there is one) and the **Comment History**.
**What it is for:** tracking the team's response and seeing the entire ticket conversation.
**How to use:**
1. In the list, click **View details** (**Actions** column) on the desired ticket.
2. Check the **Status**, the **Last Update Reason** and the **Comment History**. If there are no comments, *No comments yet* is displayed.
3. Click **Close** to return to the list.
### Reply to or add information to a ticket
**What it is:** the **Add Comment** field, at the end of the **Ticket Details** panel.
**What it is for:** answering a question from the team or adding information (a new time when the problem occurred, the name of another affected item, etc.).
**How to use:**
1. Open the ticket with **View details**.
2. In the **Add Comment** field, write the reply or the additional information (up to 500 characters; the counter shows how many have been used).
3. Click **Add Comment**. The comment is added to the **Comment History** and the field is cleared. If something fails, *Could not add the comment. Please try again in a moment.* is displayed.
## Other channels
In addition to tickets, you can [schedule a support session](https://powermonitor.com.br/suporte) or contact us on [WhatsApp](https://powermonitor.com.br/whatsapp).
## Frequently asked questions
I see tickets that I did not open. Is that normal?
Yes. The list shows all of the organization's tickets, so the team can keep track of what has already been reported.
How do I know the ticket has been answered?
Open **View details**: the status and the **Comment History** show the team's activity.
## Related pages
* [Frequently asked questions](/en/perguntas-frequentes.md)
* [Interface and navigation](/en/power-monitor/interface-e-navegacao.md)
---
# Agent Instructions
This documentation is published with GitBook. GitBook is the documentation platform designed so that both humans and AI agents can read, navigate, and reason over technical content effectively. Learn more at gitbook.com.
## Querying This Documentation
If you need additional information that is not directly available in this page, you can query the documentation by asking a question.
Perform an HTTP GET request on the following URL with the `ask` and `goal` query parameters:
```
GET https://docs.powermonitor.com.br/en/power-monitor/suporte.md?ask=&goal=
```
`ask` is the immediate question: it should be specific, self-contained, and written in natural language.
`goal` is what the user is ultimately trying to achieve, the reason they need the answer. Sharing it helps GitBook give you a better, more relevant answer. A goal is most helpful when it describes the outcome the user wants rather than restating the question. For example, with `ask=how do I create an API token`, a goal like `automate deployments from our CI pipeline` lets GitBook tailor the answer to that use case.
The response will contain a direct answer to the question and relevant excerpts and sources from the documentation.
Use this mechanism when the answer is not explicitly present in the current page, you need clarification or additional context, or you want to retrieve related documentation sections.