> For the complete documentation index, see [llms.txt](https://docs.powermonitor.com.br/llms.txt). Markdown versions of documentation pages are available by appending `.md` to page URLs; this page is available as [Markdown](https://docs.powermonitor.com.br/en/power-monitor/usuarios.md).

# Users

Manage who accesses Power Monitor, each person's role, what each person sees (workspaces and pages) and the individual AI spend limit.

The **Users** screen is where the administrator controls who accesses Power Monitor and with what reach: each person's **role** (User or Administrator), the **workspaces** they can see and receive alerts from, the menu **pages** available to them and the **monthly AI spend limit**.

**How to access:** at the bottom of the side menu, click **Users**. The screen is restricted to **Administrators**: for people with the User role, the server rejects the user list and every action on this screen and on the profiles screen, even if they open the address directly.

<figure><picture><source srcset="/files/A1gX97623kT36NgqedIC" media="(prefers-color-scheme: dark)"><img src="https://3938213054-files.gitbook.io/~/files/v0/b/gitbook-x-prod.appspot.com/o/spaces%2FH2bFRBmIfyK3kwVKbldl%2Fuploads%2Fgit-blob-7339386c475586da61e6dac277d46a6b5af20cda%2Fpm-usuarios-lista-en.png?alt=media" alt="Users screen with filters, action buttons and the users table"></picture><figcaption><p>Users screen</p></figcaption></figure>

## What it is for

* Giving new people access to Power Monitor, one by one or in bulk (Microsoft Entra ID or CSV file).
* Defining, through the **profile**, who is an **Administrator** (can configure, trigger actions and manage the organization) and who is a **User** (read access).
* Restricting what each person sees: for example, a department's team sees only the department's workspaces.
* Defining who receives the **alert emails** for each workspace.
* Hiding menu pages, and also blocking access to their data, for specific profiles (for example, an auditor who only needs the Audit screens).
* Controlling the AI budget per person.
* Exporting the user records for review or internal audit.

## Roles

| Role              | What they can do                                                                                                                                                                                                                                                                                                                                                                                       |
| ----------------- | ------------------------------------------------------------------------------------------------------------------------------------------------------------------------------------------------------------------------------------------------------------------------------------------------------------------------------------------------------------------------------------------------------ |
| **User**          | Views the screens made available to them (dashboards, monitoring, governance, data quality, audit), uses the AI assistant and Support. Does not use **Users** or profile management, and does not perform write actions (toggles, triggering scans, editing metadata, etc.). With the **Member** profile, also cannot access the Administrator-only pages (see [Predefined profiles](#user-profiles)). |
| **Administrator** | Everything the User does, plus: **Users**, **Billing**, **Settings** and the **Mapping** menu, and all write actions on the screens. Never has blocked pages.                                                                                                                                                                                                                                          |

The role is not chosen directly: it is **defined by the user's profile**. The **Admin** profile gives the **Administrator** role; any other profile (**Member**, **Audit** or custom) gives the **User** role. To make someone an Administrator, or to remove that status, change their profile (see [Switch a user's profile](#switch-a-users-profile)).

The only exception is **whoever creates the organization** (the first user, who performs the installation): they always join with the **Admin** profile, whatever the default profile, so that the organization is never left without an Administrator able to finish the setup and grant the permissions.

{% hint style="info" %}
The Power Monitor default is **"open screen, restricted action"**: most screens are visible to everyone, but buttons that change something (turning on monitoring, triggering a scan, editing metadata, granting permissions) only work for Administrators. [Page blocking](#page-access) adds a second layer: a page blocked for a person is left out of the menu and also returns no data.
{% endhint %}

## Features

All the features below require the **Administrator** role and start from the **Users** item at the bottom of the side menu.

In the action bar, from left to right: **User Profiles**, **Import**, **Hide data**, **Export** and **Create User**. On narrow screens (phones), the filters and buttons stack, and the forms open full screen with the tabs replaced by a selection list.

### Search and workspace filter

**What it is:** the bar on the left of the screen, with the **Name or email** field, the **Workspace** list and the **Clear filters** button. Below it, the **Showing X of Y records** counter shows how many users match the filters.

**What it is for:** quickly finding a person in large user lists, or checking who has a specific configuration for a workspace (for example, before changing the team responsible for it).

<figure><picture><source srcset="/files/11pGN7DDUVN8kddLVe4H" media="(prefers-color-scheme: dark)"><img src="https://3938213054-files.gitbook.io/~/files/v0/b/gitbook-x-prod.appspot.com/o/spaces%2FH2bFRBmIfyK3kwVKbldl%2Fuploads%2Fgit-blob-ebf548541f3b34e290e1290736ff0f368f6cf6ec%2Fpm-usuarios-filtros-en.png?alt=media" alt="Filter bar of the Users screen with the Name or email field, the Workspace list and the action buttons"></picture><figcaption><p>Search, workspace filter and action buttons</p></figcaption></figure>

**How to use:**

1. In **Name or email**, type part of the name or email. The list is filtered as you type.
2. (Optional) In **Workspace**, choose a workspace. **All workspaces** removes the filter.
3. Check the **Showing X of Y records** counter. To return to the full list, click **Clear filters** (the button appears only when a filter is applied).

**How it works:**

* The search compares the text with the user's email and name, without distinguishing uppercase from lowercase.
* The **Workspace** list includes only the workspaces that appear in some user's **Workspace scope** configuration. When you choose one, the table shows the users who have that workspace explicitly checked in **Can view** or in **Receives alerts**. Users without any restriction (**Visible workspaces** column = **All**) are not included in this filter, even though they can also see the workspace.
* If no one matches the filters, the table shows *No users found with the applied filters.*
* The [export](#export-the-user-list) respects the applied filters.

### Users table

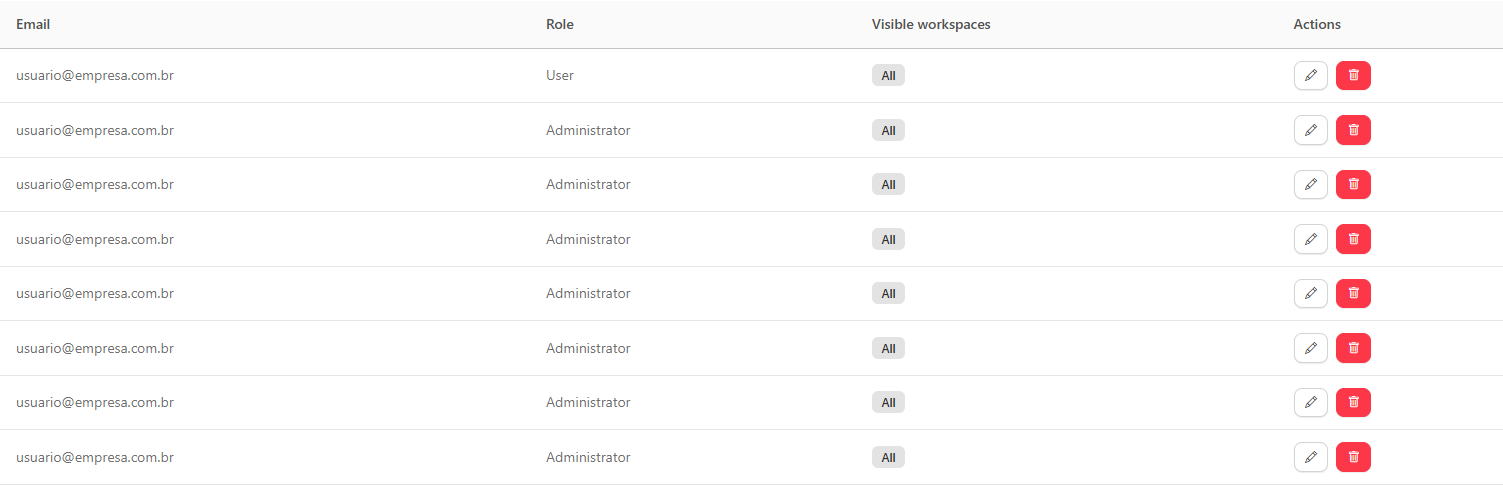
**What it is:** the list of all people registered in the organization, with the role and visibility reach of each one.

**What it is for:** getting a quick view of who is an Administrator and who has visibility restricted to certain workspaces, and accessing the editing or deletion of each user.

<figure><picture><source srcset="/files/JHQcAJmDw7uCHkZnRw3a" media="(prefers-color-scheme: dark)"><img src="https://3938213054-files.gitbook.io/~/files/v0/b/gitbook-x-prod.appspot.com/o/spaces%2FH2bFRBmIfyK3kwVKbldl%2Fuploads%2Fgit-blob-1b6e1b483ee89eac402eaaf576c304be685a8b5e%2Fpm-usuarios-tabela-en.png?alt=media" alt="Users table with the Email, Role, Visible workspaces and Actions columns"></picture><figcaption><p>Users table</p></figcaption></figure>

| Column                 | Content                                                                                                                  |
| ---------------------- | ------------------------------------------------------------------------------------------------------------------------ |
| **Email**              | The user's email (sign-in) in Microsoft Entra ID.                                                                        |
| **Role**               | **User** or **Administrator** (defined by the profile).                                                                  |
| **Visible workspaces** | **All** when the user has no visibility restriction; otherwise, the number of workspaces allowed (e.g., *3 workspaces*). |
| **Actions**            | **Edit** (pencil) and **Delete** (trash can).                                                                            |

**List order:** users appear in alphabetical order of **e-mail**, case-insensitive, also after applying the filters and in the export. The e-mail is also compared case-insensitively at sign-in: a user registered with uppercase letters in the e-mail signs in normally.

**How to use:** click **Edit** to open the user's form (**Details**, **Workspace scope** and **Page access** tabs) or **Delete** to remove the user (see [Delete a user](#delete-a-user)).

### Create a user

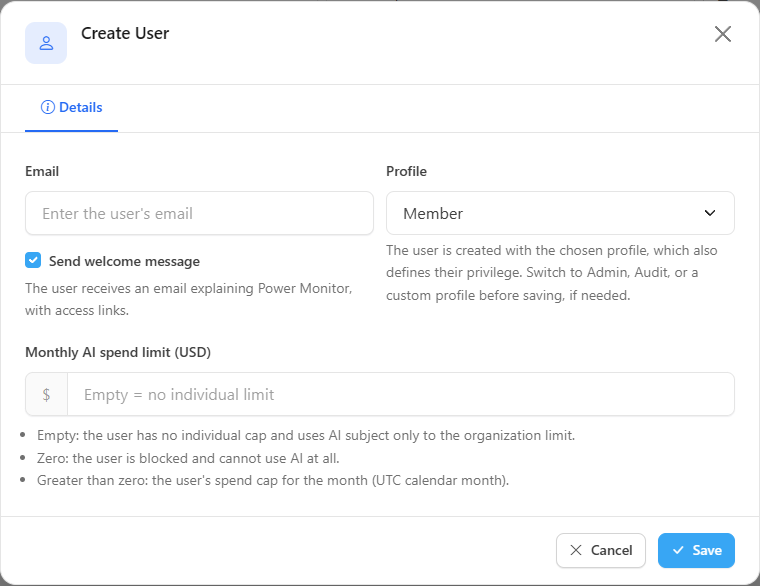
**What it is:** the **Create User** button, which opens the individual registration form. When creating, the form has only the **Details** tab.

**What it is for:** giving access to a specific person, already choosing the profile (and therefore the role) they will have.

<figure><picture><source srcset="/files/nL4mhIcQaquqHK3BIwLi" media="(prefers-color-scheme: dark)"><img src="https://3938213054-files.gitbook.io/~/files/v0/b/gitbook-x-prod.appspot.com/o/spaces%2FH2bFRBmIfyK3kwVKbldl%2Fuploads%2Fgit-blob-35e8a2aadf924b8d5f00346282764ef6ee0c6cba%2Fpm-usuarios-modal-criar-en.png?alt=media" alt="Create User modal with the Email, Profile and Monthly AI spend limit fields and the Send welcome message option"></picture><figcaption><p>Create User form</p></figcaption></figure>

**How to use:** prerequisite: the person must have an account in the Microsoft Entra ID of the organization's tenant.

{% stepper %}
{% step %}

### Open the form

Click **Create User**. The **Create User** modal opens on the **Details** tab.
{% endstep %}

{% step %}

### Fill in the fields

* **Email** (required): the person's sign-in in Entra ID. If empty or invalid, the form shows *Email is required* or *Enter a valid email*. It cannot duplicate an already registered user.
* **Profile** (required): comes preset with **Member**; choose **Admin** to create an Administrator, or **Audit** or a custom profile, if applicable.
* **Monthly AI spend limit (USD)** (optional): leave it empty to not apply an individual cap (see [Individual AI spend limit](#individual-ai-spend-limit)).
* **Send welcome message**: checked by default; uncheck it if you do not want to send the email now.
  {% endstep %}

{% step %}

### Save

Click **Save**. *User created successfully.* appears and the user is added to the table with the chosen profile.
{% endstep %}
{% endstepper %}

**How it works:**

* The user is created with the content of the chosen profile (workspaces, pages and role). The **Member** profile has no workspace restriction and allows all pages except the Administrator-only ones (see [Predefined profiles](#user-profiles)).
* The welcome message is an email that explains Power Monitor, with links to the website, the documentation and the access button.
* The **Workspace scope** and **Page access** tabs exist only when editing: to customize workspaces and pages individually, save the user and then edit them.

### Edit the user's data (Details tab)

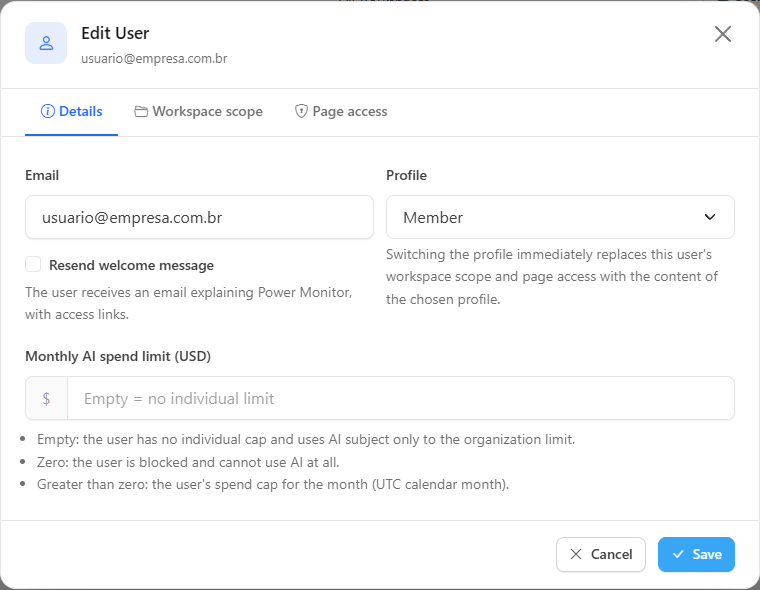
**What it is:** the **Edit** button (pencil) on the user's row opens the **Edit User** modal, with the **Details**, **Workspace scope** and **Page access** tabs. Each tab shows a badge with the number of restrictions configured.

**What it is for:** correcting the email, changing the profile, adjusting the AI limit or resending the welcome email to someone who already has access.

<figure><picture><source srcset="/files/iOsqp5EomxfRc6bSHMuH" media="(prefers-color-scheme: dark)"><img src="https://3938213054-files.gitbook.io/~/files/v0/b/gitbook-x-prod.appspot.com/o/spaces%2FH2bFRBmIfyK3kwVKbldl%2Fuploads%2Fgit-blob-808ff3d1324e1aa4fbc8f1adfa8a9189ab39e64c%2Fpm-usuarios-modal-detalhes-en.png?alt=media" alt="Edit User modal on the Details tab"></picture><figcaption><p>User form, Details tab</p></figcaption></figure>

| Field                            | Description                                                                                                                                                                                                                                        |
| -------------------------------- | -------------------------------------------------------------------------------------------------------------------------------------------------------------------------------------------------------------------------------------------------- |
| **Email**                        | Required. Must be the email the person uses to sign in to Microsoft Entra ID. It cannot duplicate an already registered user.                                                                                                                      |
| **Profile**                      | Required. Defines the allowed workspaces and pages **and the role** (Admin → Administrator; others → User). When editing, changing it asks for confirmation and takes effect immediately (see [Switch a user's profile](#switch-a-users-profile)). |
| **Monthly AI spend limit (USD)** | Optional. See [Individual AI spend limit](#individual-ai-spend-limit).                                                                                                                                                                             |
| **Resend welcome message**       | **Unchecked** by default when editing; checking it means resending the welcome email when saving.                                                                                                                                                  |

**How to use:**

1. On the user's row, click **Edit** (pencil). The **Edit User** modal opens on the **Details** tab.
2. Change the **Email**, the **Monthly AI spend limit (USD)** and/or check **Resend welcome message**.
3. Click **Save**. *User updated successfully.* appears. If **Save** is clicked while there is an error, the form returns to the tab where the problem is.

To resend only the welcome email: **Edit** › check **Resend welcome message** › **Save**. The email with the access links is sent again to the registered address.

### Switch a user's profile

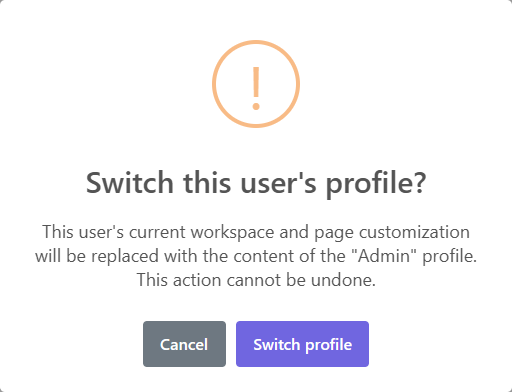
**What it is:** the **Profile** field on the **Details** tab, when editing. Switching the profile immediately applies the workspaces, pages and role of the chosen profile to the user.

**What it is for:** standardizing access for several people with the same needs (e.g., auditors with the **Audit** profile), promoting someone to Administrator (**Admin** profile) or demoting an Administrator to User.

<figure><picture><source srcset="/files/MgYG3F7ZFdkkx2VaVlPE" media="(prefers-color-scheme: dark)"><img src="https://3938213054-files.gitbook.io/~/files/v0/b/gitbook-x-prod.appspot.com/o/spaces%2FH2bFRBmIfyK3kwVKbldl%2Fuploads%2Fgit-blob-af03be7b176f2ab02dd6a4dd23c118d90978bc49%2Fpm-usuarios-modal-troca-perfil-en.png?alt=media" alt="Switch this user&#x27;s profile? confirmation window"></picture><figcaption><p>Profile switch confirmation</p></figcaption></figure>

**How to use:**

{% stepper %}
{% step %}

### Open the edit form

Click **Edit** on the user. On the **Details** tab, find the **Profile** field.
{% endstep %}

{% step %}

### Choose the profile

Select the desired profile. Power Monitor asks **Switch this user's profile?** and warns that the current customization of workspaces and pages will be replaced by the profile's content.
{% endstep %}

{% step %}

### Confirm

Click **Switch profile**. The change takes effect immediately (message *Profile assigned successfully.*), even if you close the form without clicking **Save**, and the **Workspace scope** and **Page access** tabs start reflecting the profile. If you click **Cancel**, the field returns to the previous profile.
{% endstep %}
{% endstepper %}

**How it works:**

* The switch **replaces** all of the user's individual workspace and page customization and cannot be undone (to go back, apply the previous profile and redo the customization).
* After applying a profile, you can customize the user's tabs individually; the customization remains in effect until the next profile switch or until someone [edits the profile](#edit-a-profile).
* There is no separate role selector: the role follows the profile (Admin → Administrator; others → User).
* An Administrator **cannot switch their own profile** to a profile without Administrator privilege (Power Monitor refuses, so the organization does not lose administrative access). Another Administrator can make the change.
* When an Administrator is demoted to another profile, the [API keys](/en/power-monitor/configuracoes/alertas.md#api-keys) they had created are revoked automatically.

### Workspace scope

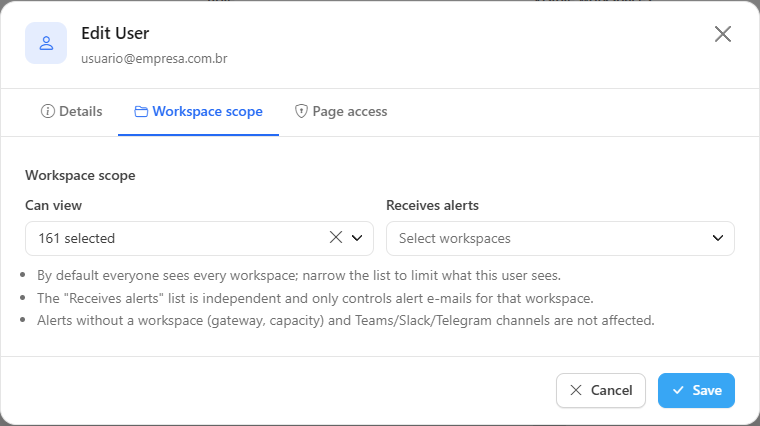
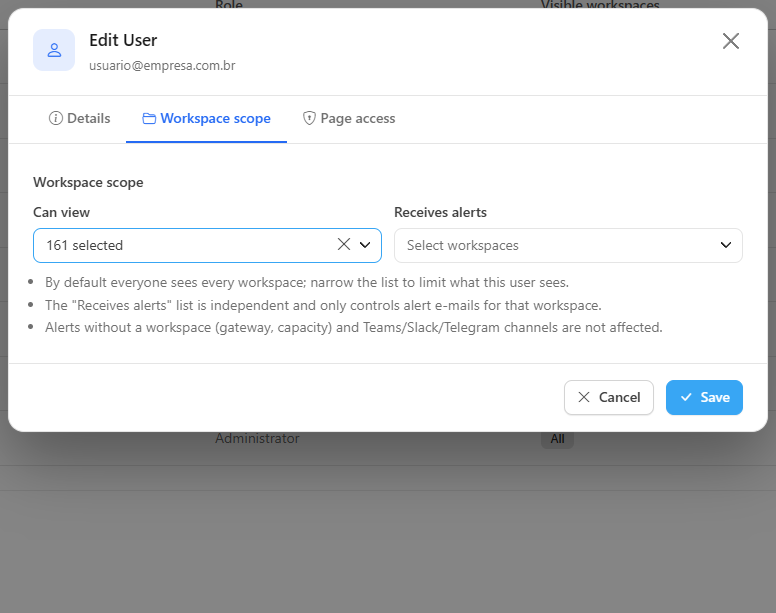
**What it is:** the **Workspace scope** tab when editing the user, with two independent lists of workspaces, each with search and a **Select all**/**Deselect all** option: **Can view** and **Receives alerts**.

**What it is for:** limiting the data the person sees across Power Monitor to certain workspaces (for example, a department's team) and defining which workspaces they receive alert emails from.

<figure><picture><source srcset="/files/Z2VoBPd6RikyBAlgJmwT" media="(prefers-color-scheme: dark)"><img src="https://3938213054-files.gitbook.io/~/files/v0/b/gitbook-x-prod.appspot.com/o/spaces%2FH2bFRBmIfyK3kwVKbldl%2Fuploads%2Fgit-blob-1ee8430b79e6e91da348e61e7ee5d4c0b6b7ff2d%2Fpm-usuarios-modal-escopo-workspace-en.png?alt=media" alt="Workspace scope tab with the Can view and Receives alerts lists"></picture><figcaption><p>Workspace scope tab</p></figcaption></figure>

<figure><picture><source srcset="/files/c6X11GKhkVdMfNvYq530" media="(prefers-color-scheme: dark)"><img src="https://3938213054-files.gitbook.io/~/files/v0/b/gitbook-x-prod.appspot.com/o/spaces%2FH2bFRBmIfyK3kwVKbldl%2Fuploads%2Fgit-blob-93b51a13912dcd0a0ea72d88bd92872206f619ed%2Fpm-usuarios-escopo-selecionar-workspaces-en.png?alt=media" alt="Can view list open, with search and checkboxes for each workspace"></picture><figcaption><p>Workspace selection with search</p></figcaption></figure>

| List                | Effect                                                                                                                                                                                         |
| ------------------- | ---------------------------------------------------------------------------------------------------------------------------------------------------------------------------------------------- |
| **Can view**        | Limits the data the user sees across Power Monitor to the checked workspaces. With **all** checked, the user has no restriction (and automatically sees workspaces that appear in the future). |
| **Receives alerts** | Defines which workspaces the user receives **alert emails** from. It is independent of the viewing list.                                                                                       |

**How to use (restrict viewing):**

{% stepper %}
{% step %}

### Open the scope tab

Click **Edit** on the user and select the **Workspace scope** tab.
{% endstep %}

{% step %}

### Check the allowed workspaces

Click the **Can view** list, use **Deselect all** and check only the desired workspaces (use the list's search to find them).
{% endstep %}

{% step %}

### Save

Click **Save**. In the table, the **Visible workspaces** column starts showing the number allowed (e.g., *3 workspaces*), and the person sees only the data from those workspaces on all screens.
{% endstep %}
{% endstepper %}

To remove the restriction, check all workspaces in **Can view** and save: the column goes back to showing **All**.

**How to use (define who receives alerts):**

1. Click **Edit** on the user and open the **Workspace scope** tab.
2. In the **Receives alerts** list, check the workspaces whose alert emails the person should receive.
3. Click **Save**.

**How it works / rules:**

* **Viewing:** by default, every user (including Administrators) sees all workspaces. If you uncheck any, they see **only** the checked ones. You cannot save with zero workspaces checked in **Can view** (*Select at least one workspace.* appears).
* **Alerts for Administrators:** without any link configured, the Administrator receives alerts from **all** workspaces. If you check some, they receive alerts only from those (plus alerts that do not belong to a workspace). For an Administrator, you also cannot save with zero workspaces checked in **Receives alerts**.
* **Alerts for Users:** the User receives alert emails only from the workspaces checked in **Receives alerts**. With none checked, they receive no alert emails. Checking "all" saves the current list; workspaces created later need to be checked.
* Alerts **without a workspace** (gateway and capacity) and the **Microsoft Teams, Slack and Telegram** channels are not affected by this scope. The recipients of each alert type can also be turned on/off in [Settings › Notifications](/en/power-monitor/configuracoes/notificacoes.md).
* Shared tenant resources, without an associated workspace, remain visible to everyone.
* The list shows the organization's active workspaces. If it does not load, *Could not load the workspace list.* appears with the **Try again** option.

### Page access

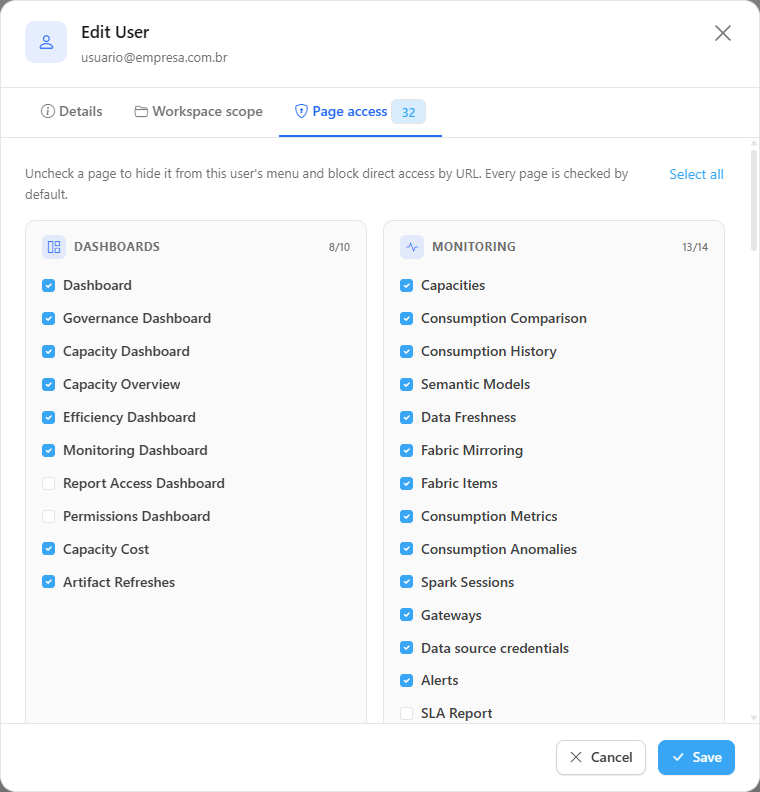
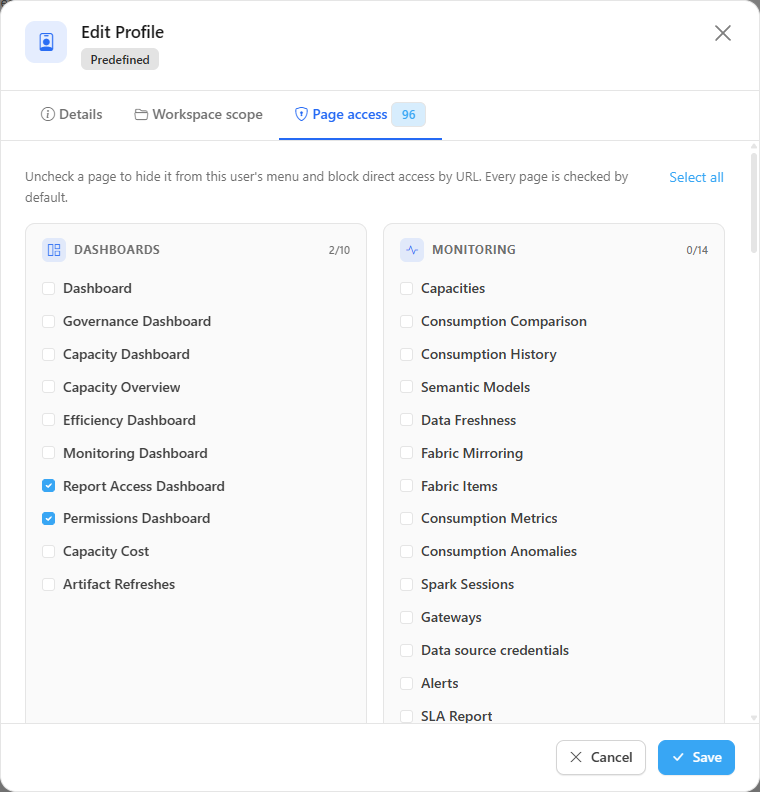
**What it is:** the **Page access** tab when editing the user (and the profile). It shows one card per menu category, in the order **Dashboards**, **Monitoring**, **Performance**, **Governance**, **Data Quality**, **Audit**, **Mapping** and **Other** (Users, Billing, Settings and Support). Each card has the counter of checked pages (for example, *10/10*) and one checkbox per page, named like the menu item. By default, all are checked.

**What it is for:** hiding from the menu the screens the person does not need (for example, leaving an auditor with only the Audit screens) and preventing access to them, both through the address and through the data the screen queries.

<figure><picture><source srcset="/files/bdrQUXRm3tGZt8NzTIdG" media="(prefers-color-scheme: dark)"><img src="https://3938213054-files.gitbook.io/~/files/v0/b/gitbook-x-prod.appspot.com/o/spaces%2FH2bFRBmIfyK3kwVKbldl%2Fuploads%2Fgit-blob-4fc9b61edc512b45ee80f960a30b95302e5b5cc1%2Fpm-usuarios-modal-acesso-paginas-en.png?alt=media" alt="Page access tab with the pages grouped by menu category"></picture><figcaption><p>Page access tab</p></figcaption></figure>

**How to use:**

1. Click **Edit** on the user and open the **Page access** tab.
2. Uncheck the pages the person should not access. The **Deselect all** button (which becomes **Select all** when not everything is checked) helps you start from scratch: it keeps only the **Users** page checked. The tab badge shows how many pages are blocked.
3. Click **Save**. The unchecked pages disappear from that person's menu; if they open the address directly, they will see the **Not allowed** screen (*You do not have permission to access this page or resource.*).

To allow them again, return to the tab, check the pages and save.

**How it works / rules:**

* **Blocking also applies to the data.** Besides hiding the screen, Power Monitor rejects the requests that feed the blocked page (access denied response). If the person tries to use a blocked resource, a notice appears saying they do not have access to the page.
* **Administrators are never blocked.** Users with the **Admin** profile always have access to all pages; this access cannot be restricted (the tab appears locked, with all pages checked and a padlock).
* The **Users** page cannot be blocked: it is the only place where a block can be undone (protection against self-lockout). Managing users and profiles is always restricted to Administrators, regardless of blocks.
* Pages that appear in more than one place in the menu (for example, capacity screens repeated in the **Capacities** domain) are blocked in both places at the same time.
* **Personal data discovery** and **Privacy risks** share a single checkbox (the **Personal data discovery** one): blocking it blocks both screens.
* **Report Best Practices Score** can also be opened from the actions menu of **Reports**; blocking only the score does not hide it from there while **Reports** is allowed.
* If all pages of a domain are blocked, the domain disappears from the menu.
* The **Home Page** and the **Favorites** management screen are not part of the catalog and are always available.
* Blocks saved before a page was renamed or moved keep working (for example, **Artifact Refreshes**, which moved from Monitoring to Dashboards, and **Environment X-Ray**).
* Administrator-only screens, such as [Departed Owners](/en/power-monitor/governanca/conformidade/responsaveis-desligados.md), [Power BI Licenses](/en/power-monitor/governanca/tenant/licencas-power-bi.md), SLA Report and Behavioral risk, also appear in the list so that they can be blocked by profile. See [Organization default and configured organization](#organization-default-and-configured-organization) to learn when they are restricted to Administrators.
* Even with the page allowed, write **actions** remain restricted to Administrators (for example, triggering a collection, managing rules or attesting a control).
* In the editor list, the Mapping pages appear with their full names **... Scan** (for example, *Inventory Scan*). In the side menu, the same pages appear with short names (*Inventory*) inside groups.

<details>

<summary>Full list of editor pages, by category</summary>

| Category             | Pages                                                                                                                                                                                                                                                                                                                                                                                                                                                                                                                                                                          |
| -------------------- | ------------------------------------------------------------------------------------------------------------------------------------------------------------------------------------------------------------------------------------------------------------------------------------------------------------------------------------------------------------------------------------------------------------------------------------------------------------------------------------------------------------------------------------------------------------------------------ |
| **Dashboards** (10)  | Dashboard; Governance Dashboard; Capacity Dashboard; Capacity Overview; Efficiency Dashboard; Monitoring Dashboard; Report Access Dashboard; Permissions Dashboard; Capacity Cost; Artifact Refreshes                                                                                                                                                                                                                                                                                                                                                                          |
| **Monitoring** (14)  | Capacities; Consumption Comparison; Consumption History; Semantic Models; Data Freshness; Fabric Mirroring; Fabric Items; Consumption Metrics; Consumption Anomalies; Spark Sessions; Gateways; Data source credentials; Alerts; SLA Report                                                                                                                                                                                                                                                                                                                                    |
| **Performance** (4)  | Average Execution Time; Performance Assessment; Model Cleanup; Lakehouse and Warehouse                                                                                                                                                                                                                                                                                                                                                                                                                                                                                         |
| **Governance** (36)  | Workspaces; Reports; Paginated Reports; Dashboards; KQL Dashboards; Apps; Explorations; Metric Sets; Public Links; Organization-wide Links; Semantic Models; Storage; Fabric Mirroring; Data Engineering; Data Science; Development; Real Time; Capacities; Gateways; Connections; Schedules; Deployment Pipelines; Deployment history; Model History; Workspace Git; Labels and Certification; Naming conventions; Personal data discovery; Compliance posture; Access reviews; Departed Owners; Tenant Settings; Power BI Licenses; Deleted Artifacts; Domains; Azure Quotas |
| **Data Quality** (9) | Data Lineage; Environment X-Ray; Data Dictionary; Best Practices Score; Report Best Practices Score; AI Score; Environment Inventory; Workspace X-Ray; Data Exposure                                                                                                                                                                                                                                                                                                                                                                                                           |
| **Audit** (12)       | Events Overview; Report Views; Permissions Audit; Permission history; Behavioral risk; Service Principals; Row-Level Security; Direct Sharing; E-mail Subscriptions; Application Events; Email Audit; Capacity Actions                                                                                                                                                                                                                                                                                                                                                         |
| **Mapping** (24)     | Inventory Scan; Capacity Scan; Gateway Scan; Model Mapping Scan; Scan Logs; Model Size Scan; Report Structure Scan; Domains Scan; Capacity Cost Scan; Audit Scan; Consumption Metrics Scan; E-mail Subscriptions Scan; Tenant Settings Scan; Power BI Licenses Scan; Azure Quotas Scan; Workspace Git; Deployment operations; Spark Sessions; Apps Scan; Refreshes and Schedules Scan; Capacity Metrics Scan; Group Members Scan; All Connections Scan; Datasets Scan                                                                                                          |
| **Other** (4)        | Users; Billing; Settings; Support                                                                                                                                                                                                                                                                                                                                                                                                                                                                                                                                              |

</details>

{% hint style="warning" %}
Page blocking controls **which screens and APIs** the person can reach. To restrict **which data** they see inside the allowed screens, use the **Workspace scope**. The two features complement each other.
{% endhint %}

#### Organization default and configured organization

While nobody has saved permissions in the organization, the **default** applies: screens restricted to Administrators stay blocked for non-administrators, and the **User Profiles** screen shows the notice *This organization uses the default: administrative screens stay blocked for non-administrators until you save a profile or permission.*

The organization is considered **configured** the first time an Administrator saves a user edit or creates, edits or deletes a profile (switching a user to an existing profile does not count). From then on, what each person sees is decided **only by the page blocks** of their profile and user: the automatic "Administrator-only screen" rule no longer applies.

{% hint style="warning" %}
In a configured organization, a **new custom profile starts with no blocked pages**, including the Administrator-only ones (Mapping, Billing, Settings, Environment X-Ray, etc.). When creating a profile, uncheck those pages if its people should not see them. The **Member** and **Audit** profiles already come with those blocks.
{% endhint %}

### Individual AI spend limit

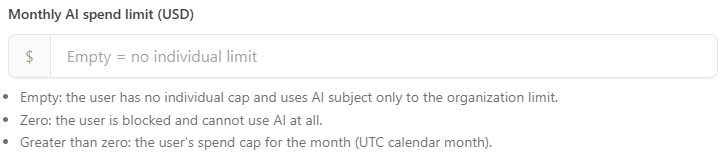
**What it is:** the **Monthly AI spend limit (USD)** field, on the **Details** tab of the user form (creation or editing).

**What it is for:** controlling the AI budget per person: blocking usage for those who should not use it, or setting a monthly cap for heavy users.

<figure><picture><source srcset="/files/FTLnoWJ0S3O4PTEtFGAk" media="(prefers-color-scheme: dark)"><img src="https://3938213054-files.gitbook.io/~/files/v0/b/gitbook-x-prod.appspot.com/o/spaces%2FH2bFRBmIfyK3kwVKbldl%2Fuploads%2Fgit-blob-7dbb046a6fece1d2a804234a3e2a48dfd1595072%2Fpm-usuarios-modal-limite-ia-en.png?alt=media" alt="Monthly AI spend limit (USD) field with the explanations for empty, zero and greater than zero"></picture><figcaption><p>Individual AI spend limit</p></figcaption></figure>

| Field value           | Behavior                                                                                                          |
| --------------------- | ----------------------------------------------------------------------------------------------------------------- |
| **Empty**             | The user has no individual cap; they use AI subject only to the organization's limit.                             |
| **0 (zero)**          | The user is blocked and cannot use AI features.                                                                   |
| **Greater than zero** | The user's spend cap for the calendar month (in UTC), in US dollars. The maximum accepted value is US$ 1,000,000. |

**How to use:**

1. Click **Edit** on the user (or fill in the field when creating).
2. In **Monthly AI spend limit (USD)**, enter: empty (no individual cap), **0** (blocks AI for the person) or a value greater than zero (monthly cap in US dollars).
3. Click **Save**. Negative values are rejected with *Enter a value greater than or equal to zero, or leave it empty for no limit.* and values above the maximum with *The maximum limit is …*.

**How it works:** the individual limit works **together** with the organization's limit, defined in [Settings › AI](/en/power-monitor/configuracoes/ia.md): the AI call is blocked when either of the two is reached. The month is counted in UTC; in Brasília time (UTC−3), the limit resets at 21:00 on the last day of the month.

### Delete a user

**What it is:** the **Delete** button (trash can) on the user's row.

**What it is for:** removing access for someone who has left the company or no longer needs Power Monitor.

**How to use:**

1. On the user's row, click **Delete** (trash can).
2. In the **Confirm User Deletion** window (*Are you sure you want to delete this user?*), click **Delete**.
3. *User deleted successfully.* appears and the person loses access to Power Monitor. If the server rejects the deletion, *Could not delete the user* appears with the reason.

### Import from Microsoft Entra ID

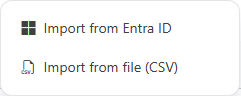
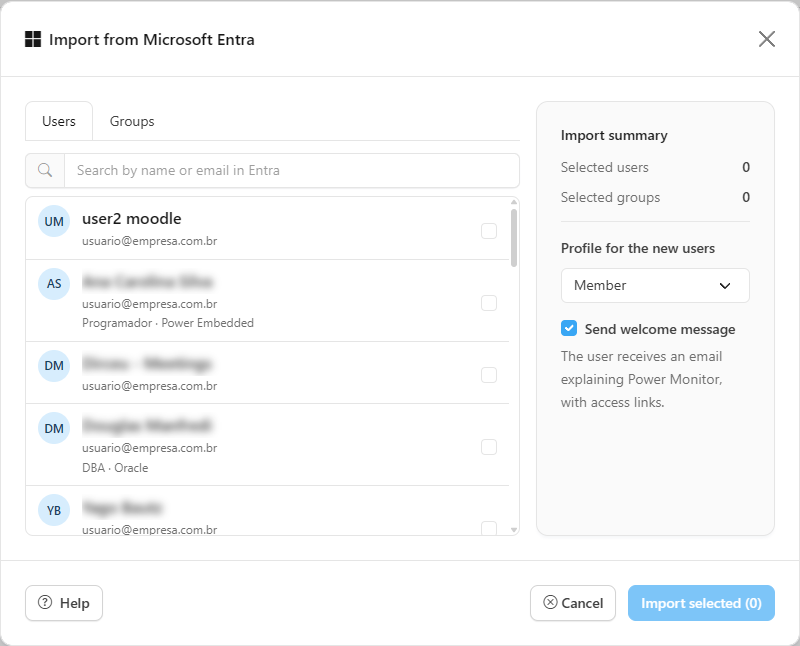
**What it is:** the **Import** › **Import from Entra ID** item, which opens the **Import from Microsoft Entra** modal. The importer queries your tenant's directory through Microsoft Graph, using the organization's application (Service Principal).

**What it is for:** registering several people at once, individually or by Entra ID group (for example, the entire "BI Team" group).

<figure><picture><source srcset="/files/ZpvBDIcETqQ5lg98MqiD" media="(prefers-color-scheme: dark)"><img src="https://3938213054-files.gitbook.io/~/files/v0/b/gitbook-x-prod.appspot.com/o/spaces%2FH2bFRBmIfyK3kwVKbldl%2Fuploads%2Fgit-blob-bff23783d246f13085e8910365848dfc8ebbb5c6%2Fpm-usuarios-menu-importar-en.png?alt=media" alt="Import menu open with the Import from Entra ID and Import from file (CSV) options"></picture><figcaption><p>Import menu</p></figcaption></figure>

<figure><picture><source srcset="/files/8BfLJ2f926YJ8FO6CgOw" media="(prefers-color-scheme: dark)"><img src="https://3938213054-files.gitbook.io/~/files/v0/b/gitbook-x-prod.appspot.com/o/spaces%2FH2bFRBmIfyK3kwVKbldl%2Fuploads%2Fgit-blob-ce3cbbb62bfa930de5a4a6384c9b64f3cf5d0647%2Fpm-usuarios-importar-entra-en.png?alt=media" alt="Import from Microsoft Entra modal with the Users and Groups tabs"></picture><figcaption><p>Import from Microsoft Entra, Users tab</p></figcaption></figure>

**How to use:** prerequisite: directory read permissions on the organization's Service Principal (see below).

{% stepper %}
{% step %}

### Open the importer

Click **Import** › **Import from Entra ID**. The **Import from Microsoft Entra** modal opens.
{% endstep %}

{% step %}

### Select people and/or groups

On the **Users** tab, search by name or email and check the people (anyone who already exists in Power Monitor appears as **Already imported** and cannot be checked). On the **Groups** tab, search for and check groups: the active members, including those of nested groups, will be imported. The two selections can be combined; the tab badges show how many items are checked.
{% endstep %}

{% step %}

### Set the profile and the welcome email

In the **Import summary** panel, check **Selected users** and **Selected groups**, choose the **Profile for the new users** (applies to the whole batch; comes preset with **Member**) and decide whether to check **Send welcome message**.
{% endstep %}

{% step %}

### Import

Click **Import selected (N)** (disabled while nothing is checked). At the end, a notification reports *Import complete: X created, Y skipped, Z error(s).*; if there are errors, they are listed.
{% endstep %}
{% endstepper %}

**How it works / requirements:**

* The list of users and groups is loaded gradually as you scroll.
* Users who already exist or are repeated (for example, the same person in two groups) are **skipped**, not duplicated.
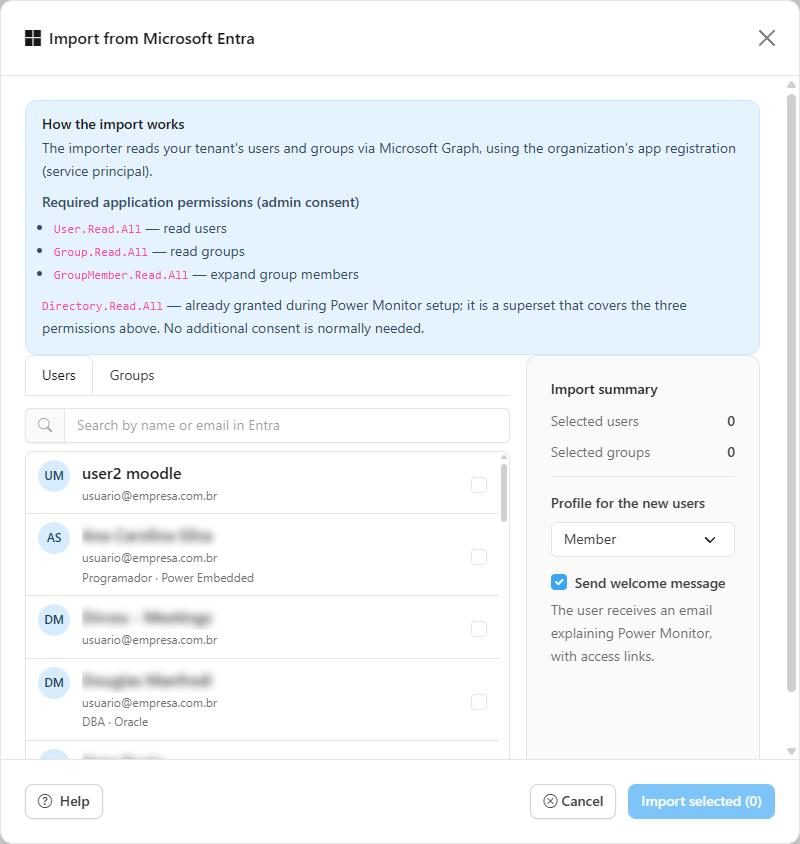
* Required Microsoft Graph application permissions (with admin consent): `User.Read.All`, `Group.Read.All` and `GroupMember.Read.All`. If the application already has `Directory.Read.All` (granted during installation), it already covers all three. You can check and grant these permissions in [Settings › Additional Permissions](/en/power-monitor/configuracoes/permissoes-adicionais.md) (**Entra ID user import** card).
* The modal's **Help** button opens the **How the import works** box, which summarizes these requirements.
* If the directory does not load (*Could not load the directory. Please try again.*), check the permissions above.

<figure><picture><source srcset="/files/5KnokbXw0y4IaFeshQa6" media="(prefers-color-scheme: dark)"><img src="https://3938213054-files.gitbook.io/~/files/v0/b/gitbook-x-prod.appspot.com/o/spaces%2FH2bFRBmIfyK3kwVKbldl%2Fuploads%2Fgit-blob-ffc80e81ce8b73f7e26fd8d10a0a2f1cf88b723d%2Fpm-usuarios-importar-entra-ajuda-en.png?alt=media" alt="How the import works box with the required Microsoft Graph permissions"></picture><figcaption><p>Entra ID importer help</p></figcaption></figure>

### Import from file (CSV)

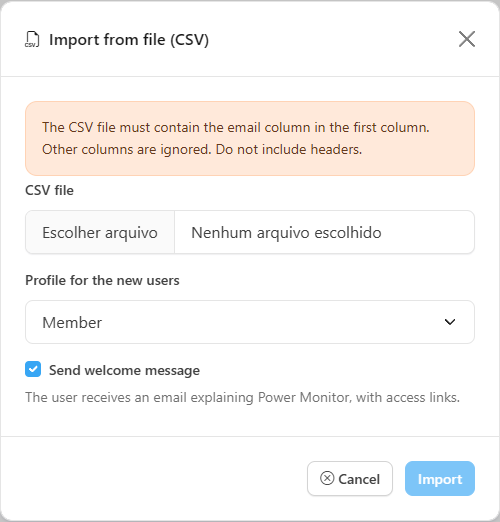
**What it is:** the **Import** › **Import from file (CSV)** item, which opens the modal of the same name.

**What it is for:** registering a list of emails at once, when it already exists in a spreadsheet or when the Entra ID importer is not available.

<figure><picture><source srcset="/files/Tgo1y6SQKJVxid0zMsra" media="(prefers-color-scheme: dark)"><img src="https://3938213054-files.gitbook.io/~/files/v0/b/gitbook-x-prod.appspot.com/o/spaces%2FH2bFRBmIfyK3kwVKbldl%2Fuploads%2Fgit-blob-1570a95cfed61a0819b74841090f69fbee170a4b%2Fpm-usuarios-importar-csv-en.png?alt=media" alt="Import from file (CSV) modal with the file selector and the Profile for the new users"></picture><figcaption><p>Import from file (CSV)</p></figcaption></figure>

**How to use:**

{% stepper %}
{% step %}

### Prepare the file

Create a CSV with one email per line in the **first column** and **no header**. Other columns are ignored.
{% endstep %}

{% step %}

### Open the importer

Click **Import** › **Import from file (CSV)**.
{% endstep %}

{% step %}

### Upload the file

In **CSV file**, select the file, choose the **Profile for the new users** (comes preset with **Member**) and, if you wish, check **Send welcome message**. Click **Import**.
{% endstep %}

{% step %}

### Check the result

The notification shows how many users were created, skipped (already registered or repeated) and had errors (invalid emails).
{% endstep %}
{% endstepper %}

{% hint style="info" %}
Imported users (Entra ID or CSV) are created with the profile chosen in **Profile for the new users** (Member by default). Adjust the scope, pages and AI limit by editing each one afterwards, or switch the profile.
{% endhint %}

### Hide data

**What it is:** the **Hide data** button in the action bar (once clicked, it is renamed **Show data**).

**What it is for:** producing a file to share without exposing people's emails. On this screen the email stays visible, because the administrator needs it to manage users: the button **masks only the exported files**.

**How it works:**

* With **Hide data** on, the email is masked in the **CSV** and **JSON** files (only the first and last letters of the user name, the first letter of the domain and the ending are kept, for example *f***o\@p**\*.br\*). In the **JSON**, the name field, when present, is also masked.
* The choice is shared with the other screens that have the button and is saved in the browser.
* It is a convenience for sharing the screen and files, **not an access control**: anyone allowed to see the screen still has access to the real data.

### Export the user list

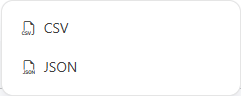
**What it is:** the **Export** menu, with the **CSV** and **JSON** options.

**What it is for:** taking the user records for review, internal audit or periodic access review.

<figure><picture><source srcset="/files/6yvWCZJl3cddg2aFyBHG" media="(prefers-color-scheme: dark)"><img src="https://3938213054-files.gitbook.io/~/files/v0/b/gitbook-x-prod.appspot.com/o/spaces%2FH2bFRBmIfyK3kwVKbldl%2Fuploads%2Fgit-blob-eb4c8c7d9d218794b603206239e16a2fae42dc14%2Fpm-usuarios-menu-exportar-en.png?alt=media" alt="Export menu open with the CSV and JSON options"></picture><figcaption><p>Export menu</p></figcaption></figure>

**How to use:**

1. (Optional) Apply the **Name or email** and/or **Workspace** filters: the export includes only what is on the screen.
2. (Optional) Click **Hide data** to mask the emails in the file.
3. Click **Export** and choose **CSV** or **JSON**. The file is downloaded named `usuarios-YYYY-MM-DD` (today's date on your computer) with the chosen extension.

The **Export** button is disabled when no user matches the filters.

**File content:**

| CSV column                  | Content                                                                                                                |
| --------------------------- | ---------------------------------------------------------------------------------------------------------------------- |
| **Email**                   | The user's email (masked if **Hide data** is on).                                                                      |
| **Role**                    | **User** or **Administrator**.                                                                                         |
| **Created date**            | Creation date in YYYY-MM-DD format. Today the user list does not provide this date, so the column is usually blank.    |
| **Monthly AI budget (USD)** | Value of the individual limit. Blank when the user has no cap of their own; **0** when blocked from AI.                |
| **Visible workspaces**      | Number of workspaces allowed in **Can view**. Blank when there is no restriction (equivalent to **All** in the table). |

The **CSV** opens correctly in Excel (accents preserved), has every field in quotes and prefixes with an apostrophe any text that starts with `=`, `+`, `-` or `@`, so that Excel does not interpret it as a formula. The **JSON** contains the full record of each displayed user, including role, AI limit, workspace scopes, blocked pages and profile.

### User profiles

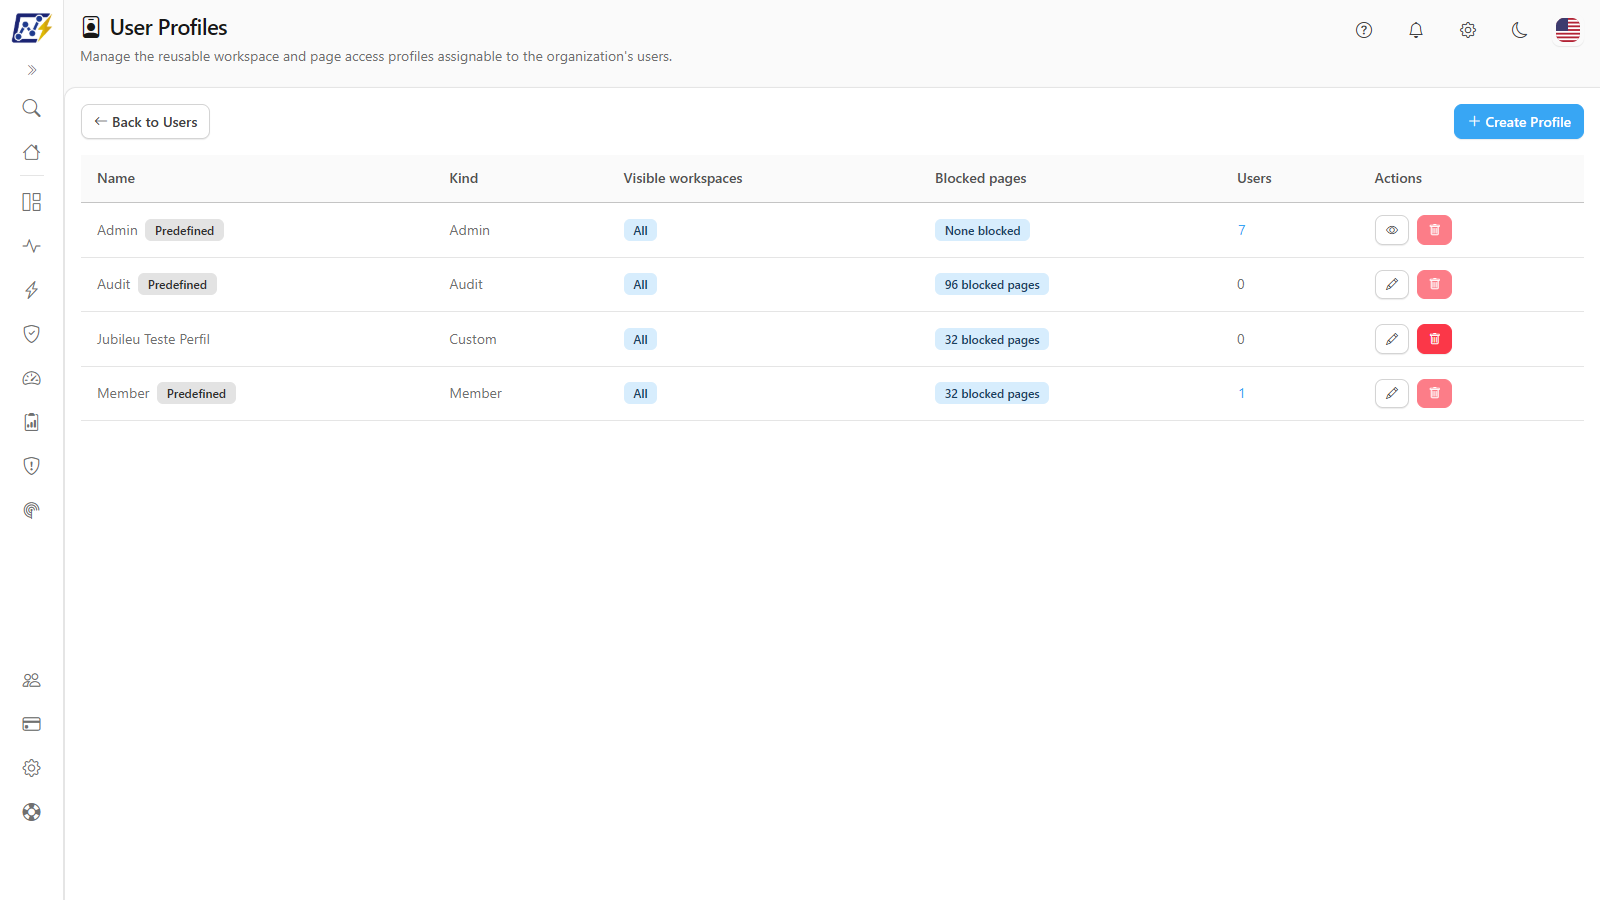
**What it is:** the **User Profiles** screen, opened with the **User Profiles** button on the Users screen (use **Back to Users** to return). A **profile** is a named, reusable set of **workspace scope** + **page access**, which also defines the **role** of whoever uses it.

**What it is for:** instead of configuring each person, you edit the profile once and apply it to several users (for example, a "Finance" profile with the area's workspaces and pages).

<figure><picture><source srcset="/files/CSMkwxlhodVTaUIoQGXN" media="(prefers-color-scheme: dark)"><img src="https://3938213054-files.gitbook.io/~/files/v0/b/gitbook-x-prod.appspot.com/o/spaces%2FH2bFRBmIfyK3kwVKbldl%2Fuploads%2Fgit-blob-f9622de011dbf47560b8f786461e6125ad96c0f1%2Fpm-usuarios-perfis-en.png?alt=media" alt="User Profiles screen with the list of predefined and custom profiles"></picture><figcaption><p>User Profiles</p></figcaption></figure>

| Column                 | Content                                                                                                                                                          |
| ---------------------- | ---------------------------------------------------------------------------------------------------------------------------------------------------------------- |
| **Name**               | Profile name. Predefined profiles display the **Predefined** badge.                                                                                              |
| **Kind**               | **Admin**, **Member**, **Audit** (predefined) or **Custom**.                                                                                                     |
| **Visible workspaces** | **All** or the number of workspaces allowed.                                                                                                                     |
| **Blocked pages**      | **None blocked** or the number.                                                                                                                                  |
| **Users**              | How many users use the profile. Click the number to see the list (see [View a profile's users](#view-a-profiles-users)).                                         |
| **Actions**            | **Edit** (pencil) and **Delete** (trash can). On the **Admin** profile, the pencil is replaced by an eye (**View**), because that profile can only be consulted. |

If the organization still uses the access default, the screen shows above the table the notice *This organization uses the default: administrative screens stay blocked for non-administrators until you save a profile or permission.* (see [Organization default and configured organization](#organization-default-and-configured-organization)).

**Predefined profiles** (created automatically for every organization):

| Profile    | Content                                                                                                                                                                                                                                                                                                                                                                                                                                                                              |
| ---------- | ------------------------------------------------------------------------------------------------------------------------------------------------------------------------------------------------------------------------------------------------------------------------------------------------------------------------------------------------------------------------------------------------------------------------------------------------------------------------------------ |
| **Admin**  | Gives the **Administrator** role. No workspace or page restriction. It is **immutable**: it cannot be edited or deleted (the screen opens for consultation only).                                                                                                                                                                                                                                                                                                                    |
| **Member** | **User** role, with no workspace restriction. Comes with the Administrator-only pages blocked: **Mapping** (except the **Workspace Git**, **Deployment operations** and **Spark Sessions** pages), **Billing**, **Settings**, **Environment X-Ray**, **Report Access Dashboard**, **Permissions Dashboard**, **Email Audit**, **Capacity Actions**, **Departed Owners**, **Power BI Licenses**, **SLA Report** and **Behavioral risk**. It is the preselected profile for new users. |
| **Audit**  | **User** role. Blocks all pages except those in the **Audit** category (including **Permission history** and **Behavioral risk**) and the **Report Access Dashboard** and **Permissions Dashboard** dashboards.                                                                                                                                                                                                                                                                      |

**Profile rules:**

* The profile controls **visibility** (workspaces and pages) **and the role**: the Admin profile gives the Administrator role and the others give the User role.
* **Assigning or switching** a user's profile immediately replaces all their workspace and page customization (see [Switch a user's profile](#switch-a-users-profile)).
* **Editing a profile** that is in use reapplies the new content to **all** users who use it, overwriting individual customizations.
* The **Member** and **Audit** predefined profiles can have their name and content edited, but cannot be deleted. The **Admin** profile can be neither edited nor deleted. A profile **in use** by any user also cannot be deleted.

### Create a profile

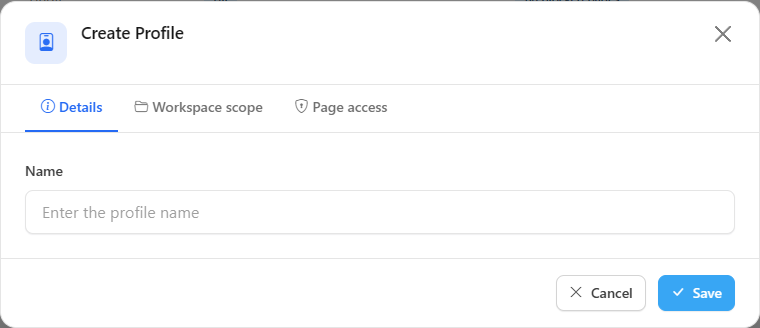
**What it is:** the **Create Profile** button, which opens the profile form with the **Details**, **Workspace scope** and **Page access** tabs (the same rules as the user tabs).

**What it is for:** building an access standard for a group of people with the same needs.

<figure><picture><source srcset="/files/fVBr3TqhP2BW7vxqWnVR" media="(prefers-color-scheme: dark)"><img src="https://3938213054-files.gitbook.io/~/files/v0/b/gitbook-x-prod.appspot.com/o/spaces%2FH2bFRBmIfyK3kwVKbldl%2Fuploads%2Fgit-blob-7acb10cdab0d01bfd5214b441c005af6a9060ee2%2Fpm-usuarios-perfis-modal-criar-en.png?alt=media" alt="Create Profile modal on the Details tab with the Name field"></picture><figcaption><p>Create Profile form</p></figcaption></figure>

**How to use:**

{% stepper %}
{% step %}

### Open the form

On the Users screen, click **User Profiles** and then **Create Profile**.
{% endstep %}

{% step %}

### Give it a name

On the **Details** tab, fill in **Name** (required, up to 200 characters). If empty, *Name is required* appears.
{% endstep %}

{% step %}

### Configure workspaces and pages

On the **Workspace scope** tab, check the allowed workspaces in **Can view** and **Receives alerts**. On the **Page access** tab, uncheck the pages the profile should block.
{% endstep %}

{% step %}

### Save

Click **Save**. *Profile created successfully.* appears and the profile is added to the list with the **Custom** kind. Then [apply it to users](#switch-a-users-profile) (**Profile** field when editing the user, or **Profile for the new users** when importing).
{% endstep %}
{% endstepper %}

### Edit a profile

**What it is:** the **Edit** button on the profile's row, which opens the **Edit Profile** form with the same three tabs.

**What it is for:** adjusting the access of everyone who uses the profile at once. Example: when the team gets a new workspace, just edit its profile.

<figure><picture><source srcset="/files/Oh7HCsJmVHWWYwha1XXI" media="(prefers-color-scheme: dark)"><img src="https://3938213054-files.gitbook.io/~/files/v0/b/gitbook-x-prod.appspot.com/o/spaces%2FH2bFRBmIfyK3kwVKbldl%2Fuploads%2Fgit-blob-d21f065eb180378bbfacbf0a03b557e18b7a511a%2Fpm-usuarios-perfis-modal-acesso-paginas-en.png?alt=media" alt="Editing the Audit profile on the Page access tab, with most pages unchecked"></picture><figcaption><p>Profile editing, Page access tab (Audit profile)</p></figcaption></figure>

**How to use:**

1. In **User Profiles**, click **Edit** on the profile.
2. Adjust **Name**, **Workspace scope** and/or **Page access** and click **Save**.
3. If the profile is in use, the **Edit a profile used by other users?** window reports how many users will be affected; click **Save and apply to all**. The new content takes effect immediately for all of them, overwriting individual customizations. *Profile updated successfully.* appears.

**How it works:**

* **Predefined** profiles (Member and Audit) show a notice that their name and content can be edited, but the profile cannot be deleted.
* The **Admin** profile opens read-only, with the notice *The Admin profile is predefined and cannot be edited or deleted. This screen is read-only.* The name, workspace scope and pages are locked (all pages checked, with a padlock) and the **Save** button does not appear: an Administrator always has access to all pages.
* On phones, the form opens full screen and the tabs become a selection list.

### View a profile's users

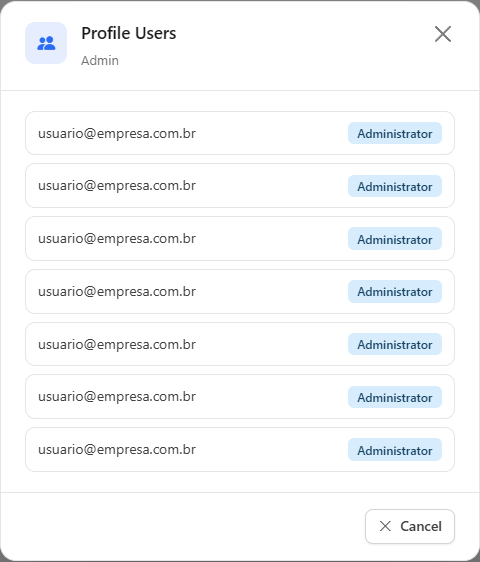
**What it is:** the number in the **Users** column, which opens the **Profile Users** window with the email and role of each person who uses that profile.

**What it is for:** knowing who will be affected before editing a profile, or finding out why a profile cannot be deleted.

<figure><picture><source srcset="/files/hvp9rYk8ZYC6UHQYFgbn" media="(prefers-color-scheme: dark)"><img src="https://3938213054-files.gitbook.io/~/files/v0/b/gitbook-x-prod.appspot.com/o/spaces%2FH2bFRBmIfyK3kwVKbldl%2Fuploads%2Fgit-blob-1ed94ae124ac5950c0017b839d563cb09cce659f%2Fpm-usuarios-perfis-usuarios-do-perfil-en.png?alt=media" alt="Profile Users window with the list of emails and roles"></picture><figcaption><p>Profile Users</p></figcaption></figure>

**How to use:**

1. In **User Profiles**, click the number in the **Users** column (tooltip: *View users assigned to this profile*).
2. Check the list. If no one is assigned, *No user is currently assigned to this profile.* appears.
3. Click **Cancel** (or the X) to close.

### Delete a profile

**What it is:** the **Delete** button on the profile's row.

**What it is for:** cleaning up custom profiles that are no longer used.

**How to use:**

1. In **User Profiles**, click **Delete** on the profile. The button is disabled for **Predefined** profiles and for profiles with users (hover over it to see the reason: *Predefined profiles cannot be deleted.* or *N user(s) use this profile and it cannot be deleted.*).
2. In the **Confirm Profile Deletion** window, click **Delete**.
3. *Profile deleted successfully.* appears.

To delete a profile in use, first switch the profile of the users who use it.

## Frequently asked questions

<details>

<summary>The user was created, but says they cannot sign in. What should I check?</summary>

Sign-in is done with the Microsoft (Entra ID) account of the organization's tenant. Confirm that the registered **Email** is exactly the person's sign-in in Entra ID. If they sign in with another account, they will see the **User not found** screen, with the **Sign out and sign in again** option.

</details>

<details>

<summary>Why does a user not receive alert emails?</summary>

Users with the **User** role only receive alerts from the workspaces checked in **Receives alerts**. Also check that they have not been turned off as a recipient of the alert type in [Settings › Notifications](/en/power-monitor/configuracoes/notificacoes.md).

</details>

<details>

<summary>I filtered by a workspace and some users who can see that workspace did not appear. Why?</summary>

The **Workspace** filter shows who has the workspace explicitly checked in the **Workspace scope**. Users without restriction (**Visible workspaces** column = **All**) can see all workspaces, but do not appear in this filter.

</details>

<details>

<summary>Can I block the Users page for another administrator?</summary>

No. The Users page can never be blocked, and users with the Admin profile always have access to all pages.

</details>

<details>

<summary>I edited the profile and some users' customizations disappeared. Is that normal?</summary>

Yes. Editing a profile reapplies its content to all users who use it, overwriting individual customizations. The notice before saving reports how many users will be affected.

</details>

<details>

<summary>What is the difference between the user's AI limit and the organization's?</summary>

The organization's limit ([Settings › AI](/en/power-monitor/configuracoes/ia.md)) is the global cap; the user's is an individual cap. Both apply at the same time: as soon as either one is reached, that user's calls are blocked.

</details>

<details>

<summary>I created a custom profile and people can open administrative screens. Why?</summary>

Once the organization is considered configured, only page blocks decide what each person sees, and a new profile starts with everything allowed. Edit the profile, open the **Page access** tab and uncheck the Administrator-only screens (Mapping, Billing, Settings, etc.). Write actions remain restricted to Administrators regardless. See [Organization default and configured organization](#organization-default-and-configured-organization).

</details>

<details>

<summary>I blocked a page and the person still sees it in the menu. What should I do?</summary>

If the person already had Power Monitor open when you saved, ask them to refresh the browser page (or sign out and back in) so the menu reflects the new access. If they open a blocked page by its address, they see the **Not allowed** screen, and the queries of that page are rejected.

</details>

<details>

<summary>Can I edit the Admin profile?</summary>

No. The **Admin** profile is predefined, immutable and opens for consultation only: administrators never have blocked pages or workspace restrictions.

</details>

## Related pages

* [Settings › AI](/en/power-monitor/configuracoes/ia.md): the organization's monthly limit and AI consumption.
* [Settings › Notifications](/en/power-monitor/configuracoes/notificacoes.md): recipients by alert type.
* [Settings › Additional Permissions](/en/power-monitor/configuracoes/permissoes-adicionais.md): permissions for importing from Entra ID.
* [Audit › Application Events](/en/power-monitor/auditoria/eventos-da-aplicacao.md): trail of changes made to users.
* [Interface and navigation](/en/power-monitor/interface-e-navegacao.md): how the menu reflects the user's role and blocks.


---

# Agent Instructions
This documentation is published with GitBook. GitBook is the documentation platform designed so that both humans and AI agents can read, navigate, and reason over technical content effectively. Learn more at gitbook.com.

## Querying This Documentation
If you need additional information that is not directly available in this page, you can query the documentation by asking a question.

Perform an HTTP GET request on the following URL with the `ask` and `goal` query parameters:

```
GET https://docs.powermonitor.com.br/en/power-monitor/usuarios.md?ask=<question>&goal=<user_goal>
```

`ask` is the immediate question: it should be specific, self-contained, and written in natural language.
`goal` is what the user is ultimately trying to achieve, the reason they need the answer. Sharing it helps GitBook give you a better, more relevant answer. A goal is most helpful when it describes the outcome the user wants rather than restating the question. For example, with `ask=how do I create an API token`, a goal like `automate deployments from our CI pipeline` lets GitBook tailor the answer to that use case.

The response will contain a direct answer to the question and relevant excerpts and sources from the documentation.

Use this mechanism when the answer is not explicitly present in the current page, you need clarification or additional context, or you want to retrieve related documentation sections.